34.【Spring源码分析】34-Spring Bean作用域的设计与实现
34.【Spring源码分析】34-Spring Bean作用域的设计与实现
1、Spring Bean作用域简介
bean定义的配方是很重要的,因为这意味着,对于一个类,你可以使用一个配方创建许多对象实例。你不仅可以通过特定的bean定义控制各种依赖关系和配置值创建一个对象,还控制创建的对象的作用域。这种方法是强大和灵活的,因为你可以选择您创建的对象的作用域通过配置,而不是靠对象在Java类级别的作用域。可以定义bean被部署在一个作用域。Spring框架支持六个作用域,其中四个作用域需要使用带有Web功能的ApplicationContext(AbstractRefreshableWebApplicationContext)。您还可以创建一个自定义作用域。下表描述了支持的作用域:
| 作用域 | 描述 |
|---|---|
| singleton | (默认作用域) 一个bean定义对应一个在Spring IoC容器中存在的对象实例。 |
| prototype | 一个bean定义可以创建任意数量的对象实例。 |
| request | 一个bean定义代表一个单独的HTTP请求的生命周期。也就是说,每个HTTP请求都有自己的bean的实例。只有在web应用的Spring ApplicationContext中生效。 |
| session | 一个bean定义代表对应bean的作用域与Http Session的生命周期相同。只有在web应用的Spring ApplicationContext中生效。 |
| application | 一个bean定义代表对应bean的作用域与ServletContext的生命周期相同。 只有在web应用的Spring ApplicationContext中生效。 |
| websocket | 一个bean定义代表对应bean的作用域与WebSocket的生命周期相同。只有在web应用的Spring ApplicationContext中生效。 |
| [Bean作用域] |
1.1、Singleton作用域
只有一个共享一个单例bean管理的实例,以及所有bean的请求ID或bean定义ID相匹配的结果在一个特定的Spring容器返回的bean实例。换句话说,当你定义一个作用域为singleton的bean的BeanDefinition,Spring的IoC容器创建一个BeanDefinition定义的实例对象的。这单一实例会被当做单例缓存起来,以后所有后续请求和引用bean返回缓存的对象。
1.2、Prototype作用域
导致每次请求特定bean都会创建一个新的bean实例。即在一个bean注入另一个bean或者请求通过在容器调用getBean()方法的时候。
与其他作用域相比,Spring不管理prototype作用域bean的完整生命周期。容器实例化,配置和组装原型对象并将其交给客户端,而没有该原型实例的进一步记录。因此,尽管无论是什么作用域都会在所有对象上调用初始化生命周期回调方法,但在prototype作用域的情况下,不会调用已配置的销毁生命周期回调。客户端代码必须清理prototype作用域的对象并释放prototype bean所拥有的昂贵资源。要使Spring容器释放prototype的bean所拥有的资源,请尝试使用自定义bean后处理器,它包含对需要清理的bean的引用。
1.3、Request, Session, Application和WebSocket作用域
仅当您使用Spring WebApplicationContext实现(例如XmlWebApplicationContext)时,Request,Session,Application和WebSocket作用域才可用。如果将这些作用域与常规的Spring IoC容器(例如ClassPathXmlApplicationContext)一起使用,则会引发未知bean 作用域的IllegalStateException。
1.3.1、初始Web配置
要在请求,会话,应用程序和websocket级别(Web作用域的bean)支持bean的作用域,在定义bean之前需要一些小的初始配置。 (标准作用域不需要此初始设置:单例和原型。)
如何完成此初始设置取决于您的特定Servlet环境。
如果您在Spring Web MVC中访问scoped bean,实际上是在Spring DispatcherServlet处理的请求中,则无需进行特殊设置。 DispatcherServlet已经公开了所有相关状态。
如果您使用Servlet 2.5 Web容器,并且在Spring的DispatcherServlet之外处理请求(例如,使用JSF或Struts时),则需要注册org.springframework.web.context.request.RequestContextListener ServletRequestListener。对于Servlet 3.0+,可以使用WebApplicationInitializer接口以编程方式完成此操作。或者,如果您的监听器设置存在问题,请考虑使用Spring的RequestContextFilter。 过滤器映射取决于周围的Web应用程序配置,因此您必须根据需要进行更改。 以下清单显示了Web应用程序的过滤器部分:
<web-app>
    ...
    <filter>
        <filter-name>requestContextFilter</filter-name>
        <filter-class>org.springframework.web.filter.RequestContextFilter</filter-class>
    </filter>
    <filter-mapping>
        <filter-name>requestContextFilter</filter-name>
        <url-pattern>/*</url-pattern>
    </filter-mapping>
    ...
</web-app>
DispatcherServlet,RequestContextListener和RequestContextFilter都完全相同,即将HTTP请求对象绑定到为该请求提供服务的Thread。 这使得请求和会话作用域的bean可以在调用链中进一步使用。
1.3.2、Request作用域
@RequestScope
@Component
public class LoginAction {
    // ...
}
Spring容器通过对每个HTTP请求使用loginAction bean定义来创建LoginAction bean的新实例。 也就是说,loginAction bean的作用域是HTTP请求级别。 您可以根据需要更改创建的实例的内部状态,因为从同一loginAction bean定义创建的其他实例在状态中看不到这些更改。 当请求完成处理时,将放弃作用于Request作用域的bean。
1.3.3、Session作用域
@SessionScope
@Component
public class UserPreferences {
    // ...
}
Spring容器通过在单个HTTP会话的生存期内使用userPreferences bean定义来创建UserPreferences bean的新实例。 换句话说,userPreferences bean在HTTP会话级别有效地作用域。 与Request作用域的bean一样,您可以根据需要更改创建的实例的内部状态,因为知道同样使用从同一userPreferences bean定义创建的实例的其他HTTP Session实例在状态中看不到这些更改 ,因为它们特定于单个HTTP会话。 最终丢弃HTTP会话时,也会丢弃作用于该特定HTTP会话的bean。
1.3.4、Application作用域
@ApplicationScope
@Component
public class AppPreferences {
    // ...
}
Spring容器通过对整个Web应用程序使用appPreferences bean定义一次来创建AppPreferences bean的新实例。 也就是说,appPreferences bean的作用域是ServletContext级别,并存储为常规的ServletContext属性。 这有点类似于Spring单例bean,但在两个重要方面有所不同:它是每个ServletContext的单例,而不是每个Spring的'ApplicationContext'(在任何给定的Web应用程序中可能有几个),它实际上是暴露的,因此 作为ServletContext属性可见。
1.4、作为依赖的Scoped Bean
Spring IoC容器不仅管理对象(bean)的实例化,还管理依赖关系。 如果要将(例如)HTTP Request作用域的bean注入到寿命较长作用域的另一个bean中,您可以选择注入AOP代理来代替作用域内的bean。 也就是说,您需要注入一个代理对象,该对象公开与作用域对象相同的公共接口,但也可以从相关作用域(例如HTTP请求)中检索真实目标对象,并将方法调用委托给真实对象。
您还可以在作为单例的作用域的bean之间使用<aop:scoped-proxy/>(注解方式为@Scope(proxyMode=ScopedProxyMode.TARGET_CLASS)),然后引用通过可序列化的中间代理,从而能够在反序列化时重新获取目标单例bean。
当针对原型作用域的bean声明<aop:scoped-proxy />时,共享代理上的每个方法调用都会导致创建一个新的目标实例,然后将该调用转发到该目标实例。
要创建此类代理,请将子<aop:scoped-proxy/>元素插入到作用域bean定义中。 为什么在Request,Session和自定义范作用域别定义bean的定义需要<aop:scoped-proxy/>元素? 考虑以下单例bean定义,并将其与您需要为上述作用域定义的内容进行对比(请注意,以下userPreferences bean定义不完整):
<bean id="userPreferences" class="com.something.UserPreferences" scope="session"/>
<bean id="userManager" class="com.something.UserManager">
    <property name="userPreferences" ref="userPreferences"/>
</bean>
在前面的示例中,单例bean(userManager)注入了对HTTP会话作用域的bean(userPreferences)的引用。这里的重点是userManager bean是一个单例:它每个容器只实例化一次,它的依赖项(在这种情况下只有一个,userPreferences bean)也只注入一次。这意味着userManager bean仅在完全相同的userPreferences对象(即最初注入它的对象)上运行。
当将一个寿命较短的scoped bean注入一个寿命较长的scoped bean时,这不是你想要的行为(例如,将一个HTTP Session-scoped协作bean作为依赖注入singleton bean)。相反,您需要一个userManager对象,并且,对于HTTP会话的生命周期,您需要一个特定于HTTP会话的userPreferences对象。因此,容器创建一个对象,该对象公开与UserPreferences类(理想情况下是UserPreferences实例的对象)完全相同的公共接口,该对象可以从作用域机制(HTTP请求,会话等)获取真实的UserPreferences对象。 容器将此代理对象注入userManager bean,该bean不知道此UserPreferences引用是代理。在此示例中,当UserManager实例在依赖注入的UserPreferences对象上调用方法时,它实际上是在代理上调用方法。然后,代理从(在这种情况下)HTTP会话中获取真实的UserPreferences对象,并将方法调用委托给检索到的真实UserPreferences对象。
因此,在将请求和会话作用域的bean注入协作对象时,您需要以下(正确和完整)配置,如以下示例所示:
<bean id="userPreferences" class="com.something.UserPreferences" scope="session">
    <aop:scoped-proxy/>
</bean>
<bean id="userManager" class="com.something.UserManager">
    <property name="userPreferences" ref="userPreferences"/>
</bean>
选择要创建的代理类型
默认情况下,当Spring容器为使用<aop:scoped-proxy />元素或@RequestScope标记的bean创建代理时,将创建基于CGLIB的类代理。
CGLIB代理只拦截公共方法调用! 不要在这样的代理上调用非公共方法。 它们不会委托给实际的作用域目标对象。
或者,您可以通过为<aop:scoped-proxy />元素的proxy-target-class属性的值指定false或@RequestScope(proxyMode=ScopedProxyMode.INTERFACES),将Spring容器配置为为此类作用域bean创建基于JDK接口的标准代理。 使用基于JDK接口的代理意味着您不需要在应用程序类路径中使用其他库来影响此类代理。 但是,这也意味着作用域bean的类必须至少实现一个接口,并且注入了作用域bean的所有协作者必须通过其中一个接口引用bean。 以下示例显示了基于接口的代理:
<bean id="userPreferences" class="com.stuff.DefaultUserPreferences" scope="session">
    <aop:scoped-proxy proxy-target-class="false"/>
</bean>
<bean id="userManager" class="com.stuff.UserManager">
    <property name="userPreferences" ref="userPreferences"/>
</bean>
1.5、自定义作用域
要将自定义作用域集成到Spring容器中,需要实现org.springframework.beans.factory.config.Scope接口。Scope接口是ConfigurableBeanFactory使用的策略接口, 表示保存bean实例的目标作用域。 这允许扩展BeanFactory的标准作用域("singleton"和"prototype")自定义的其他作用域,注册为ConfigurableBeanFactory#registerScope(String,Scope)特定键。
ApplicationContext实现例如WebApplicationContext 可以注册特定于其环境的其他标准作用域, 例如"request" 和"session",
基于此Scope SPI。
即使它主要用于Web环境中的扩展作用域, 这个SPI是完全通用的:它提供了获取和放置的能力来自任何底层存储机制的对象,例如HTTP会话 或自定义会话机制。传入此类的名称get()和remove()方法将识别出来当前作用域内的目标对象。
Scope实现应该是线程安全的。 一个Scope实例可以与多个bean工厂一起使用 同时,如果需要(除非明确要注意包含BeanFactory),可以访问任意数量的线程来自任意数量工厂的Scope。
Scope接口有四种方法可以从作用域中获取对象,从作用域中删除它们,然后将它们销毁。
public interface Scope {
   //如果在底层存储机制中找不到,则从基础作用域返回具有给定名称的对象,ObjectFactory.getObject()创建它
   //这是Scope的核心操作,也是唯一绝对需要的操作。
   Object get(String name, ObjectFactory<?> objectFactory);
   //从基础作用域中删除具有给定name的对象。如果没有找到对象,则返回{@code null}; 否则返回已删除Object
   //请注意,实现还应删除指定对象的已注册销毁回调(如果有)。
   //但是,在这种情况下,不需要执行已注册的销毁回调,因为对象将被调用者销毁(如果适用)。
   //注意:这是可选操作。 如果实现不支持显式删除对象,则可能会抛出UnsupportedOperationException
   @Nullable
   Object remove(String name);
   //注册要在作用域内销毁指定对象时执行的回调(或者在破坏整个作用域时,如果作用域不破坏单个对象,而只是完全终止)。
   //注意:这是一个可选操作。只有具有实际销毁配置的scoped bean(DisposableBean,destroy-method,DestructionAwareBeanPostProcessor)才会调用此方法。
   //实现应该尽力在适当的时间执行给定的回调。如果底层运行时环境根本不支持这样的回调,则必须忽略回调并记录相应的警告。
   //请注意,"销毁"是指将对象自动销毁为作用域自身生命周期的一部分,而不是个人应用程序已明确删除了作用域对象。
   //如果通过此facade的remove(String)方法删除了作用域对象,则也应删除任何已注册的销毁回调,假设删除的对象将被重用或手动销毁
   void registerDestructionCallback(String name, Runnable callback);
   //解析给定键的上下文对象(如果有)。例如。 键"request"的HttpServletRequest对象。
   @Nullable
   Object resolveContextualObject(String key);
   //返回当前基础作用域的会话ID(如果有)。会话ID的确切含义取决于底层存储机制。
   //对于会话作用域的对象,会话ID通常等于(或派生自)HttpSession#getId()会话ID;
   //对于位于整个会话中的自定义会话,当前会话的特定ID将是合适的。
   //注意:这是可选操作。 如果底层存储机制没有明显的此类ID候选者,则在此方法的实现中返回null是完全有效的。
   @Nullable
   String getConversationId();
}
假设您编写自定义Scope实现,然后按照下一个示例中的说明进行注册。
下一个示例使用SimpleThreadScope,它包含在Spring中,但默认情况下未注册。 对于您自己的自定义Scope实现,指令是相同的。
Scope threadScope = new SimpleThreadScope();
beanFactory.registerScope("thread", threadScope);
然后,您可以创建符合自定义Scope的作用域规则的bean定义,如下所示:
<bean id="..." class="..." scope="thread">使用自定义Scope实现,您不仅限于作用域的编程注册。 您还可以使用CustomScopeConfigurer类以声明方式执行Scope注册,如以下示例所示:
<bean class="org.springframework.beans.factory.config.CustomScopeConfigurer">
    <property name="scopes">
        <map>
            <entry key="thread">
                <bean class="org.springframework.context.support.SimpleThreadScope"/>
            </entry>
        </map>
    </property>
</bean>
<bean id="thing2" class="x.y.Thing2" scope="thread">
    <property name="name" value="Rick"/>
    <aop:scoped-proxy/>
</bean>
<bean id="thing1" class="x.y.Thing1">
    <property name="thing2" ref="thing2"/>
</bean>
当您在FactoryBean实现中放置<aop:scoped-proxy/>时,它是作用域的工厂bean本身,而不是从getObject()返回的对象。
2、Spring作用域的实现
Spring Bean的每种作用域都有一种与之对应的Scope实例来管理它的生命周期,这些Scope实例通常在Spring容器启动的时候注册到容器中。
2.1、Scope实现类的注册
AbstractApplicationContext在refresh()方法调用时会触发postProcessBeanFactory()方法,默认为空实现,WebApplicationContext的实现类会重写此方法,如AbstractRefreshableWebApplicationContext。
@Override
protected void postProcessBeanFactory(ConfigurableListableBeanFactory beanFactory) {
   beanFactory.addBeanPostProcessor(new ServletContextAwareProcessor(this.servletContext, this.servletConfig));
   beanFactory.ignoreDependencyInterface(ServletContextAware.class);
   beanFactory.ignoreDependencyInterface(ServletConfigAware.class);
   //这里注册Scope实例
   WebApplicationContextUtils.registerWebApplicationScopes(beanFactory, this.servletContext);
   WebApplicationContextUtils.registerEnvironmentBeans(beanFactory, this.servletContext, this.servletConfig);
}
//使用WebApplicationContext使用的给定BeanFactory注册特定于Web的作用域
//("request","session","globalSession","application")。
public static void registerWebApplicationScopes(ConfigurableListableBeanFactory beanFactory,
      @Nullable ServletContext sc) {
   beanFactory.registerScope(WebApplicationContext.SCOPE_REQUEST, new RequestScope());
   beanFactory.registerScope(WebApplicationContext.SCOPE_SESSION, new SessionScope());
   if (sc != null) {
      ServletContextScope appScope = new ServletContextScope(sc);
      beanFactory.registerScope(WebApplicationContext.SCOPE_APPLICATION, appScope);
      // Register as ServletContext attribute, for ContextCleanupListener to detect it.
      sc.setAttribute(ServletContextScope.class.getName(), appScope);
   }
   beanFactory.registerResolvableDependency(ServletRequest.class, new RequestObjectFactory());
   beanFactory.registerResolvableDependency(ServletResponse.class, new ResponseObjectFactory());
   beanFactory.registerResolvableDependency(HttpSession.class, new SessionObjectFactory());
   beanFactory.registerResolvableDependency(WebRequest.class, new WebRequestObjectFactory());
   if (jsfPresent) {
      FacesDependencyRegistrar.registerFacesDependencies(beanFactory);
   }
}
这里AbstractRefreshableWebApplicationContext注册了三种Scope实例:
- RequestScope:request作用域的实现。
- SessionScope:session作用域的实现。
- ServletContextScope:application作用域的实现。
下图Spring默认给出的Scope实现。

AbstractRequestAttributesScope是Scope抽象实现,它从当前线程绑定的RequestAttributes对象中的特定作用域读取。
子类只需要实现getScope()来指示此类RequestAttributes作用域从中读取属性。
子类可能希望覆盖get()和remove()方法,以便在回调中将同步添加到此超类中。
public abstract class AbstractRequestAttributesScope implements Scope {
   @Override
   public Object get(String name, ObjectFactory<?> objectFactory) {
      RequestAttributes attributes = RequestContextHolder.currentRequestAttributes();
      Object scopedObject = attributes.getAttribute(name, getScope());
      if (scopedObject == null) {
         scopedObject = objectFactory.getObject();
         attributes.setAttribute(name, scopedObject, getScope());
         // Retrieve object again, registering it for implicit session attribute updates.
         // As a bonus, we also allow for potential decoration at the getAttribute level.
         Object retrievedObject = attributes.getAttribute(name, getScope());
         if (retrievedObject != null) {
            // Only proceed with retrieved object if still present (the expected case).
            // If it disappeared concurrently, we return our locally created instance.
            scopedObject = retrievedObject;
         }
      }
      return scopedObject;
   }
   @Override
   @Nullable
   public Object remove(String name) {
      RequestAttributes attributes = RequestContextHolder.currentRequestAttributes();
      Object scopedObject = attributes.getAttribute(name, getScope());
      if (scopedObject != null) {
         attributes.removeAttribute(name, getScope());
         return scopedObject;
      }
      else {
         return null;
      }
   }
   @Override
   public void registerDestructionCallback(String name, Runnable callback) {
      RequestAttributes attributes = RequestContextHolder.currentRequestAttributes();
      attributes.registerDestructionCallback(name, callback, getScope());
   }
   @Override
   @Nullable
   public Object resolveContextualObject(String key) {
      RequestAttributes attributes = RequestContextHolder.currentRequestAttributes();
      return attributes.resolveReference(key);
   }
   //RequestScope返回RequestAttributes#SCOPE_REQUEST
   //SessionScope返回RequestAttributes#SCOPE_SESSION
   protected abstract int getScope();
}
AbstractRequestAttributesScope是RequestScope和SessionScope的父类,实现了核心方法get(),这个方法用于创建Scoped bean,大致逻辑是从RequestContextHolder中获取与当前线程绑定的RequestAttributes对象,如果这个bean的name存在于RequestAttributes中则直接返回,否则使用外部传来的ObjectFactory创建一个对象放入与当前线程绑定的RequestAttributes对象中。
上面这个过程有两个问题需要解决:
- get()方法何时被调用
- RequestAttributes对象何时与当前线程的RequestContextHolder绑定
对于问题一,是在bean创建的阶段被调用的,换句话说就是AbstractBeanFactory的doGetBean()方法调用时:

在Bean的创建过程中,会判断如果此Bean是scoped的,会调用此bean对应scope实例的registerDestructionCallback()方法,实现代码在AbstractAutowireCapableBeanFactory.doCreateBean()中。

//将给定的bean添加到此工厂中的一次性Bean列表中,
//注册其DisposableBean接口和/或在工厂关闭时调用的给定destroy方法(如果适用)。
//仅适用于singleton和scoped的bean
protected void registerDisposableBeanIfNecessary(String beanName, Object bean, RootBeanDefinition mbd) {
   AccessControlContext acc = (System.getSecurityManager() != null ? getAccessControlContext() : null);
   if (!mbd.isPrototype() && requiresDestruction(bean, mbd)) {
      if (mbd.isSingleton()) {
         // Register a DisposableBean implementation that performs all destruction
         // work for the given bean: DestructionAwareBeanPostProcessors,
         // DisposableBean interface, custom destroy method.
         registerDisposableBean(beanName,
               new DisposableBeanAdapter(bean, beanName, mbd, getBeanPostProcessors(), acc));
      }
      else {
         //这个scopes保存着容器中通过registerScope()方法注册的Scope实例
         Scope scope = this.scopes.get(mbd.getScope());
         if (scope == null) {
            throw new IllegalStateException("No Scope registered for scope name '" + mbd.getScope() + "'");
         }
         scope.registerDestructionCallback(beanName,
               new DisposableBeanAdapter(bean, beanName, mbd, getBeanPostProcessors(), acc));
      }
   }
}
对于bean的具体创建过程可以参考《BeanFactory的实现》。
从registerDisposableBeanIfNecessary()方法的实现可以看到,Scope会为这个bean注册一个DisposableBeanAdapter,从上面AbstractRequestAttributesScope的registerDestructionCallback()方法实现可知,此DisposableBeanAdapter也会放入与当前线程绑定的RequestAttributes对象中,那么问题又来了:此DisposableBeanAdapter何时会被执行呢?
下面我们将这个问题和RequestAttributes对象何时与当前线程的RequestContextHolder绑定一起解答。
2.2、Scoped Bean生命周期过程
从上面概述了解到request、session、application这三种bean作用域只有在web环境下才可以使用,这里就以Spring MVC为例进行讲解。
我们知道Spring MVC有个中央控制器DispatcherServlet负责协调和组织不同组件完成请求处理并返回响应工作,它继承于FrameworkServlet,本身也是一个Servlet重写了service()方法,并将请求处理交给了processRequest()方法。
@Override
protected void service(HttpServletRequest request, HttpServletResponse response)
      throws ServletException, IOException {
   HttpMethod httpMethod = HttpMethod.resolve(request.getMethod());
   if (httpMethod == HttpMethod.PATCH || httpMethod == null) {
      processRequest(request, response);
   }
   else {
      super.service(request, response);
   }
}
protected final void processRequest(HttpServletRequest request, HttpServletResponse response)
      throws ServletException, IOException {
   long startTime = System.currentTimeMillis();
   Throwable failureCause = null;
   LocaleContext previousLocaleContext = LocaleContextHolder.getLocaleContext();
   LocaleContext localeContext = buildLocaleContext(request);

   RequestAttributes previousAttributes = RequestContextHolder.getRequestAttributes();
   //这里是创建RequestAttributes的地方
   ServletRequestAttributes requestAttributes = buildRequestAttributes(request, response, previousAttributes);

   WebAsyncManager asyncManager = WebAsyncUtils.getAsyncManager(request);
   asyncManager.registerCallableInterceptor(FrameworkServlet.class.getName(), new RequestBindingInterceptor());
   //然后这里使用LocaleContextHolder将当前线程与requestAttributes绑定
   initContextHolders(request, localeContext, requestAttributes);
   try {//这里是具体处理请丢的逻辑
      doService(request, response);
   }
   catch (ServletException | IOException ex) {
      failureCause = ex;
      throw ex;
   }
   catch (Throwable ex) {
      failureCause = ex;
      throw new NestedServletException("Request processing failed", ex);
   }
   finally {
      //还原previousAttributes,保证当前请求处理完就将bean从当前线程移除
      resetContextHolders(request, previousLocaleContext, previousAttributes);
      if (requestAttributes != null) {
         requestAttributes.requestCompleted();
      }
      logResult(request, response, failureCause, asyncManager);
      //这里会发送一个请求处理完毕事件,感兴趣的话可以接收
      publishRequestHandledEvent(request, response, startTime, failureCause);
   }
}
从上面的代码得知,当一个请求到来buildRequestAttributes()方法会创建一个ServletRequestAttributes与当前线程绑定,解答了上面的一个问题:RequestAttributes对象何时与当前线程的RequestContextHolder绑定。
下面解答第二个问题DisposableBeanAdapter何时会被执行呢?
在processRequest()方法的finally代码块中调用requestAttributes.requestCompleted(),这里会将RequestAttributes对象通过registerRequestDestructionCallback()方法注册的回调函数也就是上面提到DisposableBeanAdapter执行一遍。
//执行所有请求销毁回调并更新在请求处理期间访问的会话属性。
public void requestCompleted() {
   //执行请求完成后已注册执行的所有回调。
   executeRequestDestructionCallbacks();
   //更新在请求处理期间访问过的所有会话属性,以将其可能更新的状态公开给基础会话管理器。
   updateAccessedSessionAttributes();
   this.requestActive = false;
}
private void executeRequestDestructionCallbacks() {
   synchronized (this.requestDestructionCallbacks) {
      for (Runnable runnable : this.requestDestructionCallbacks.values()) {
         runnable.run();
      }
      this.requestDestructionCallbacks.clear();
   }
}
下面看一看DisposableBeanAdapter的具体代码。
在AbstractAutowireCapableBeanFactory中的registerDisposableBeanIfNecessary()方法中使用了五个参数的构造方法来实例化DisposableBeanAdapter。
public DisposableBeanAdapter(Object bean, String beanName, RootBeanDefinition beanDefinition,
      List<BeanPostProcessor> postProcessors, @Nullable AccessControlContext acc) {

   Assert.notNull(bean, "Disposable bean must not be null");
   this.bean = bean;
   this.beanName = beanName;
   this.invokeDisposableBean =
         (this.bean instanceof DisposableBean && !beanDefinition.isExternallyManagedDestroyMethod("destroy"));
   this.nonPublicAccessAllowed = beanDefinition.isNonPublicAccessAllowed();
   this.acc = acc;
   String destroyMethodName = inferDestroyMethodIfNecessary(bean, beanDefinition);
   if (destroyMethodName != null && !(this.invokeDisposableBean && "destroy".equals(destroyMethodName)) &&
         !beanDefinition.isExternallyManagedDestroyMethod(destroyMethodName)) {
      this.destroyMethodName = destroyMethodName;
      this.destroyMethod = determineDestroyMethod(destroyMethodName);
      if (this.destroyMethod == null) {
         if (beanDefinition.isEnforceDestroyMethod()) {
            throw new BeanDefinitionValidationException("Could not find a destroy method named '" +
                  destroyMethodName + "' on bean with name '" + beanName + "'");
         }
      }
      else {
         Class<?>[] paramTypes = this.destroyMethod.getParameterTypes();
         if (paramTypes.length > 1) {
            throw new BeanDefinitionValidationException("Method '" + destroyMethodName + "' of bean '" +
                  beanName + "' has more than one parameter - not supported as destroy method");
         }
         else if (paramTypes.length == 1 && boolean.class != paramTypes[0]) {
            throw new BeanDefinitionValidationException("Method '" + destroyMethodName + "' of bean '" +
                  beanName + "' has a non-boolean parameter - not supported as destroy method");
         }
      }
   }
   this.beanPostProcessors = filterPostProcessors(postProcessors, bean);
}
这个构造函数主要是保存bean的destroy方法,这个destroy方法可以是bean的destroy-method、@PreDestroy,和容器中能处理此bean的DestructionAwareBeanPostProcessor。
@Nullable
private List<DestructionAwareBeanPostProcessor> filterPostProcessors(List<BeanPostProcessor> processors, Object bean) {
   List<DestructionAwareBeanPostProcessor> filteredPostProcessors = null;
   if (!CollectionUtils.isEmpty(processors)) {
      filteredPostProcessors = new ArrayList<>(processors.size());
      for (BeanPostProcessor processor : processors) {
         if (processor instanceof DestructionAwareBeanPostProcessor) {
            DestructionAwareBeanPostProcessor dabpp = (DestructionAwareBeanPostProcessor) processor;
            if (dabpp.requiresDestruction(bean)) {
               filteredPostProcessors.add(dabpp);
            }
         }
      }
   }
   return filteredPostProcessors;
}
下面看run()方法和destroy()的实现。
@Override
public void run() {
   destroy();
}

@Override
public void destroy() {
   if (!CollectionUtils.isEmpty(this.beanPostProcessors)) {
      for (DestructionAwareBeanPostProcessor processor : this.beanPostProcessors) {
         processor.postProcessBeforeDestruction(this.bean, this.beanName);
      }
   }
   if (this.invokeDisposableBean) {
      if (logger.isTraceEnabled()) {
         logger.trace("Invoking destroy() on bean with name '" + this.beanName + "'");
      }
      try {
         if (System.getSecurityManager() != null) {
            AccessController.doPrivileged((PrivilegedExceptionAction<Object>) () -> {
               ((DisposableBean) this.bean).destroy();
               return null;
            }, this.acc);
         }
         else {
            ((DisposableBean) this.bean).destroy();
         }
      }
      catch (Throwable ex) {
         String msg = "Invocation of destroy method failed on bean with name '" + this.beanName + "'";
         if (logger.isDebugEnabled()) {
            logger.info(msg, ex);
         }
         else {
            logger.info(msg + ": " + ex);
         }
      }
   }
   if (this.destroyMethod != null) {
      invokeCustomDestroyMethod(this.destroyMethod);
   }
   else if (this.destroyMethodName != null) {
      Method methodToCall = determineDestroyMethod(this.destroyMethodName);
      if (methodToCall != null) {
         invokeCustomDestroyMethod(methodToCall);
      }
   }
}
2.3、ScopedProxyFactoryBean实现原理
在1.4节中提到如果Scoped Bean不是直接通过容器通过getBean()获取的,而是作为一个依赖注入到其他bean中,这时需要使用<aop:scoped-proxy/>或@Scope(proxyMode=ScopedProxyMode.INTERFACES)或@Scope(proxyMode=ScopedProxyMode.TARGET_CLASS),原因在1.4节中已经说明了,下面看代码的实现过程。
这里已注解的形式说明实现原理。
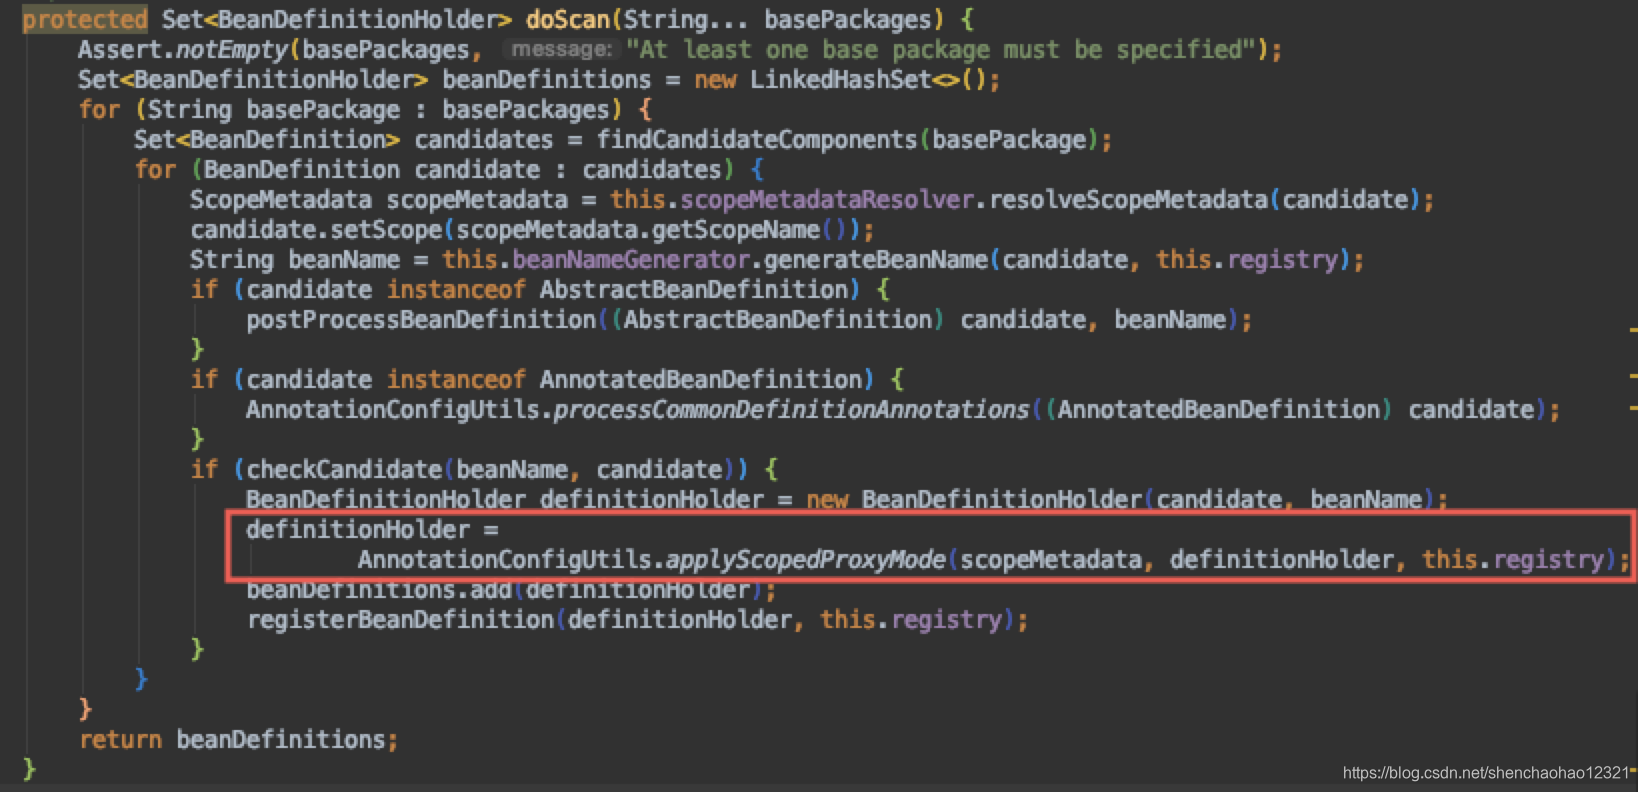
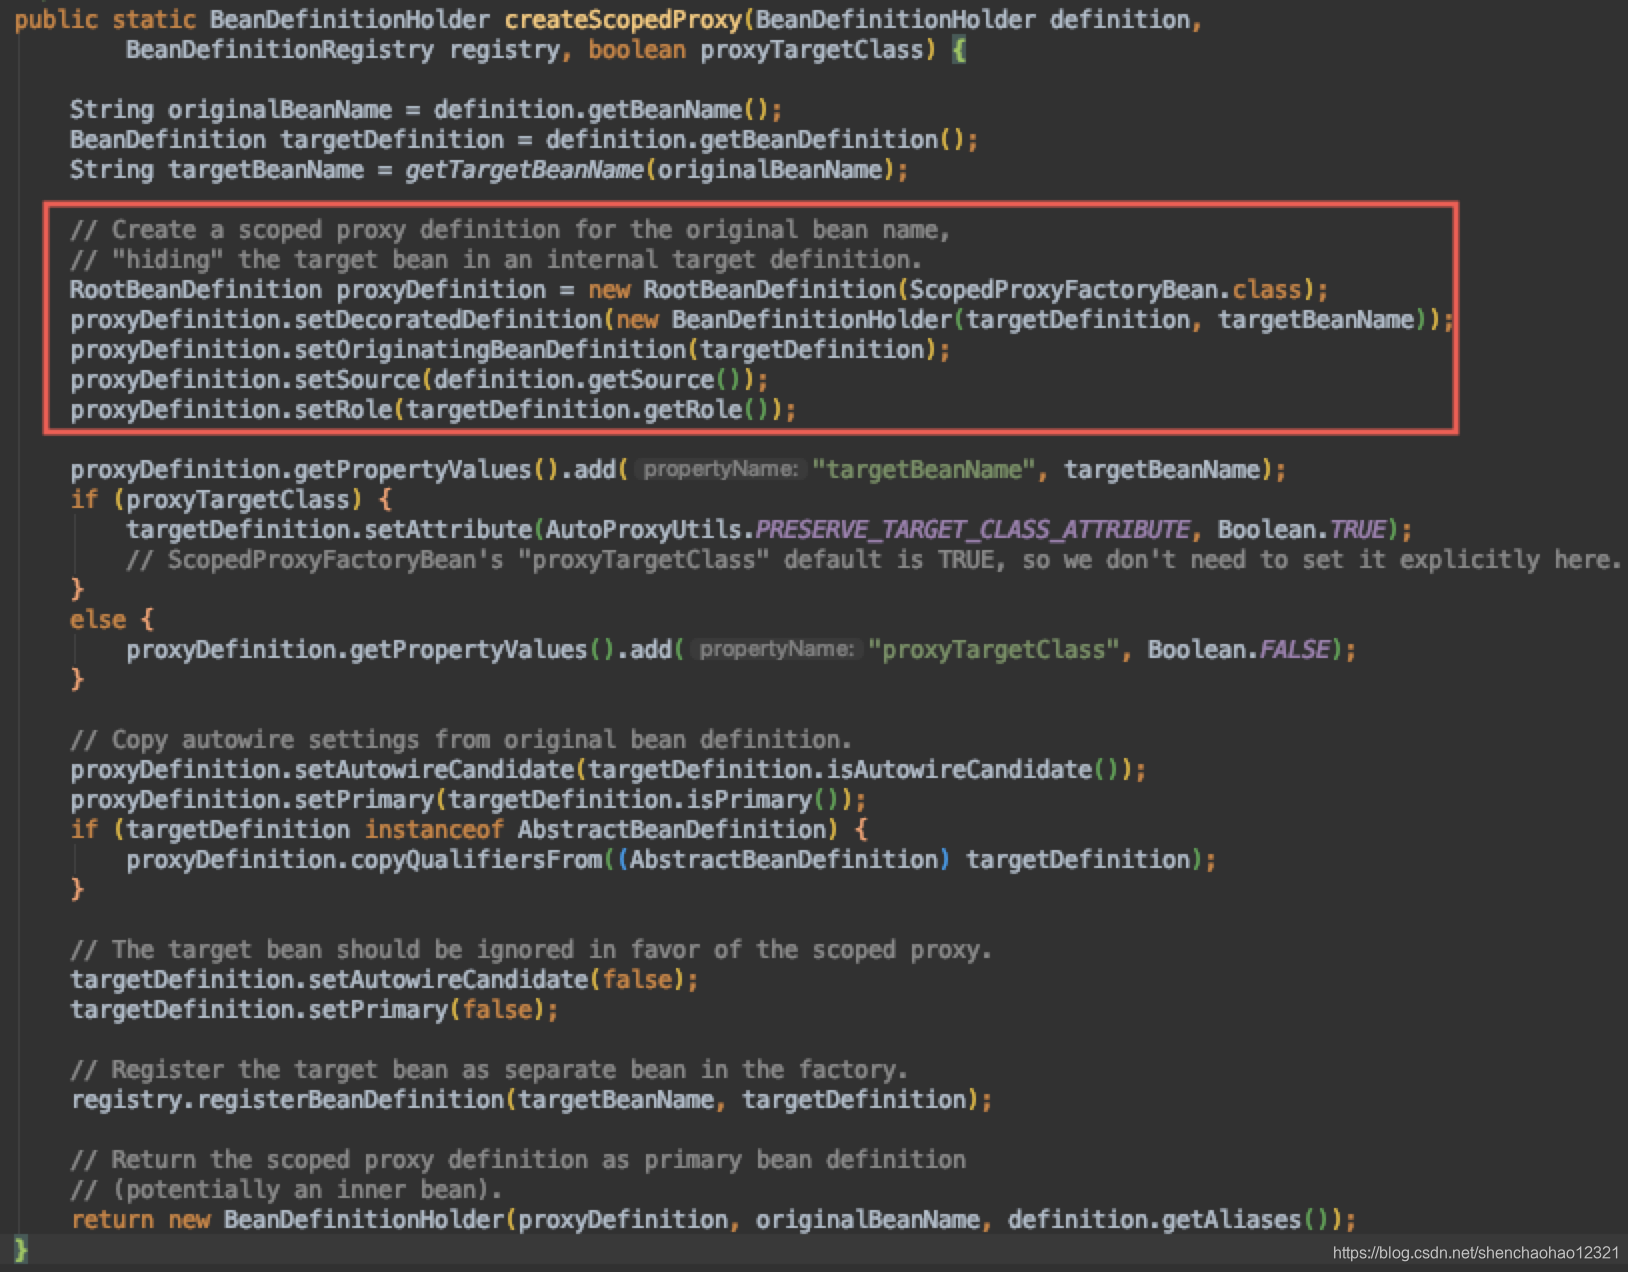
在进行@Conponent注解扫描的时候会调用ClassPathBeanDefinitionScanner#doScan()方法,这个方法内部使用ScopeMetadataResolver读取bean类上面的@Scope注解,如果存在此注解则使用ScopedProxyCreator#createScopedProxy()方法定义一个ScopedProxyFactoryBean的BeanDefinition,他是一个FactoryBean,getObject()返回的就是这个bean的代理,Spring容器注入的时候也就使用的是这个代理了。


Spring在装配bean阶段会将原始bean的bean name设置到ScopedProxyFactoryBean中通过setTargetBeanName()方法,在这个方法中会使用成员实例scopedTargetSource保存bean name,这个scopedTargetSource在setBeanFactory()方法调用的时候保存BeanFactory,这样在scopedTargetSource的getTarget()方法被调用的时候就直接委托给BeanFactory的getBean()方法,这就保证了scoped bean如果当前线程还存在则直接返回否则就创建一个新的bean。
public class ScopedProxyFactoryBean extends ProxyConfig
      implements FactoryBean<Object>, BeanFactoryAware, AopInfrastructureBean {
   /** The TargetSource that manages scoping. */
   private final SimpleBeanTargetSource scopedTargetSource = new SimpleBeanTargetSource();
   /** The name of the target bean. */
   @Nullable
   private String targetBeanName;
   /** The cached singleton proxy. */
   @Nullable
   private Object proxy;
   /**
    * Create a new ScopedProxyFactoryBean instance.
    */
   public ScopedProxyFactoryBean() {
      setProxyTargetClass(true);
   }
   /**
    * Set the name of the bean that is to be scoped.
    */
   public void setTargetBeanName(String targetBeanName) {
      this.targetBeanName = targetBeanName;
      this.scopedTargetSource.setTargetBeanName(targetBeanName);
   }
   @Override
   public void setBeanFactory(BeanFactory beanFactory) {
      if (!(beanFactory instanceof ConfigurableBeanFactory)) {
         throw new IllegalStateException("Not running in a ConfigurableBeanFactory: " + beanFactory);
      }
      ConfigurableBeanFactory cbf = (ConfigurableBeanFactory) beanFactory;
      this.scopedTargetSource.setBeanFactory(beanFactory);
      ProxyFactory pf = new ProxyFactory();
      pf.copyFrom(this);
      pf.setTargetSource(this.scopedTargetSource);
      Assert.notNull(this.targetBeanName, "Property 'targetBeanName' is required");
      Class<?> beanType = beanFactory.getType(this.targetBeanName);
      if (beanType == null) {
         throw new IllegalStateException("Cannot create scoped proxy for bean '" + this.targetBeanName +
               "': Target type could not be determined at the time of proxy creation.");
      }
      if (!isProxyTargetClass() || beanType.isInterface() || Modifier.isPrivate(beanType.getModifiers())) {
         pf.setInterfaces(ClassUtils.getAllInterfacesForClass(beanType, cbf.getBeanClassLoader()));
      }
      // Add an introduction that implements only the methods on ScopedObject.
      ScopedObject scopedObject = new DefaultScopedObject(cbf, this.scopedTargetSource.getTargetBeanName());
      pf.addAdvice(new DelegatingIntroductionInterceptor(scopedObject));
      // Add the AopInfrastructureBean marker to indicate that the scoped proxy
      // itself is not subject to auto-proxying! Only its target bean is.
      pf.addInterface(AopInfrastructureBean.class);
      this.proxy = pf.getProxy(cbf.getBeanClassLoader());
   }
   @Override
   public Object getObject() {
      if (this.proxy == null) {
         throw new FactoryBeanNotInitializedException();
      }
      return this.proxy;
   }
   @Override
   public Class<?> getObjectType() {
      if (this.proxy != null) {
         return this.proxy.getClass();
      }
      return this.scopedTargetSource.getTargetClass();
   }
   @Override
   public boolean isSingleton() {
      return true;
   }
}
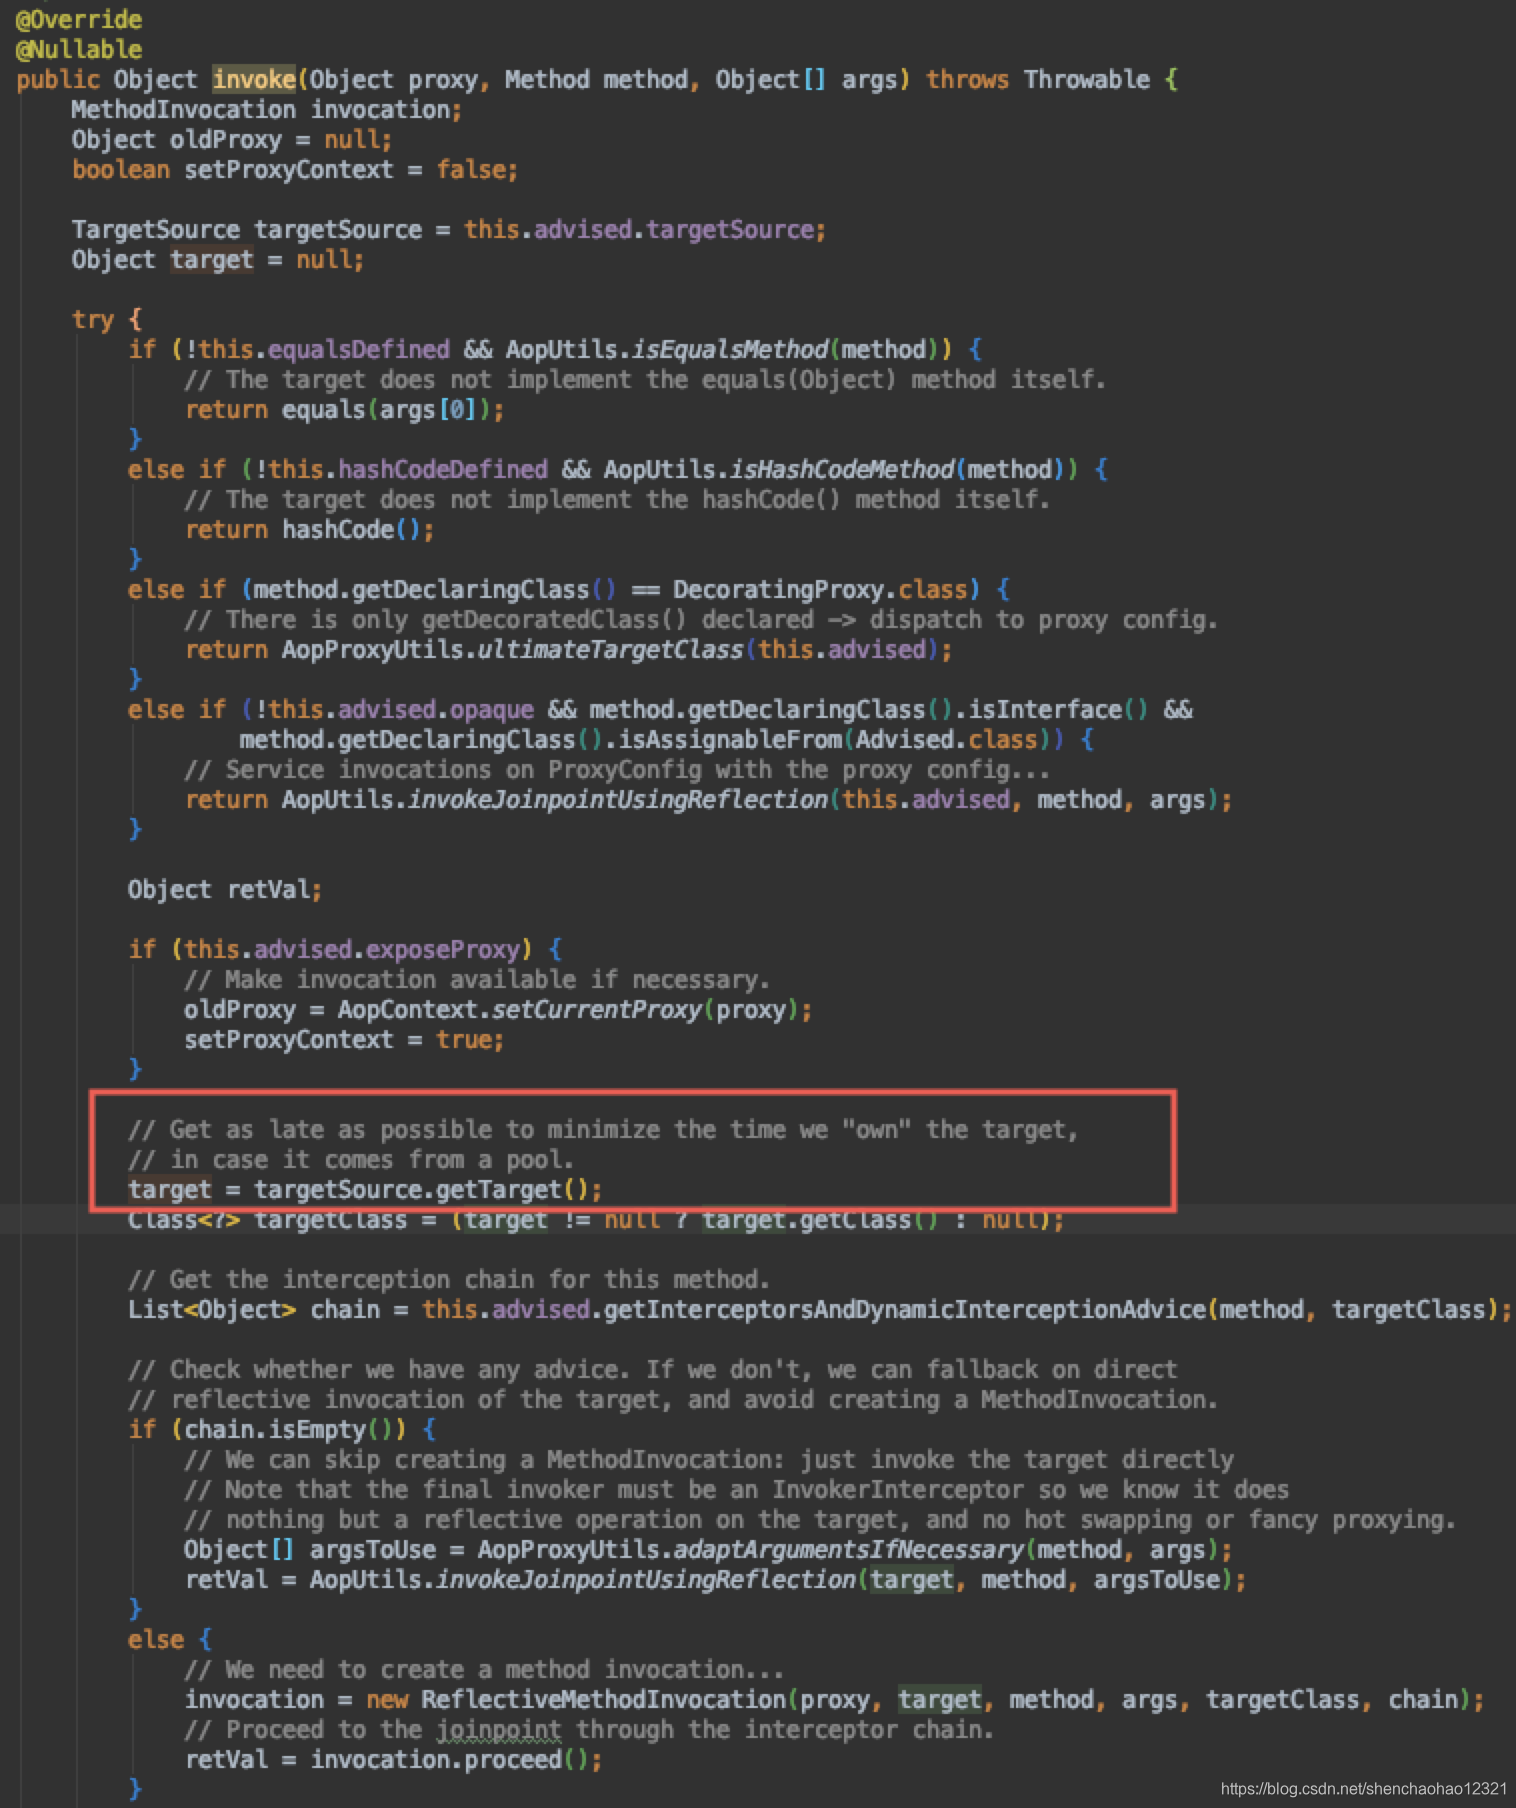
这个ScopedProxyFactoryBean使用了ProxyFactory生成代理对象,我们以JdkDynamicAopProxy为例说明。在代理方法被调用的时候会触发JdkDynamicAopProxy的invoke()方法,这个方法中获取目标对象就是通过ScopedProxyFactoryBean的scopedTargetSource获取的从而保证了每次方法被调用的时候都会创建(如果超出了作用域)一个对象。

来源:https://blog.csdn.net/shenchaohao12321/article/details/86656236
