02.SpringCloud - Spring Cloud根、父项目,开发准备(二)
02.SpringCloud - Spring Cloud根、父项目,开发准备(二)
一、Spring Cloud开发项目工程说明
在后续的 Spring Cloud 工程项目开发,以及博文中,都要注意此文说明!
1、Spring Cloud 本身并不是一个拿来即可用的框架,它是一套微服务规范,共有两代实现。
(1)Spring Cloud Netflix 是 Spring Cloud 的第一代实现,主要由 Eureka、Ribbon、Feign、Hystrix 等组件组成。
(2)Spring Cloud Alibaba 是 Spring Cloud 的第二代实现,主要由 Nacos、Sentinel、Seata 等组件组成。
2、Spring Cloud 是基于 Spring Boot 实现的,它不能独立创建工程或模块,更不能脱离 Spring Boot 独立运行
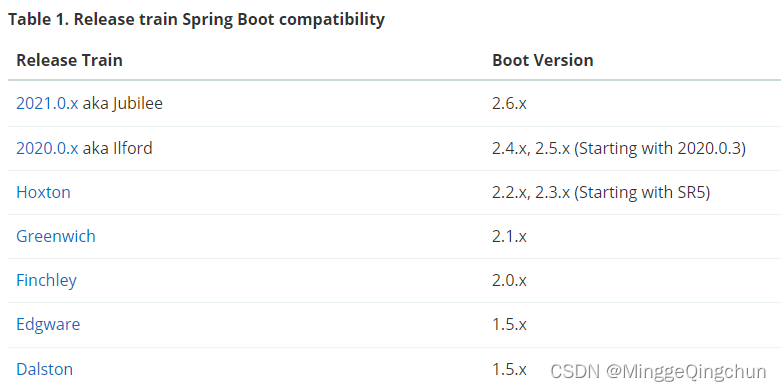
Spring Cloud 与 Spring Boot的兼容版本对应关系如下(参考自Spring Cloud 官网)

Spring Cloud(特指 Spring Cloud Netflix) 中包含了 spring-cloud-config、spring-cloud-bus 等近 20 个子项目,提供了服务治理、服务网关、智能路由、负载均衡、断路器、监控跟踪、分布式消息队列、配置管理等领域的解决方案。
Netflix 是美国的一个在线视频网站,它是公认的大规模生产级微服务的杰出实践者,微服务界的翘楚。Netflix 的开源组件已经在其大规模分布式微服务环境中经过了多年的生产实战验证,成熟且可靠。
Spring Cloud 将 Netflix 中的开源服务组件(如 Eureka 、Ribbon、Feign 以及 Hystrix 等)一起整合进 Spring Cloud Netflix 模块中,整合后的组件全称为 Spring Cloud Netflix XX,因此第一代 SpringCloud实现 也被称为 Spring Cloud Netflix
后续针对 Spring Cloud Netflix 和 Spring Cloud Alibaba都会进行区分
Spring Cloud (特指 Spring Cloud Netflix)常用组件如下表所示
| Spring Cloud 组件 | 描述 |
|---|---|
| Spring Cloud Netflix Eureka | Spring Cloud Netflix 中的服务治理组件,包含服务注册中心、服务注册与发现机制的实现。 |
| Spring Cloud Netflix Ribbon | Spring Cloud Netflix 中的服务调用和客户端负载均衡组件。 |
| Spring Cloud Netflix Hystrix | 人称"豪猪哥",Spring Cloud Netflix 的容错管理组件,为服务中出现的延迟和故障提供强大的容错能力。 |
| Spring Cloud Netflix Feign | 基于 Ribbon 和 Hystrix 的声明式服务调用组件。 |
| Spring Cloud Netflix Zuul | Spring Cloud Netflix 中的网关组件,提供了智能路由、访问过滤等功能 |
| Spring Cloud Gateway | 一个基于 Spring 5.0,Spring Boot 2.0 和 Project Reactor 等技术开发的网关框架,它使用 Filter 链的方式提供了网关的基本功能,例如安全、监控/指标和限流等。 |
| Spring Cloud Config | Spring Cloud 的配置管理工具,支持使用 Git 存储配置内容,实现应用配置的外部化存储,并支持在客户端对配置进行刷新、加密、解密等操作。 |
| Spring Cloud Bus | Spring Cloud 的事件和消息总线,主要用于在集群中传播事件或状态变化,以触发后续的处理,例如动态刷新配置。 |
| Spring Cloud Stream | Spring Cloud 的消息中间件组件,它集成了 Apache Kafka 和 RabbitMQ 等消息中间件,并通过定义绑定器作为中间层,完美地实现了应用程序与消息中间件之间的隔离。通过向应用程序暴露统一的 Channel 通道,使得应用程序不需要再考虑各种不同的消息中间件实现,就能轻松地发送和接收消息。 |
| Spring Cloud Sleuth | Spring Cloud 分布式链路跟踪组件,能够完美的整合 Twitter 的 Zipkin。 |
在后续的Spring Cloud项目中,我们都是以此项目工程为
二、根/父工程继承 SpringBoot
首先我们创建一个 根/父工程(springcloud-demo),让其继承 SpringBoot 父项目
1、创建根/父 工程,两种方式(这里不做多讲解,不是本文重点,可自行百度,这里只做简述一下)
Maven多模块管理
可参考博文Java--Maven多模块管理_MinggeQingchun的博客-CSDN博客_java多模块
(1)创建空工程Empty Project,设置Parent父工程
(2)创建Maven父工程,设置 Add as module to 和 Parent
2、在 pom.xml 文件中设置继承 Springboot父项目
<!--继承springboot父项目
    注:保持和spring-cloud版本兼容性;spring-cloud 依赖,使用Hoxton版本
    Hoxton      对应springboot 2.2.x, 2.3.x (Starting with SR5)
    Greenwich   对应springboot 2.1.x
    springcloud官网:https://spring.io/projects/spring-cloud#overview
  -->
  <parent>
    <groupId>org.springframework.boot</groupId>
    <artifactId>spring-boot-starter-parent</artifactId>
    <version>2.2.13.RELEASE</version>
    <relativePath/> <!-- lookup parent from repository -->
  </parent>
3、设置 pom.xml 文件的 packing标签为 pom
<!-- pom打包方式表示父项目
        在父项目中打包,会将其下所有子项目打包
    -->
  <packaging>pom</packaging>
4、删除 src 目录
5、导入 springcloud 依赖
<dependencyManagement>
    <dependencies>
      <!-- spring-cloud 依赖,使用Hoxton版本
          注:保持和springboot版本兼容性
          Hoxton      对应springboot 2.2.x, 2.3.x (Starting with SR5)
          Greenwich   对应springboot 2.1.x
          springcloud官网:https://spring.io/projects/spring-cloud#overview
       -->
      <dependency>
        <groupId>org.springframework.cloud</groupId>
        <artifactId>spring-cloud-dependencies</artifactId>
        <version>Hoxton.SR12</version>
        <type>pom</type>
        <scope>import</scope>
      </dependency>

    </dependencies>
  </dependencyManagement>
6、聚合各个子项目
如果父工程下有子模块,在父工程的 pom.xml 文件会有 <modules> 标签,点击左上角的 m↓ 标记,可跳转到指定子模块工程
<!--聚合各个子项目-->
  <modules>
    <module>springcloud-1-noregistry-provider</module>
    <module>springcloud-1-noregistry-consumer</module>
    <module>springcloud-2-service-common</module>
  </modules>
7、设置父工程编译级别
统一使用 JDK 版本和编译级别,将编 译插件添加到父工程,子模块依然会无条件去继承父工程的插件
在父工程中的 pom.xml 文件 build ----> plugins 标签中添加编译插件
<build>

        <!--处理资源目录-->
        <resources>
            <resource>
                <directory>src/main/java</directory>
                <includes>
                    <include>**/*.xml</include>
                </includes>
            </resource>

            <resource>
                <directory>src/main/resources</directory>
                <includes>
                    <include>**/*.*</include>
                </includes>
            </resource>
        </resources>

    <!-- 设置父工程编译级别
        统一使用 JDK 版本和编译级别,将编 译插件添加到父工程,子模块依然会无条件去继承父工程的插件
     -->
    <plugins>
      <!--JDK1.8编译插件-->
      <plugin>
        <groupId>org.apache.maven.plugins</groupId>
        <artifactId>maven-compiler-plugin</artifactId>
        <!-- 插件的版本 -->
        <version>3.8.0</version>
        <!-- 编译级别 -->
        <configuration>
          <source>1.8</source>
          <target>1.8</target>
          <!-- 编码格式 -->
          <encoding>UTF-8</encoding>
        </configuration>
      </plugin>
    </plugins>
  </build>
根/父工程最终 配置文件 pom.xml如下
<?xml version="1.0" encoding="UTF-8"?>

<project xmlns="http://maven.apache.org/POM/4.0.0" xmlns:xsi="http://www.w3.org/2001/XMLSchema-instance"
  xsi:schemaLocation="http://maven.apache.org/POM/4.0.0 http://maven.apache.org/xsd/maven-4.0.0.xsd">
  <modelVersion>4.0.0</modelVersion>

  <!--继承springboot父项目
    注:保持和spring-cloud版本兼容性;spring-cloud 依赖,使用Hoxton版本
    Hoxton      对应springboot 2.2.x, 2.3.x (Starting with SR5)
    Greenwich   对应springboot 2.1.x
    springcloud官网:https://spring.io/projects/spring-cloud#overview
  -->
  <parent>
    <groupId>org.springframework.boot</groupId>
    <artifactId>spring-boot-starter-parent</artifactId>
    <version>2.2.13.RELEASE</version>
    <relativePath/> <!-- lookup parent from repository -->
  </parent>

  <groupId>com.company</groupId>
  <artifactId>springcloud-demo</artifactId>
  <version>1.0.0</version>
  <!-- pom打包方式表示父项目
        在父项目中打包,会将其下所有子项目打包
    -->
  <packaging>pom</packaging>

  <properties>
    <project.build.sourceEncoding>UTF-8</project.build.sourceEncoding>
    <maven.compiler.source>1.8</maven.compiler.source>
    <maven.compiler.target>1.8</maven.compiler.target>
  </properties>

  <!--聚合各个子项目-->
  <modules>
    <module>springcloud-1-noregistry-provider</module>
    <module>springcloud-1-noregistry-consumer</module>
    <module>springcloud-2-service-common</module>
  </modules>

  <dependencyManagement>
    <dependencies>
      <!-- spring-cloud 依赖,使用Hoxton版本
          注:保持和springboot版本兼容性
          Hoxton      对应springboot 2.2.x, 2.3.x (Starting with SR5)
          Greenwich   对应springboot 2.1.x
          springcloud官网:https://spring.io/projects/spring-cloud#overview
       -->
      <dependency>
        <groupId>org.springframework.cloud</groupId>
        <artifactId>spring-cloud-dependencies</artifactId>
        <version>Hoxton.SR12</version>
        <type>pom</type>
        <scope>import</scope>
      </dependency>

    </dependencies>
  </dependencyManagement>

  <build>

    <!-- 设置父工程编译级别
        统一使用 JDK 版本和编译级别,将编 译插件添加到父工程,子模块依然会无条件去继承父工程的插件
     -->
    <plugins>
      <!--JDK1.8编译插件-->
      <plugin>
        <groupId>org.apache.maven.plugins</groupId>
        <artifactId>maven-compiler-plugin</artifactId>
        <!-- 插件的版本 -->
        <version>3.8.0</version>
        <!-- 编译级别 -->
        <configuration>
          <source>1.8</source>
          <target>1.8</target>
          <!-- 编码格式 -->
          <encoding>UTF-8</encoding>
        </configuration>
      </plugin>
    </plugins>
  </build>

</project>
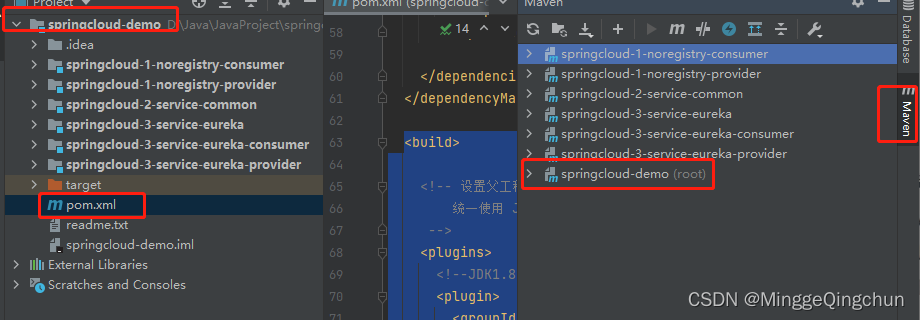
根/父工程最终目录结构如下:

三、创建数据库以及表
使用 Navicat 创建一个MySQL数据库,取名 springcloud
在创建一张表 goods
-- 创建表 goods
DROP TABLE IF EXISTS `goods`;
CREATE TABLE `goods`  (
  `good_id` int(11) NOT NULL COMMENT '商品ID',
  `good_name` varchar(80) CHARACTER SET utf8 COLLATE utf8_general_ci NULL DEFAULT NULL COMMENT '商品名',
  `good_name_desc` varchar(255) CHARACTER SET utf8 COLLATE utf8_general_ci NULL DEFAULT NULL COMMENT '商品描述',
  `good_price` decimal(10, 2) NULL DEFAULT NULL COMMENT '商品价格',
  `good_img_url` varchar(255) CHARACTER SET utf8 COLLATE utf8_general_ci NULL DEFAULT NULL COMMENT '商品图片url',
  `start_time` datetime(6) NULL DEFAULT NULL,
  `end_time` datetime(6) NULL DEFAULT NULL,
  PRIMARY KEY (`good_id`) USING BTREE
) ENGINE = InnoDB CHARACTER SET = utf8 COLLATE = utf8_general_ci ROW_FORMAT = Dynamic;


-- 往 goods 表中插入数据
INSERT INTO `goods` VALUES (1, 'iPhone13', '苹果13', 5000.00, '', NULL, NULL);
INSERT INTO `goods` VALUES (2, '华为Mate40', '华为Mate系列手机', 4800.00, NULL, NULL, NULL);
来源:https://blog.csdn.net/MinggeQingchun/article/details/125273584
