31.Spring Boot 分布式事务 Seata 入门
31.Spring Boot 分布式事务 Seata 入门
1. 概述
在《芋道 Seata 极简入门》文章中,我们对 Seata 进行了简单的了解,并完成了 Seata 的部署。而本文,我们将纯 Spring Boot 应用接入 Seata 来实现分布式事务。
Seata 是阿里 开源的一款开源的分布式事务解决方案,致力于提供高性能和简单易用的分布式事务服务。
2. AT 模式 + 多数据源
示例代码对应仓库:
lab-52-multiple-datasource。
在 Spring Boot 单体 项目中,如果使用了多个 数据源,我们就需要考虑多个数据源的一致性,面临分布式事务的问题。本小节,我们将使用 Seata 的 AT 模式,解决该问题。
友情提示:对 Seata 的 AT 模式不了解的胖友,可以阅读《Seata 文档 ------ AT 模式》文档。
我们以用户购买商品 的业务逻辑,来作为具体示例,一共会有三个模块的 Service,分别对应不同的数据库。整体如下图所示:
下面,我们来新建 lab-52-multiple-datasource 项目,最终结构如下图: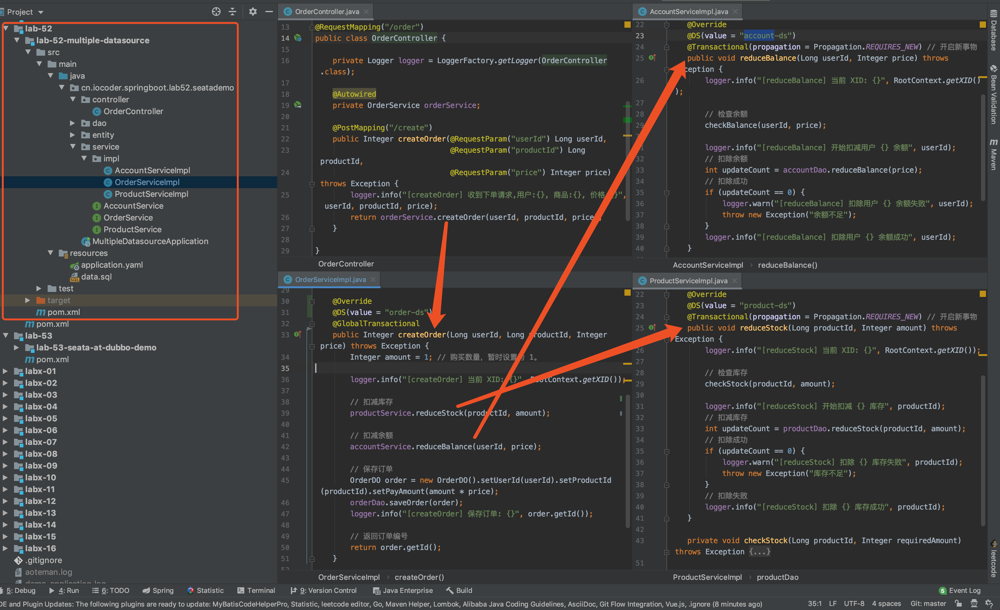
2.1 初始化数据库
使用 data.sql 脚本,创建 seata_order、seata_storage、seata_amount 三个库。脚本内容如下:
# Order
DROP DATABASE IF EXISTS seata_order;
CREATE DATABASE seata_order;

CREATE TABLE seata_order.orders
(
    id               INT(11) NOT NULL AUTO_INCREMENT,
    user_id          INT(11)        DEFAULT NULL,
    product_id       INT(11)        DEFAULT NULL,
    pay_amount       DECIMAL(10, 0) DEFAULT NULL,
    add_time         DATETIME       DEFAULT CURRENT_TIMESTAMP,
    last_update_time DATETIME       DEFAULT CURRENT_TIMESTAMP ON UPDATE CURRENT_TIMESTAMP,
    PRIMARY KEY (id)
) ENGINE = InnoDB AUTO_INCREMENT = 1 DEFAULT CHARSET = utf8;

CREATE TABLE seata_order.undo_log
(
    id            BIGINT(20)   NOT NULL AUTO_INCREMENT,
    branch_id     BIGINT(20)   NOT NULL,
    xid           VARCHAR(100) NOT NULL,
    context       VARCHAR(128) NOT NULL,
    rollback_info LONGBLOB     NOT NULL,
    log_status    INT(11)      NOT NULL,
    log_created   DATETIME     NOT NULL,
    log_modified  DATETIME     NOT NULL,
    PRIMARY KEY (id),
    UNIQUE KEY ux_undo_log (xid, branch_id)
) ENGINE = InnoDB AUTO_INCREMENT = 1 DEFAULT CHARSET = utf8;

# Storage
DROP DATABASE IF EXISTS seata_storage;
CREATE DATABASE seata_storage;

CREATE TABLE seata_storage.product
(
    id               INT(11) NOT NULL AUTO_INCREMENT,
    stock            INT(11)  DEFAULT NULL,
    last_update_time DATETIME DEFAULT CURRENT_TIMESTAMP ON UPDATE CURRENT_TIMESTAMP,
    PRIMARY KEY (id)
) ENGINE = InnoDB AUTO_INCREMENT = 1 DEFAULT CHARSET = utf8;
INSERT INTO seata_storage.product (id, stock) VALUES (1, 10); # 插入一条产品的库存

CREATE TABLE seata_storage.undo_log
(
    id            BIGINT(20)   NOT NULL AUTO_INCREMENT,
    branch_id     BIGINT(20)   NOT NULL,
    xid           VARCHAR(100) NOT NULL,
    context       VARCHAR(128) NOT NULL,
    rollback_info LONGBLOB     NOT NULL,
    log_status    INT(11)      NOT NULL,
    log_created   DATETIME     NOT NULL,
    log_modified  DATETIME     NOT NULL,
    PRIMARY KEY (id),
    UNIQUE KEY ux_undo_log (xid, branch_id)
) ENGINE = InnoDB AUTO_INCREMENT = 1 DEFAULT CHARSET = utf8;

# Amount
DROP DATABASE IF EXISTS seata_amount;
CREATE DATABASE seata_amount;

CREATE TABLE seata_amount.account
(
    id               INT(11) NOT NULL AUTO_INCREMENT,
    balance          DOUBLE   DEFAULT NULL,
    last_update_time DATETIME DEFAULT CURRENT_TIMESTAMP ON UPDATE CURRENT_TIMESTAMP,
    PRIMARY KEY (id)
) ENGINE = InnoDB AUTO_INCREMENT = 1  DEFAULT CHARSET = utf8;

CREATE TABLE seata_amount.undo_log
(
    id            BIGINT(20)   NOT NULL AUTO_INCREMENT,
    branch_id     BIGINT(20)   NOT NULL,
    xid           VARCHAR(100) NOT NULL,
    context       VARCHAR(128) NOT NULL,
    rollback_info LONGBLOB     NOT NULL,
    log_status    INT(11)      NOT NULL,
    log_created   DATETIME     NOT NULL,
    log_modified  DATETIME     NOT NULL,
    PRIMARY KEY (id),
    UNIQUE KEY ux_undo_log (xid, branch_id)
) ENGINE = InnoDB AUTO_INCREMENT = 1 DEFAULT CHARSET = utf8;
INSERT INTO seata_amount.account (id, balance) VALUES (1, 1);
其中,每个库中的 undo_log 表,是 Seata AT 模式必须创建的表,主要用于分支事务的回滚。
另外,考虑到测试方便,我们插入了一条 id = 1 的 account 记录,和一条 id = 1 的 product 记录。
2.2 引入依赖
创建 pom.xml 文件,引入相关的依赖。内容如下:
<?xml version="1.0" encoding="UTF-8"?>
<project xmlns="http://maven.apache.org/POM/4.0.0"
         xmlns:xsi="http://www.w3.org/2001/XMLSchema-instance"
         xsi:schemaLocation="http://maven.apache.org/POM/4.0.0 http://maven.apache.org/xsd/maven-4.0.0.xsd">
    <parent>
        <groupId>org.springframework.boot</groupId>
        <artifactId>spring-boot-starter-parent</artifactId>
        <version>2.2.2.RELEASE</version>
        <relativePath/> <!-- lookup parent from repository -->
    </parent>
    <modelVersion>4.0.0</modelVersion>

    <artifactId>lab-52-multiple-datasource</artifactId>

    <dependencies>
        <!-- 实现对 Spring MVC 的自动化配置 -->
        <dependency>
            <groupId>org.springframework.boot</groupId>
            <artifactId>spring-boot-starter-web</artifactId>
        </dependency>

        <!-- 实现对数据库连接池的自动化配置 -->
        <dependency>
            <groupId>org.springframework.boot</groupId>
            <artifactId>spring-boot-starter-jdbc</artifactId>
        </dependency>
        <dependency> <!-- 本示例,我们使用 MySQL -->
            <groupId>mysql</groupId>
            <artifactId>mysql-connector-java</artifactId>
            <version>5.1.48</version>
        </dependency>

        <!-- 实现对 MyBatis 的自动化配置 -->
        <dependency>
            <groupId>org.mybatis.spring.boot</groupId>
            <artifactId>mybatis-spring-boot-starter</artifactId>
            <version>2.1.2</version>
        </dependency>

        <!-- 实现对 dynamic-datasource 的自动化配置 -->
        <dependency>
            <groupId>com.baomidou</groupId>
            <artifactId>dynamic-datasource-spring-boot-starter</artifactId>
            <version>3.0.0</version>
        </dependency>

        <!-- 实现对 Seata 的自动化配置 -->
        <dependency>
            <groupId>io.seata</groupId>
            <artifactId>seata-spring-boot-starter</artifactId>
            <version>1.1.0</version>
        </dependency>
    </dependencies>

</project>
① 引入 dynamic-datasource-spring-boot-starter 依赖,实现对 dynamic-datasource 的自动配置,用于多数据源的切换功能。
友情提示:关于数据源的切换功能,胖友可以阅读《芋道 Spring Boot 多数据源(读写分离)入门》文章,贼详细。
② 引入 seata-spring-boot-starter 依赖,实现对 Seata 的自动配置。
2.3 配置文件
创建 application.yaml 配置文件,添加相关的配置项。内容如下:
server:
  port: 8081 # 端口

spring:
  application:
    name: multi-datasource-service  # 应用名

  datasource:
    # dynamic-datasource-spring-boot-starter 动态数据源的配配项,对应 DynamicDataSourceProperties 类
    dynamic:
      primary: order-ds # 设置默认的数据源或者数据源组,默认值即为 master
      datasource:
        # 订单 order 数据源配置
        order-ds:
          url: jdbc:mysql://127.0.0.1:3306/seata_order?useSSL=false&useUnicode=true&characterEncoding=UTF-8
          driver-class-name: com.mysql.jdbc.Driver
          username: root
          password:
        # 账户 pay 数据源配置
        amount-ds:
          url: jdbc:mysql://127.0.0.1:3306/seata_pay?useSSL=false&useUnicode=true&characterEncoding=UTF-8
          driver-class-name: com.mysql.jdbc.Driver
          username: root
          password:
        # 库存 storage 数据源配置
        storage-ds:
          url: jdbc:mysql://127.0.0.1:3306/seata_storage?useSSL=false&useUnicode=true&characterEncoding=UTF-8
          driver-class-name: com.mysql.jdbc.Driver
          username: root
          password:
      seata: true # 是否启动对 Seata 的集成

# Seata 配置项,对应 SeataProperties 类
seata:
  application-id: ${spring.application.name} # Seata 应用编号,默认为 ${spring.application.name}
  tx-service-group: ${spring.application.name}-group # Seata 事务组编号,用于 TC 集群名
  # 服务配置项,对应 ServiceProperties 类
  service:
    # 虚拟组和分组的映射
    vgroup-mapping:
      multi-datasource-service-group: default
    # 分组和 Seata 服务的映射
    grouplist:
      default: 127.0.0.1:8091
① spring.datasource.dynamic 配置项,设置 dynamic-datasource-spring-boot-starter 动态数据源的配置项,对应 DynamicDataSourceProperties 类。
注意 ,一定要设置 spring.datasource.dynamic.seata 配置项为 true,开启对 Seata 的集成!!!艿艿一开始忘记配置,导致 Seata 全局事务回滚失败。
② seata 配置项,设置 Seata 的配置项目,对应 SeataProperties 类。
application-id配置项,对应 Seata 应用编号,默认为${spring.application.name}。实际上,可以不进行设置。tx-service-group配置项,Seata 事务组编号,用于 TC 集群名。
③ seata.service 配置项,Seata 服务配置项,对应 ServiceProperties 类。它主要用于 Seata 在事务分组的特殊设计,可见《Seata 文档 ------ 事务分组专题》。如果不能理解的胖友,可以见如下图:

简单来说,就是多了一层虚拟 映射。这里,我们直接 设置 TC Server 的地址,为 127.0.0.1:8091。
2.4 订单模块
2.4.1 OrderController
创建 OrderController 类,提供 order/create 下单 HTTP API。代码如下:
@RestController
@RequestMapping("/order")
public class OrderController {

    private Logger logger = LoggerFactory.getLogger(OrderController.class);

    @Autowired
    private OrderService orderService;

    @PostMapping("/create")
    public Integer createOrder(@RequestParam("userId") Long userId,
                               @RequestParam("productId") Long productId,
                               @RequestParam("price") Integer price) throws Exception {
        logger.info("[createOrder] 收到下单请求,用户:{}, 商品:{}, 价格:{}", userId, productId, price);
        return orderService.createOrder(userId, productId, price);
    }

}- 该 API 中,会调用 OrderService 进行下单。
友情提示:因为这个是示例项目,所以直接传入
price参数,作为订单的金额,实际肯定不是这样的,哈哈哈~
2.4.2 OrderService
创建 OrderService 接口,定义了创建订单的方法。代码如下:
/**
 * 订单 Service
 */
public interface OrderService {

    /**
     * 创建订单
     *
     * @param userId 用户编号
     * @param productId 产品编号
     * @param price 价格
     * @return 订单编号
     * @throws Exception 创建订单失败,抛出异常
     */
    Integer createOrder(Long userId, Long productId, Integer price) throws Exception;

}
2.4.3 OrderServiceImpl
创建 OrderServiceImpl 类,实现创建订单的方法。代码如下:
@Service
public class OrderServiceImpl implements OrderService {

    private Logger logger = LoggerFactory.getLogger(getClass());

    @Autowired
    private OrderDao orderDao;

    @Autowired
    private AccountService accountService;

    @Autowired
    private ProductService productService;

    @Override
    @DS(value = "order-ds") // <1>
    @GlobalTransactional // <2>
    public Integer createOrder(Long userId, Long productId, Integer price) throws Exception {
        Integer amount = 1; // 购买数量,暂时设置为 1。

        logger.info("[createOrder] 当前 XID: {}", RootContext.getXID());

        // <3> 扣减库存
        productService.reduceStock(productId, amount);

        // <4> 扣减余额
        accountService.reduceBalance(userId, price);

        // <5> 保存订单
        OrderDO order = new OrderDO().setUserId(userId).setProductId(productId).setPayAmount(amount * price);
        orderDao.saveOrder(order);
        logger.info("[createOrder] 保存订单: {}", order.getId());

        // 返回订单编号
        return order.getId();
    }

}
<1> 处,在类上,添加了 @DS 注解,设置使用 order-ds 订单数据源。
<2> 处,在类上,添加 Seata @GlobalTransactional 注解,声明全局事务。
<3> 和 <4> 处,在该方法中,调用 ProductService 扣除商品的库存,调用 AccountService 扣除账户的余额。虽然说,调用是 JVM 进程 内的,但是 ProductService 操作的是 product-ds 商品数据源,AccountService 操作的是 account-ds 账户数据源。
<5> 处,在全部调用成功后,调用 OrderDao 保存订单。
2.4.4 OrderDao
创建 OrderDao 接口,定义保存订单的操作。代码如下:
@Mapper
@Repository
public interface OrderDao {

    /**
     * 插入订单记录
     *
     * @param order 订单
     * @return 影响记录数量
     */
    @Insert("INSERT INTO orders (user_id, product_id, pay_amount) VALUES (#{userId}, #{productId}, #{payAmount})")
    @Options(useGeneratedKeys = true, keyColumn = "id", keyProperty = "id")
    int saveOrder(OrderDO order);

}其中,OrderDO 实体 类,对应 orders 表。代码如下:
/**
 * 订单实体
 */
public class OrderDO {

    /** 订单编号 **/
    private Integer id;

    /** 用户编号 **/
    private Long userId;

    /** 产品编号 **/
    private Long productId;

    /** 支付金额 **/
    private Integer payAmount;

    // ... 省略 setter/getter 方法

}
2.5 商品模块
2.5.1 ProductService
创建 ProductService 接口,定义了扣除库存的方法。代码如下:
/**
 * 商品 Service
 */
public interface ProductService {

    /**
     * 扣减库存
     *
     * @param productId 商品 ID
     * @param amount    扣减数量
     * @throws Exception 扣减失败时抛出异常
     */
    void reduceStock(Long productId, Integer amount) throws Exception;

}
2.5.2 ProductServiceImpl
创建 ProductServiceImpl 类,实现扣减库存的方法。代码如下:
@Service
public class ProductServiceImpl implements ProductService {

    private Logger logger = LoggerFactory.getLogger(getClass());

    @Autowired
    private ProductDao productDao;

    @Override
    @DS(value = "product-ds") // <1>
    @Transactional(propagation = Propagation.REQUIRES_NEW) // <2> 开启新事物
    public void reduceStock(Long productId, Integer amount) throws Exception {
        logger.info("[reduceStock] 当前 XID: {}", RootContext.getXID());

        // <3> 检查库存
        checkStock(productId, amount);

        logger.info("[reduceStock] 开始扣减 {} 库存", productId);
        // <4> 扣减库存
        int updateCount = productDao.reduceStock(productId, amount);
        // 扣除成功
        if (updateCount == 0) {
            logger.warn("[reduceStock] 扣除 {} 库存失败", productId);
            throw new Exception("库存不足");
        }
        // 扣除失败
        logger.info("[reduceStock] 扣除 {} 库存成功", productId);
    }

    private void checkStock(Long productId, Integer requiredAmount) throws Exception {
        logger.info("[checkStock] 检查 {} 库存", productId);
        Integer stock = productDao.getStock(productId);
        if (stock < requiredAmount) {
            logger.warn("[checkStock] {} 库存不足,当前库存: {}", productId, stock);
            throw new Exception("库存不足");
        }
    }

}
<1> 处,在类上,添加了 @DS 注解,设置使用 product-ds 商品数据源。
<2> 处,在类上,添加了 Spring @Transactional 注解,声明本地事务 。也就是说,此处会开启一个 seata_product 库的数据库事务。
<3> 处,检查库存是否足够,如果不够则抛出 Exception 异常。因为我们需要通过异常,回滚全局异常。
<4> 处,进行扣除库存,如果扣除失败则抛出 Exception 异常。
2.5.3 ProductDao
创建 ProductDao 接口,定义获取和扣除库存的操作。代码如下:
@Mapper
@Repository
public interface ProductDao {

    /**
     * 获取库存
     *
     * @param productId 商品编号
     * @return 库存
     */
    @Select("SELECT stock FROM product WHERE id = #{productId}")
    Integer getStock(@Param("productId") Long productId);

    /**
     * 扣减库存
     *
     * @param productId 商品编号
     * @param amount    扣减数量
     * @return 影响记录行数
     */
    @Update("UPDATE product SET stock = stock - #{amount} WHERE id = #{productId} AND stock >= #{amount}")
    int reduceStock(@Param("productId") Long productId, @Param("amount") Integer amount);

}
2.6 账户模块
友情提示:逻辑和「2.5 商品模块」基本一致,也是扣减逻辑。
2.6.1 AccountService
创建 AccountService 类,定义扣除余额的方法。代码如下:
/**
 * 账户 Service
 */
public interface AccountService {

    /**
     * 扣除余额
     *
     * @param userId 用户编号
     * @param price  扣减金额
     * @throws Exception 失败时抛出异常
     */
    void reduceBalance(Long userId, Integer price) throws Exception;

}
2.6.2 AccountServiceImpl
创建 AccountServiceImpl 类,实现扣除余额的方法。代码如下:
@Service
public class AccountServiceImpl implements AccountService {

    private Logger logger = LoggerFactory.getLogger(getClass());

    @Autowired
    private AccountDao accountDao;

    @Override
    @DS(value = "account-ds") // <1>
    @Transactional(propagation = Propagation.REQUIRES_NEW) // <2> 开启新事物
    public void reduceBalance(Long userId, Integer price) throws Exception {
        logger.info("[reduceBalance] 当前 XID: {}", RootContext.getXID());

        // <3> 检查余额
        checkBalance(userId, price);

        logger.info("[reduceBalance] 开始扣减用户 {} 余额", userId);
        // <4> 扣除余额
        int updateCount = accountDao.reduceBalance(price);
        // 扣除成功
        if (updateCount == 0) {
            logger.warn("[reduceBalance] 扣除用户 {} 余额失败", userId);
            throw new Exception("余额不足");
        }
        logger.info("[reduceBalance] 扣除用户 {} 余额成功", userId);
    }

    private void checkBalance(Long userId, Integer price) throws Exception {
        logger.info("[checkBalance] 检查用户 {} 余额", userId);
        Integer balance = accountDao.getBalance(userId);
        if (balance < price) {
            logger.warn("[checkBalance] 用户 {} 余额不足,当前余额:{}", userId, balance);
            throw new Exception("余额不足");
        }
    }

}
<1> 处,在类上,添加了 @DS 注解,设置使用 account-ds 账户数据源。
<2> 处,在类上,添加了 Spring @Transactional 注解,声明本地事务 。也就是说,此处会开启一个 seata_account 库的数据库事务。
<3> 处,检查余额是否足够,如果不够则抛出 Exception 异常。因为我们需要通过异常,回滚全局异常。
<4> 处,进行扣除余额,如果扣除失败则抛出 Exception 异常。
2.6.3 AccountDao
创建 AccountDao 接口,定义查询和扣除余额的操作。代码如下:
@Mapper
@Repository
public interface AccountDao {

    /**
     * 获取账户余额
     *
     * @param userId 用户 ID
     * @return 账户余额
     */
    @Select("SELECT balance FROM account WHERE id = #{userId}")
    Integer getBalance(@Param("userId") Long userId);

    /**
     * 扣减余额
     *
     * @param price 需要扣减的数目
     * @return 影响记录行数
     */
    @Update("UPDATE account SET balance = balance - #{price} WHERE id = 1 AND balance >= ${price}")
    int reduceBalance(@Param("price") Integer price);

}
2.7 MultipleDatasourceApplication
创建 MultipleDatasourceApplication 类,用于启动项目。代码如下:
@SpringBootApplication
public class MultipleDatasourceApplication {

    public static void main(String[] args) {
        SpringApplication.run(MultipleDatasourceApplication.class, args);
    }

}
2.8 简单测试
下面,我们将测试两种情况:
- 分布式事务正常提交
- 分布式事务异常回滚
Debug 执行 MultipleDatasourceApplication 启动 Spring Boot 应用。此时,我们可以看到 Seata 相关日志如下:
友情提示:日志的顺序,艿艿做了简单的整理,为了更容易阅读。
# ... 上面还有 Seata 相关 Bean 初始化的日志,忘记加进来了,嘿嘿~

# `dynamic-datasource` 初始化动态数据源
2020-04-03 21:01:28.305  INFO 24912 --- [           main] c.b.d.d.DynamicRoutingDataSource         : dynamic-datasource detect ALIBABA SEATA and enabled it
2020-04-03 21:01:28.415  INFO 24912 --- [           main] com.alibaba.druid.pool.DruidDataSource   : {dataSource-1,order-ds} inited
2020-04-03 21:01:28.416  INFO 24912 --- [           main] com.alibaba.druid.pool.DruidDataSource   : {dataSource-2,account-ds} inited
2020-04-03 21:01:28.417  INFO 24912 --- [           main] com.alibaba.druid.pool.DruidDataSource   : {dataSource-3,product-ds} inited
# 给数据源增加 Seata 的数据源代理
2020-04-03 21:01:28.933  INFO 24912 --- [           main] s.s.a.d.SeataDataSourceBeanPostProcessor : Auto proxy of [dataSource]
# 加载 Druid 提供的 SQL 解析器
2020-04-03 21:01:28.742  INFO 24912 --- [           main] i.s.common.loader.EnhancedServiceLoader  : load DbTypeParser[druid] extension by class[io.seata.sqlparser.druid.DruidDelegatingDbTypeParser]
# 连接到 Seata TC Server 服务器
2020-04-03 21:01:28.750  INFO 24912 --- [           main] i.s.c.r.netty.NettyClientChannelManager  : will connect to 127.0.0.1:8091
2020-04-03 21:01:28.752  INFO 24912 --- [           main] i.s.core.rpc.netty.NettyPoolableFactory  : NettyPool create channel to transactionRole:RMROLE,address:127.0.0.1:8091,msg:< RegisterRMRequest{resourceIds='jdbc:mysql://127.0.0.1:3306/seata_product', applicationId='multi-datasource-service', transactionServiceGroup='multi-datasource-service-group'} >
# 加载 Seata 序列化器
2020-04-03 21:01:28.883  INFO 24912 --- [lector_RMROLE_1] i.s.common.loader.EnhancedServiceLoader  : load Serializer[SEATA] extension by class[io.seata.serializer.seata.SeataSerializer]
# 注册 Seata Resource Manager 到 Seata TC Server 成功
2020-04-03 21:01:28.751  INFO 24912 --- [           main] io.seata.core.rpc.netty.RmRpcClient      : RM will register :jdbc:mysql://127.0.0.1:3306/seata_product
2020-04-03 21:01:28.902  INFO 24912 --- [           main] io.seata.core.rpc.netty.RmRpcClient      : register RM success. server version:1.1.0,channel:[id: 0x0ec2ca91, L:/127.0.0.1:56463 - R:/127.0.0.1:8091]
2020-04-03 21:01:28.911  INFO 24912 --- [           main] i.s.core.rpc.netty.NettyPoolableFactory  : register success, cost 52 ms, version:1.1.0,role:RMROLE,channel:[id: 0x0ec2ca91, L:/127.0.0.1:56463 - R:/127.0.0.1:8091]
2020-04-03 21:01:28.916  INFO 24912 --- [           main] io.seata.core.rpc.netty.RmRpcClient      : will register resourceId:jdbc:mysql://127.0.0.1:3306/seata_account
2020-04-03 21:01:28.920  INFO 24912 --- [           main] io.seata.core.rpc.netty.RmRpcClient      : will register resourceId:jdbc:mysql://127.0.0.1:3306/seata_order
2020-04-03 21:01:28.937  INFO 24912 --- [           main] io.seata.core.rpc.netty.RmRpcClient      : will register resourceId:jdbc:mysql://127.0.0.1:3306/seata_order
# `dynamic-datasource` 针对 Seata 的集成
2020-04-03 21:01:28.921  INFO 24912 --- [           main] c.b.d.d.DynamicRoutingDataSource         : dynamic-datasource - load a datasource named [order-ds] success
2020-04-03 21:01:28.912  INFO 24912 --- [           main] c.b.d.d.DynamicRoutingDataSource         : dynamic-datasource [product-ds] wrap seata plugin
2020-04-03 21:01:28.912  INFO 24912 --- [           main] c.b.d.d.DynamicRoutingDataSource         : dynamic-datasource - load a datasource named [product-ds] success
2020-04-03 21:01:28.916  INFO 24912 --- [           main] c.b.d.d.DynamicRoutingDataSource         : dynamic-datasource [account-ds] wrap seata plugin
2020-04-03 21:01:28.916  INFO 24912 --- [           main] c.b.d.d.DynamicRoutingDataSource         : dynamic-datasource - load a datasource named [account-ds] success
2020-04-03 21:01:28.921  INFO 24912 --- [           main] c.b.d.d.DynamicRoutingDataSource         : dynamic-datasource [order-ds] wrap seata plugin
2020-04-03 21:01:28.921  INFO 24912 --- [           main] c.b.d.d.DynamicRoutingDataSource         : dynamic-datasource initial loaded [3] datasource,primary datasource named [order-ds]
# 因为 OrderServiceImpl 添加了 `@GlobalTransactional` 注解,所以创建其代理,用于全局事务。
2020-04-03 21:01:29.115  INFO 24912 --- [           main] i.s.s.a.GlobalTransactionScanner         : Bean[cn.iocoder.springboot.lab52.seatademo.service.impl.OrderServiceImpl$$EnhancerBySpringCGLIB$$f38d0660] with name [orderServiceImpl] would use interceptor [io.seata.spring.annotation.GlobalTransactionalInterceptor]
2.8.1 正常流程
① 先查询下目前数据库的数据情况。如下图所示: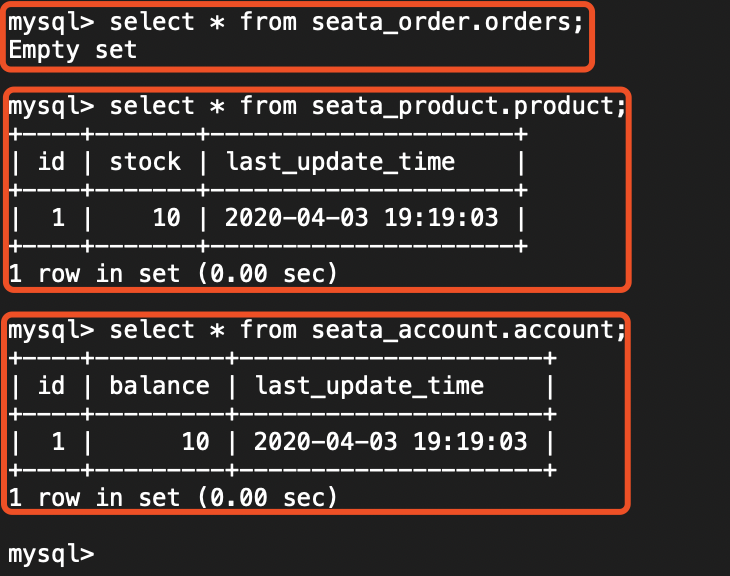
② 使用 Postman 模拟调用 http://127.0.0.1:8081/order/create 创建订单的接口,如下图所示:
此时,在控制台打印日志如下图所示:
再查询下目前数据库的数据情况。如下图所示: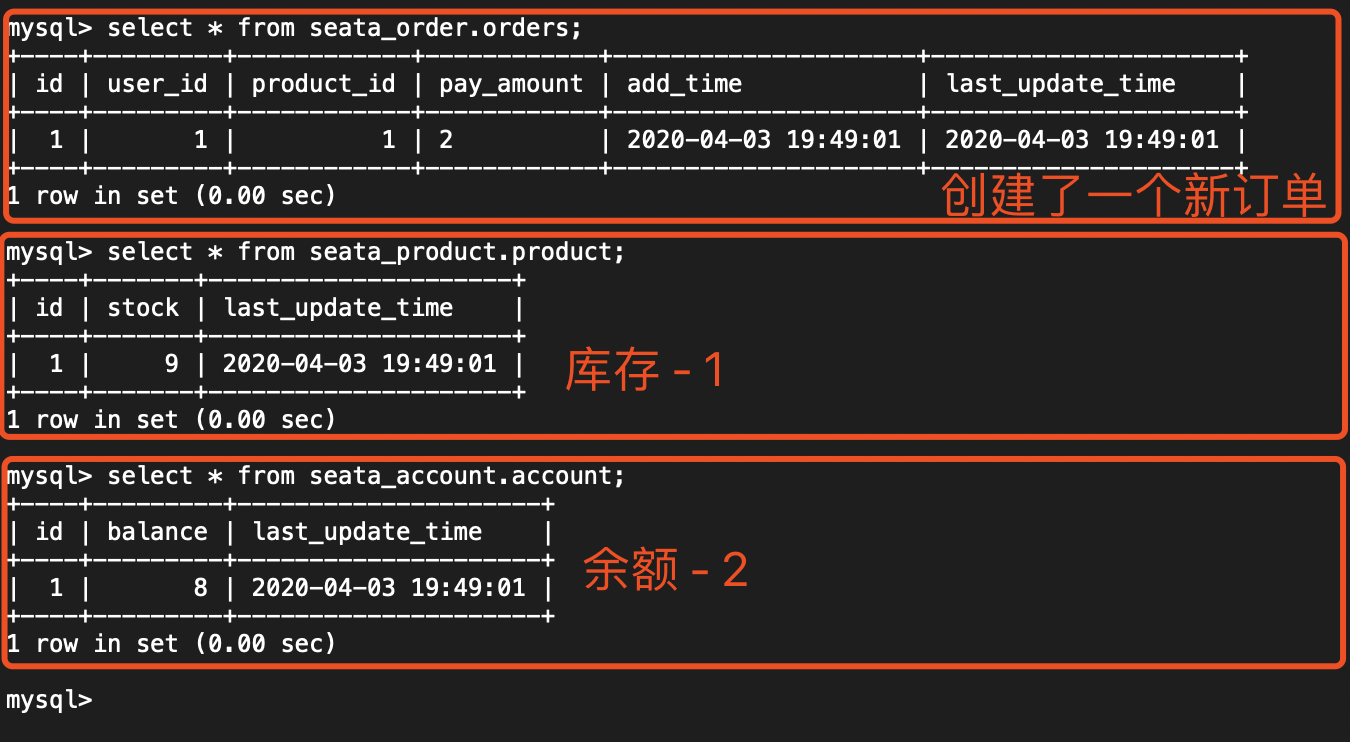
2.8.2 异常流程
① 先查询下目前数据库的数据情况。如下图所示: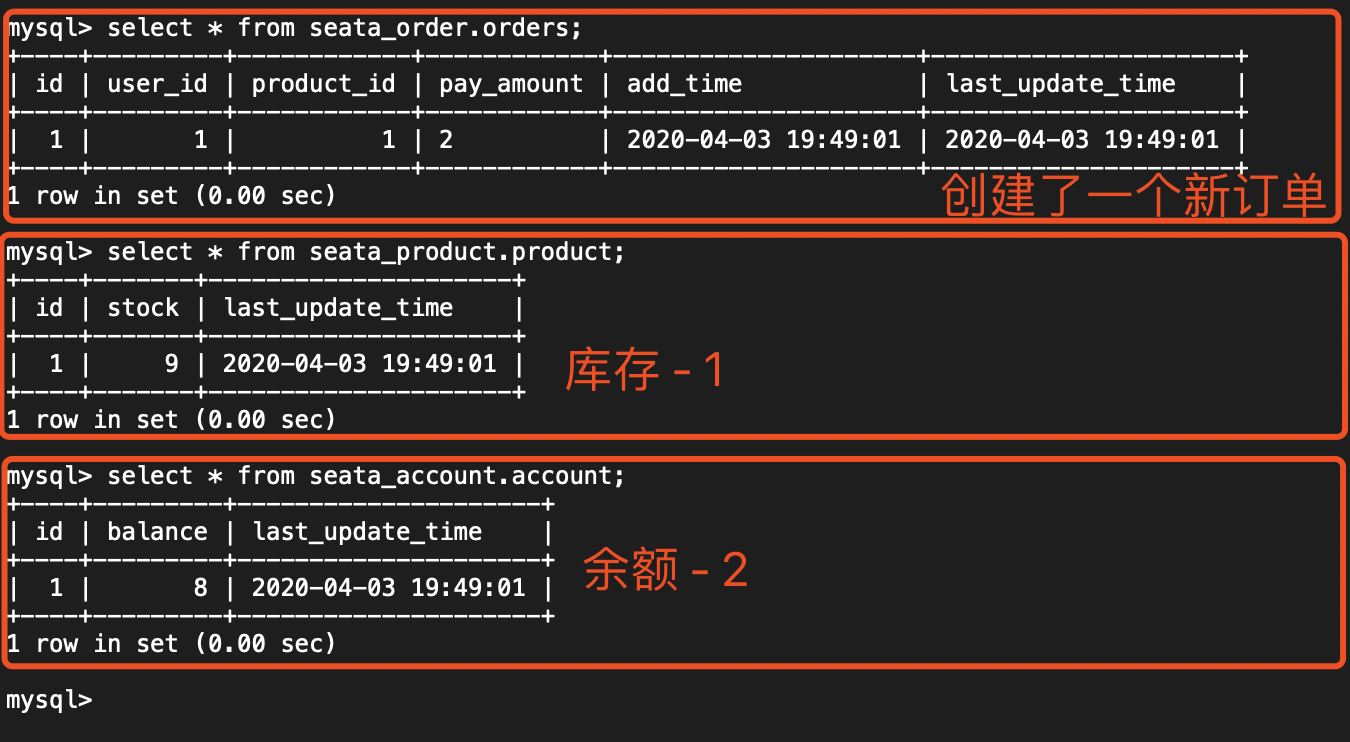
② 在 OrderServiceImpl 的 #createOrder(...) 方法上,打上断点如下图,方便我们看到 product 表的 balance 被减少:
友情提示:这里忘记截图了,稍后 IDEA 停留在该断点时,胖友可以去查询
product表,会发现balance已经减少。
③ 使用 Postman 模拟调用 http://127.0.0.1:8081/order/create 创建订单的接口,如下图所示:
此时,在控制台打印日志如下图所示:
再查询下目前数据库的数据情况。如下图所示:
3. AT 模式 + HttpClient 远程调用
示例代码对应仓库:
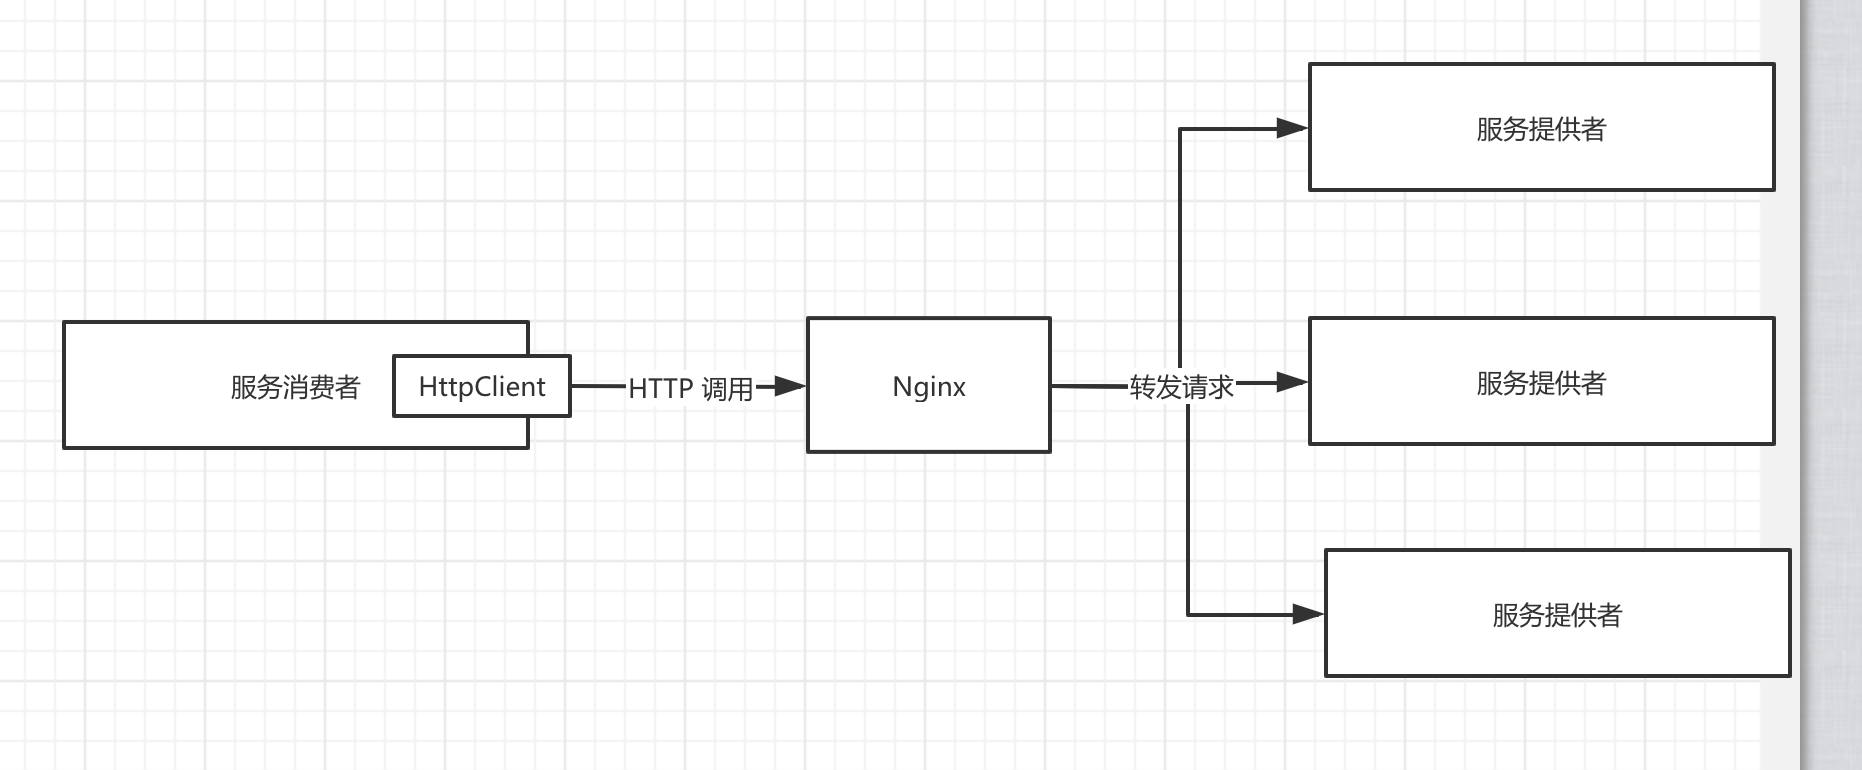
本小节,我们会将「2. AT 模式 + 多数据源」小节的用户购买商品 的 Spring Boot 单体 应用,拆成分多个 Spring Boot 应用,通过 Apache HttpClient 来实现 HTTP 远程调用每个 Spring Boot 应用提供的 Restful API 接口。整体如下图所示: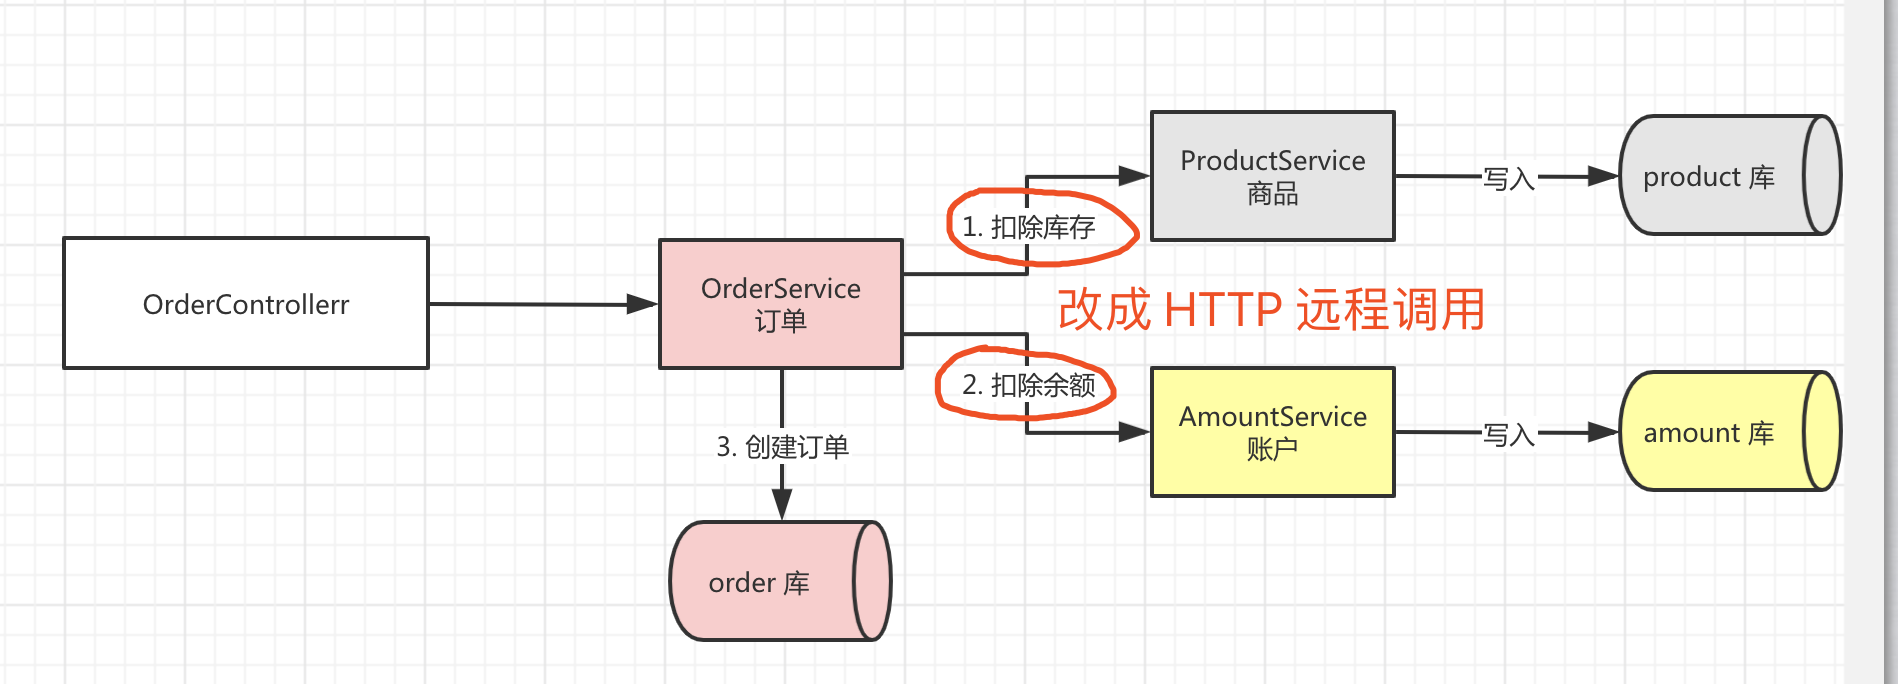
友情提示:早期的微服务架构,会采用 Nginx 对后端的服务进行负载均衡,而服务提供者使用 HttpClient 进行远程 HTTP 调用。例如说:
Seata 提供了 seata-http 项目,对 Apache HttpClient 进行集成。实现原理是:
- 服务消费者 ,使用 Seata 封装的 AbstractHttpExecutor 执行器,在使用HttpClient 发起 HTTP 调用时,将 Seata 全局事务 XID 通过 Header 传递。
- 服务提供者 ,使用 Seata 提供的 SpringMVC TransactionPropagationIntercepter 拦截器,将 Header 中的 Seata 全局事务 XID 解析出来,设置到 Seata 上下文 中。
如此,我们便实现了多个 Spring Boot 应用的 Seata 全局事务的传播。
下面,我们来新建 lab-52-seata-at-httpclient-demo 模块,包含三个 Spring Boot 项目。最终结构如下图: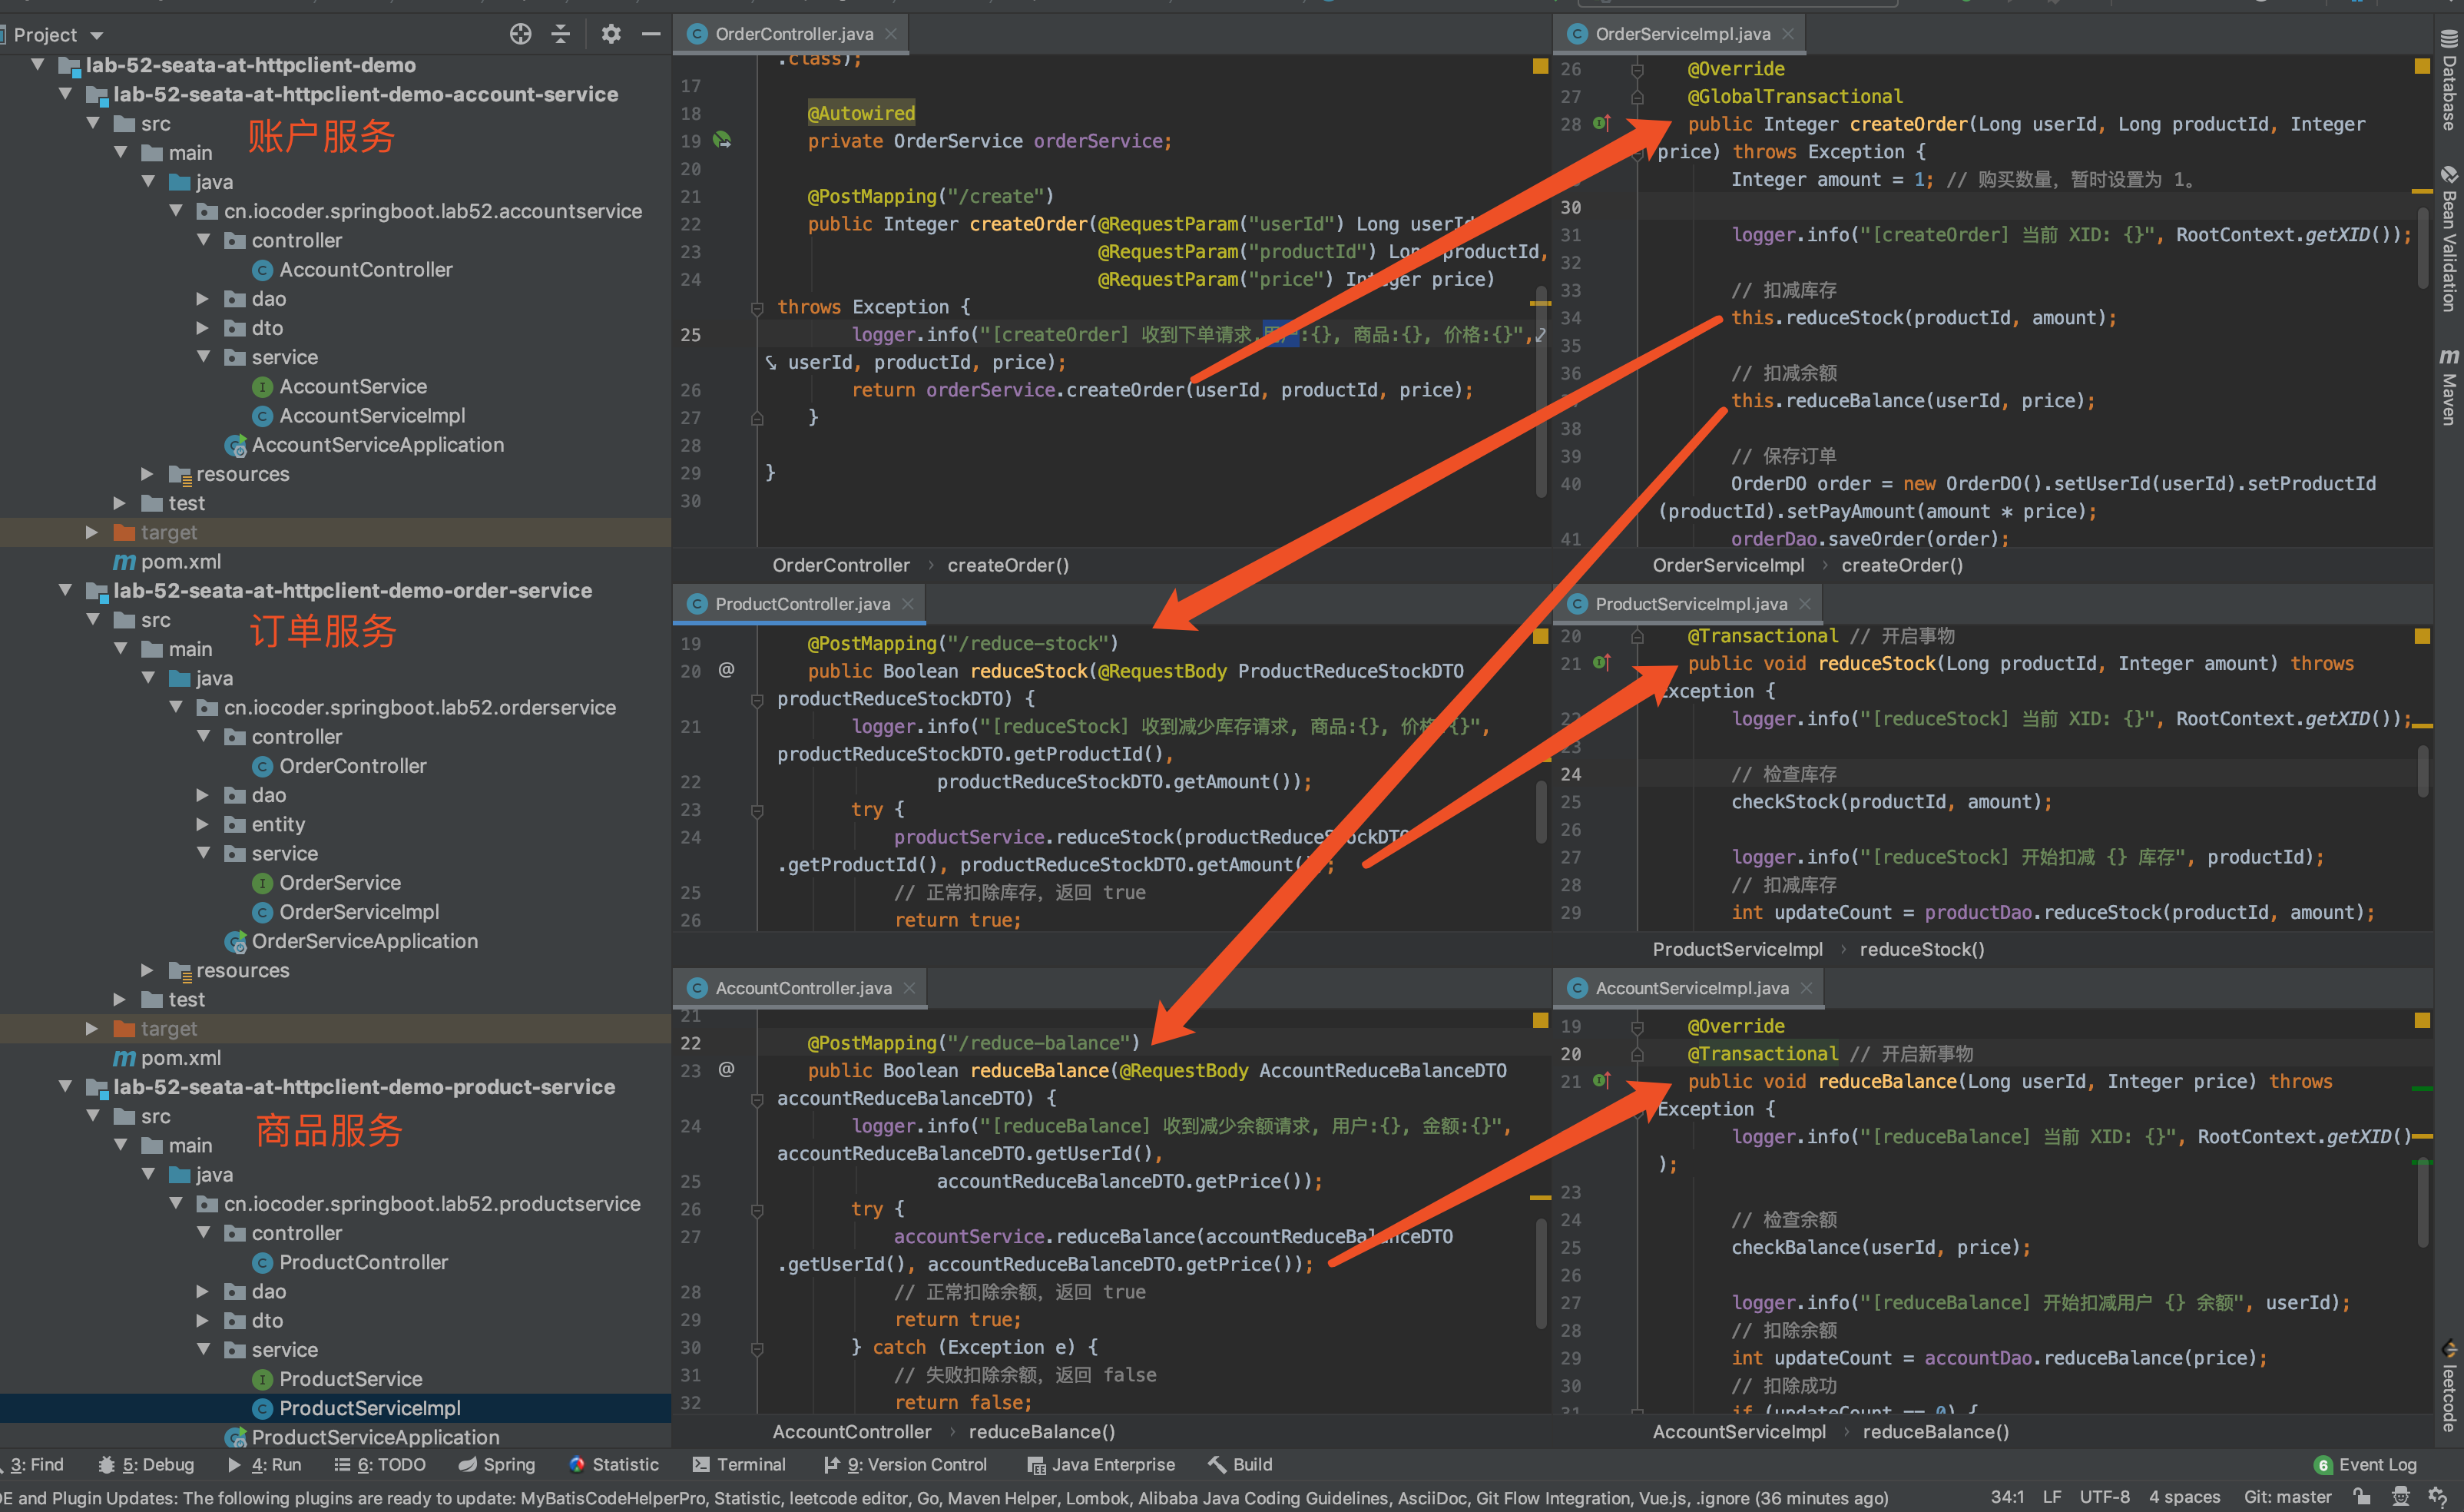
3.1 初始化数据库
使用 data.sql 脚本,创建 seata_order、seata_storage、seata_amount 三个库。
友情提示:整体内容和「2.1 初始化数据库」小节一样。
3.2 订单服务
新建 lab-52-seata-at-httpclient-demo-order-service 项目,作为订单 服务。它主要提供 /order/create 接口,实现下单逻辑。
友情提示:整体内容和「2.4 订单模块」一致。
3.2.1 引入依赖
创建 pom.xml 文件,引入相关的依赖。内容如下:
<?xml version="1.0" encoding="UTF-8"?>
<project xmlns="http://maven.apache.org/POM/4.0.0"
         xmlns:xsi="http://www.w3.org/2001/XMLSchema-instance"
         xsi:schemaLocation="http://maven.apache.org/POM/4.0.0 http://maven.apache.org/xsd/maven-4.0.0.xsd">
    <parent>
        <groupId>org.springframework.boot</groupId>
        <artifactId>spring-boot-starter-parent</artifactId>
        <version>2.2.2.RELEASE</version>
        <relativePath/> <!-- lookup parent from repository -->
    </parent>
    <modelVersion>4.0.0</modelVersion>

    <artifactId>lab-52-seata-at-httpclient-demo-account-service</artifactId>

    <dependencies>
        <!-- 实现对 Spring MVC 的自动化配置 -->
        <dependency>
            <groupId>org.springframework.boot</groupId>
            <artifactId>spring-boot-starter-web</artifactId>
        </dependency>

        <!-- 实现对数据库连接池的自动化配置 -->
        <dependency>
            <groupId>org.springframework.boot</groupId>
            <artifactId>spring-boot-starter-jdbc</artifactId>
        </dependency>
        <dependency> <!-- 本示例,我们使用 MySQL -->
            <groupId>mysql</groupId>
            <artifactId>mysql-connector-java</artifactId>
            <version>5.1.48</version>
        </dependency>

        <!-- 实现对 MyBatis 的自动化配置 -->
        <dependency>
            <groupId>org.mybatis.spring.boot</groupId>
            <artifactId>mybatis-spring-boot-starter</artifactId>
            <version>2.1.2</version>
        </dependency>

        <!-- 实现对 Seata 的自动化配置 -->
        <dependency>
            <groupId>io.seata</groupId>
            <artifactId>seata-spring-boot-starter</artifactId>
            <version>1.1.0</version>
        </dependency>
        <!-- 实现 Seata 对 HttpClient 的集成支持  -->
        <dependency>
            <groupId>io.seata</groupId>
            <artifactId>seata-http</artifactId>
            <version>1.1.0</version>
        </dependency>

        <!-- Apache HttpClient 依赖 -->
        <dependency>
            <groupId>org.apache.httpcomponents</groupId>
            <artifactId>httpclient</artifactId>
            <version>4.5.8</version>
        </dependency>
    </dependencies>

</project>
① 引入 seata-spring-boot-starter 依赖,实现对 Seata 的自动配置。
② 引入 seata-http 依赖,实现 Seata 对 HttpClient 的集成支持。
3.2.2 配置文件
创建 application.yaml 配置文件,添加相关的配置项。内容如下:
server:
  port: 8081 # 端口

spring:
  application:
    name: order-service

  datasource:
    url: jdbc:mysql://127.0.0.1:3306/seata_order?useSSL=false&useUnicode=true&characterEncoding=UTF-8
    driver-class-name: com.mysql.jdbc.Driver
    username: root
    password:

# Seata 配置项,对应 SeataProperties 类
seata:
  application-id: ${spring.application.name} # Seata 应用编号,默认为 ${spring.application.name}
  tx-service-group: ${spring.application.name}-group # Seata 事务组编号,用于 TC 集群名
  # 服务配置项,对应 ServiceProperties 类
  service:
    # 虚拟组和分组的映射
    vgroup-mapping:
      order-service-group: default
    # 分组和 Seata 服务的映射
    grouplist:
      default: 127.0.0.1:8091
① spring.datasource 配置项,设置连接 seata_order 库。
② seata 配置项,设置 Seata 的配置项目,对应 SeataProperties 类。
application-id配置项,对应 Seata 应用编号,默认为${spring.application.name}。实际上,可以不进行设置。tx-service-group配置项,Seata 事务组编号,用于 TC 集群名。
③ seata.service 配置项,Seata 服务配置项,对应 ServiceProperties 类。它主要用于 Seata 在事务分组的特殊设计,可见《Seata 文档 ------ 事务分组专题》。如果不能理解的胖友,可以见如下图: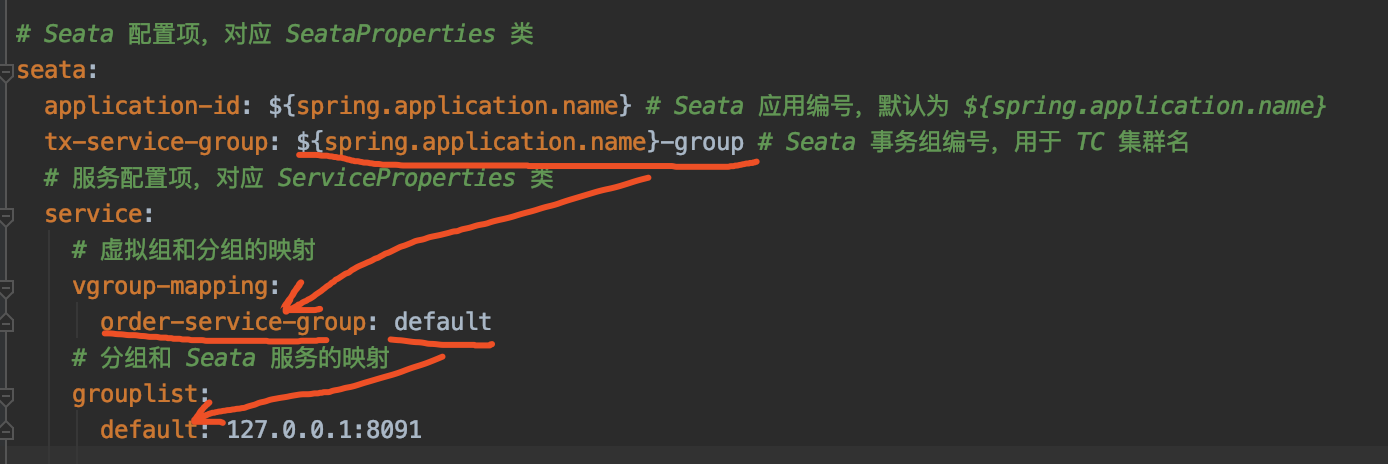
简单来说,就是多了一层虚拟 映射。这里,我们直接 设置 TC Server 的地址,为 127.0.0.1:8091。
3.2.3 OrderController
创建 OrderController 类,提供 order/create 下单 HTTP API。代码如下:
@RestController
@RequestMapping("/order")
public class OrderController {

    private Logger logger = LoggerFactory.getLogger(OrderController.class);

    @Autowired
    private OrderService orderService;

    @PostMapping("/create")
    public Integer createOrder(@RequestParam("userId") Long userId,
                               @RequestParam("productId") Long productId,
                               @RequestParam("price") Integer price) throws Exception {
        logger.info("[createOrder] 收到下单请求,用户:{}, 商品:{}, 价格:{}", userId, productId, price);
        return orderService.createOrder(userId, productId, price);
    }

}- 该 API 中,会调用 OrderService 进行下单。
友情提示:因为这个是示例项目,所以直接传入
price参数,作为订单的金额,实际肯定不是这样的,哈哈哈~
3.2.4 OrderService
创建 OrderService 接口,定义了创建订单的方法。代码如下:
/**
 * 订单 Service
 */
public interface OrderService {

    /**
     * 创建订单
     *
     * @param userId 用户编号
     * @param productId 产品编号
     * @param price 价格
     * @return 订单编号
     * @throws Exception 创建订单失败,抛出异常
     */
    Integer createOrder(Long userId, Long productId, Integer price) throws Exception;

}
3.2.5 OrderServiceImpl
创建 OrderServiceImpl 类,实现创建订单的方法。代码如下:
@Service
public class OrderServiceImpl implements OrderService {

    private Logger logger = LoggerFactory.getLogger(getClass());

    @Autowired
    private OrderDao orderDao;

    @Override
    @GlobalTransactional // <1>
    public Integer createOrder(Long userId, Long productId, Integer price) throws Exception {
        Integer amount = 1; // 购买数量,暂时设置为 1。

        logger.info("[createOrder] 当前 XID: {}", RootContext.getXID());

        // <2> 扣减库存
        this.reduceStock(productId, amount);

        // <3> 扣减余额
        this.reduceBalance(userId, price);

        // <4> 保存订单
        OrderDO order = new OrderDO().setUserId(userId).setProductId(productId).setPayAmount(amount * price);
        orderDao.saveOrder(order);
        logger.info("[createOrder] 保存订单: {}", order.getId());

        // 返回订单编号
        return order.getId();
    }

    private void reduceStock(Long productId, Integer amount) throws IOException {
        // 参数拼接
        JSONObject params = new JSONObject().fluentPut("productId", String.valueOf(productId))
                .fluentPut("amount", String.valueOf(amount));
        // 执行调用
        HttpResponse response = DefaultHttpExecutor.getInstance().executePost("http://127.0.0.1:8082", "/product/reduce-stock",
                params, HttpResponse.class);
        // 解析结果
        Boolean success = Boolean.valueOf(EntityUtils.toString(response.getEntity()));
        if (!success) {
            throw new RuntimeException("扣除库存失败");
        }
    }

    private void reduceBalance(Long userId, Integer price) throws IOException {
        // 参数拼接
        JSONObject params = new JSONObject().fluentPut("userId", String.valueOf(userId))
                .fluentPut("price", String.valueOf(price));
        // 执行调用
        HttpResponse response = DefaultHttpExecutor.getInstance().executePost("http://127.0.0.1:8083", "/account/reduce-balance",
                params, HttpResponse.class);
        // 解析结果
        Boolean success = Boolean.valueOf(EntityUtils.toString(response.getEntity()));
        if (!success) {
            throw new RuntimeException("扣除余额失败");
        }
    }
}
<1> 处,在类上,添加 Seata @GlobalTransactional 注解,声明全局事务。
<2> 处,调用 #reduceStock(productId, amount) 方法,通过 Apache HttpClient 远程 HTTP 调用商品服务,进行扣除库存。
其中,DefaultHttpExecutor 是 Seata 封装,在使用个 HttpClient 发起 HTTP 调用时,将 Seata 全局事务 XID 通过 Header 传递。不过有两点要注意:
在使用 POST 请求时,DefaultHttpExecutor 暂时只支持
application/json请求参数格式。所以,如果胖友想要application/x-www-form-urlencoded等格式,需要自己重新封装~针对返回结果的转换,DefaultHttpExecutor 暂时没有实现完成,代码如下图所示:

艿艿使用的是 Seata 1.1.0 版本,未来这块应该会实现。
另外,商品 服务提供的 /product/reduce-stock 接口,通过返回 true 或 false 来表示扣除库存是否成功。因此,我们在 false 扣除失败时,抛出 RuntimeException 异常,从而实现全局事务的回滚。
<3> 处,调用 #reduceBalance(userId, price) 方法,通过 Apache HttpClient 远程 HTTP 调用账户 服务,进行扣除余额。整体逻辑和 <2> 一致,就不重复哔哔。
<4> 处,在全部调用成功后,调用 OrderDao 保存订单。
3.2.6 OrderDao
创建 OrderDao 接口,定义保存订单的操作。代码如下:
@Mapper
@Repository
public interface OrderDao {

    /**
     * 插入订单记录
     *
     * @param order 订单
     * @return 影响记录数量
     */
    @Insert("INSERT INTO orders (user_id, product_id, pay_amount) VALUES (#{userId}, #{productId}, #{payAmount})")
    @Options(useGeneratedKeys = true, keyColumn = "id", keyProperty = "id")
    int saveOrder(OrderDO order);

}其中,OrderDO 实体 类,对应 orders 表。代码如下:
/**
 * 订单实体
 */
public class OrderDO {

    /** 订单编号 **/
    private Integer id;

    /** 用户编号 **/
    private Long userId;

    /** 产品编号 **/
    private Long productId;

    /** 支付金额 **/
    private Integer payAmount;

    // ... 省略 setter/getter 方法

}
3.2.7 OrderServiceApplication
创建 OrderServiceApplication 类,用于启动订单服务。代码如下:
@SpringBootApplication
public class OrderServiceApplication {

    public static void main(String[] args) {
        SpringApplication.run(OrderServiceApplication.class, args);
    }

}
3.3 商品服务
新建 lab-52-seata-at-httpclient-demo-product-service 项目,作为商品 服务。它主要提供 /product/reduce-stock 接口,实现扣除商品的库存逻辑。
友情提示:整体内容和「2.5 商品模块」一致。
3.3.1 引入依赖
创建 pom.xml 文件,引入相关的依赖。和「3.2.1 引入依赖」是一致的,就不重复"贴"出来了,胖友点击 pom.xml 文件查看。
3.3.2 配置文件
创建 application.yaml 配置文件,添加相关的配置项。和「3.2.2 配置文件」是一致的,就不重复"贴"出来了,胖友点击 application.yaml 文件查看。
3.3.3 ProductController
创建 ProductController 类,提供 /product/reduce-stock 扣除库存 HTTP API。代码如下:
@RestController
@RequestMapping("/product")
public class ProductController {

    private Logger logger = LoggerFactory.getLogger(ProductController.class);

    @Autowired
    private ProductService productService;

    @PostMapping("/reduce-stock")
    public Boolean reduceStock(@RequestBody ProductReduceStockDTO productReduceStockDTO) {
        logger.info("[reduceStock] 收到减少库存请求, 商品:{}, 价格:{}", productReduceStockDTO.getProductId(),
                productReduceStockDTO.getAmount());
        try {
            productService.reduceStock(productReduceStockDTO.getProductId(), productReduceStockDTO.getAmount());
            // 正常扣除库存,返回 true
            return true;
        } catch (Exception e) {
            // 失败扣除库存,返回 false
            return false;
        }
    }

}- 该 API 中,会调用 ProductService 进行扣除库存,最终通过返回结果为
true或者false,表示扣除库存成功或是失败。
其中,ProductReduceStockDTO 为商品减少库存 DTO 类,代码如下:
public class ProductReduceStockDTO {

    /**
     * 商品编号
     */
    private Long productId;
    /**
     * 数量
     */
    private Integer amount;

    // ... 省略 setter/getter 方法

}
3.3.4 ProductService
创建 ProductService 接口,定义了扣除库存的方法。代码如下:
/**
 * 商品 Service
 */
public interface ProductService {

    /**
     * 扣减库存
     *
     * @param productId 商品 ID
     * @param amount    扣减数量
     * @throws Exception 扣减失败时抛出异常
     */
    void reduceStock(Long productId, Integer amount) throws Exception;

}
3.3.5 ProductServiceImpl
创建 ProductServiceImpl 类,实现扣减库存的方法。代码如下:
@Service
public class ProductServiceImpl implements ProductService {

    private Logger logger = LoggerFactory.getLogger(getClass());

    @Autowired
    private ProductDao productDao;

    @Override
    @Transactional // <1> 开启新事物
    public void reduceStock(Long productId, Integer amount) throws Exception {
        logger.info("[reduceStock] 当前 XID: {}", RootContext.getXID());

        // <2> 检查库存
        checkStock(productId, amount);

        logger.info("[reduceStock] 开始扣减 {} 库存", productId);
        // <3> 扣减库存
        int updateCount = productDao.reduceStock(productId, amount);
        // 扣除成功
        if (updateCount == 0) {
            logger.warn("[reduceStock] 扣除 {} 库存失败", productId);
            throw new Exception("库存不足");
        }
        // 扣除失败
        logger.info("[reduceStock] 扣除 {} 库存成功", productId);
    }

    private void checkStock(Long productId, Integer requiredAmount) throws Exception {
        logger.info("[checkStock] 检查 {} 库存", productId);
        Integer stock = productDao.getStock(productId);
        if (stock < requiredAmount) {
            logger.warn("[checkStock] {} 库存不足,当前库存: {}", productId, stock);
            throw new Exception("库存不足");
        }
    }

}
<1> 处,在类上,添加了 Spring @Transactional 注解,声明本地事务 。也就是说,此处会开启一个 seata_product 库的数据库事务。
<2> 处,检查库存是否足够,如果不够则抛出 Exception 异常。因为我们需要通过异常,回滚全局异常。
<3> 处,进行扣除库存,如果扣除失败则抛出 Exception 异常。
3.3.6 ProductDao
创建 ProductDao 接口,定义获取和扣除库存的操作。代码如下:
@Mapper
@Repository
public interface ProductDao {

    /**
     * 获取库存
     *
     * @param productId 商品编号
     * @return 库存
     */
    @Select("SELECT stock FROM product WHERE id = #{productId}")
    Integer getStock(@Param("productId") Long productId);

    /**
     * 扣减库存
     *
     * @param productId 商品编号
     * @param amount    扣减数量
     * @return 影响记录行数
     */
    @Update("UPDATE product SET stock = stock - #{amount} WHERE id = #{productId} AND stock >= #{amount}")
    int reduceStock(@Param("productId") Long productId, @Param("amount") Integer amount);

}
3.3.7 ProductServiceApplication
创建 ProductServiceApplication 类,用于启动商品服务。代码如下:
@SpringBootApplication
public class ProductServiceApplication {

    public static void main(String[] args) {
        SpringApplication.run(ProductServiceApplication.class, args);
    }

}
3.4 账户服务
新建 lab-52-seata-at-httpclient-demo-account-service 项目,作为账户 服务。它主要提供 /account/reduce-balance 接口,实现扣除账户的余额逻辑。
友情提示:整体内容和「2.5 账户模块」一致。
3.4.1 引入依赖
创建 pom.xml 文件,引入相关的依赖。和「3.2.1 引入依赖」是一致的,就不重复"贴"出来了,胖友点击 pom.xml 文件查看。
3.4.2 配置文件
创建 application.yaml 配置文件,添加相关的配置项。和「3.2.2 配置文件」是一致的,就不重复"贴"出来了,胖友点击 application.yaml 文件查看。
3.4.3 AccountController
创建 AccountController 类,提供 /account/reduce-balance 扣除余额 HTTP API。代码如下:
@RestController
@RequestMapping("/account")
public class AccountController {

    private Logger logger = LoggerFactory.getLogger(AccountController.class);

    @Autowired
    private AccountService accountService;

    @PostMapping("/reduce-balance")
    public Boolean reduceBalance(@RequestBody AccountReduceBalanceDTO accountReduceBalanceDTO) {
        logger.info("[reduceBalance] 收到减少余额请求, 用户:{}, 金额:{}", accountReduceBalanceDTO.getUserId(),
                accountReduceBalanceDTO.getPrice());
        try {
            accountService.reduceBalance(accountReduceBalanceDTO.getUserId(), accountReduceBalanceDTO.getPrice());
            // 正常扣除余额,返回 true
            return true;
        } catch (Exception e) {
            // 失败扣除余额,返回 false
            return false;
        }
    }

}- 该 API 中,会调用 AccountService 进行扣除余额,最终通过返回结果为
true或者false,表示扣除余额成功或是失败。
其中,AccountReduceBalanceDTO 为账户减少余额 DTO 类,代码如下:
public class AccountReduceBalanceDTO {

    /**
     * 用户编号
     */
    private Long userId;

    /**
     * 扣减金额
     */
    private Integer price;

    public Long getUserId() {
        return userId;
    }

    // ... 省略 setter/getter 方法

}
3.4.4 AccountService
创建 AccountService 类,定义扣除余额的方法。代码如下:
/**
 * 账户 Service
 */
public interface AccountService {

    /**
     * 扣除余额
     *
     * @param userId 用户编号
     * @param price  扣减金额
     * @throws Exception 失败时抛出异常
     */
    void reduceBalance(Long userId, Integer price) throws Exception;

}
3.4.5 AccountServiceImpl
创建 AccountServiceImpl 类,实现扣除余额的方法。代码如下:
@Service
public class AccountServiceImpl implements AccountService {

    private Logger logger = LoggerFactory.getLogger(getClass());

    @Autowired
    private AccountDao accountDao;

    @Override
    @Transactional(propagation = Propagation.REQUIRES_NEW) // <1> 开启新事物
    public void reduceBalance(Long userId, Integer price) throws Exception {
        logger.info("[reduceBalance] 当前 XID: {}", RootContext.getXID());

        // <2> 检查余额
        checkBalance(userId, price);

        logger.info("[reduceBalance] 开始扣减用户 {} 余额", userId);
        // <3> 扣除余额
        int updateCount = accountDao.reduceBalance(price);
        // 扣除成功
        if (updateCount == 0) {
            logger.warn("[reduceBalance] 扣除用户 {} 余额失败", userId);
            throw new Exception("余额不足");
        }
        logger.info("[reduceBalance] 扣除用户 {} 余额成功", userId);
    }

    private void checkBalance(Long userId, Integer price) throws Exception {
        logger.info("[checkBalance] 检查用户 {} 余额", userId);
        Integer balance = accountDao.getBalance(userId);
        if (balance < price) {
            logger.warn("[checkBalance] 用户 {} 余额不足,当前余额:{}", userId, balance);
            throw new Exception("余额不足");
        }
    }

}
<1> 处,在类上,添加了 Spring @Transactional 注解,声明本地事务 。也就是说,此处会开启一个 seata_account 库的数据库事务。
<2> 处,检查余额是否足够,如果不够则抛出 Exception 异常。因为我们需要通过异常,回滚全局异常。
<3> 处,进行扣除余额,如果扣除失败则抛出 Exception 异常。
3.4.6 AccountDao
创建 AccountDao 接口,定义查询和扣除余额的操作。代码如下:
@Mapper
@Repository
public interface AccountDao {

    /**
     * 获取账户余额
     *
     * @param userId 用户 ID
     * @return 账户余额
     */
    @Select("SELECT balance FROM account WHERE id = #{userId}")
    Integer getBalance(@Param("userId") Long userId);

    /**
     * 扣减余额
     *
     * @param price 需要扣减的数目
     * @return 影响记录行数
     */
    @Update("UPDATE account SET balance = balance - #{price} WHERE id = 1 AND balance >= ${price}")
    int reduceBalance(@Param("price") Integer price);

}
3.4.7 AccountServiceApplication
创建 AccountServiceApplication 类,用于启动商品服务。代码如下:
@SpringBootApplication
public class AccountServiceApplication {

    public static void main(String[] args) {
        SpringApplication.run(AccountServiceApplication.class, args);
    }

}
3.5 简单测试
下面,我们将测试两种情况:
- 分布式事务正常提交
- 分布式事务异常回滚
Debug 执行 Order ServiceApplication 启动订单服务。此时,我们可以看到 Seata 相关日志如下:
友情提示:日志的顺序,艿艿做了简单的整理,为了更容易阅读。
# ... 上面还有 Seata 相关 Bean 初始化的日志,忘记加进来了,嘿嘿~

# 给数据源增加 Seata 的数据源代理
2020-04-05 10:51:00.687  INFO 52124 --- [           main] s.s.a.d.SeataDataSourceBeanPostProcessor : Auto proxy of [dataSource]
2020-04-05 10:51:00.688  INFO 52124 --- [           main] com.zaxxer.hikari.HikariDataSource       : HikariPool-1 - Starting...
2020-04-05 10:51:00.833  INFO 52124 --- [           main] com.zaxxer.hikari.HikariDataSource       : HikariPool-1 - Start completed.
# 加载 Druid 提供的 SQL 解析器
2020-04-05 10:51:00.881  INFO 52124 --- [           main] i.s.common.loader.EnhancedServiceLoader  : load DbTypeParser[druid] extension by class[io.seata.sqlparser.druid.DruidDelegatingDbTypeParser]
# 连接到 Seata TC Server 服务器
2020-04-05 10:51:00.892  INFO 52124 --- [           main] i.s.c.r.netty.NettyClientChannelManager  : will connect to 127.0.0.1:8091
2020-04-05 10:51:00.893  INFO 52124 --- [           main] i.s.core.rpc.netty.NettyPoolableFactory  : NettyPool create channel to transactionRole:RMROLE,address:127.0.0.1:8091,msg:< RegisterRMRequest{resourceIds='jdbc:mysql://127.0.0.1:3306/seata_order', applicationId='order-service', transactionServiceGroup='order-service-group'} >
# 加载 Seata 序列化器
2020-04-05 10:51:01.042  INFO 52124 --- [lector_RMROLE_1] i.s.common.loader.EnhancedServiceLoader  : load Serializer[SEATA] extension by class[io.seata.serializer.seata.SeataSerializer]
# 注册 Seata Resource Manager 到 Seata TC Server 成功
2020-04-05 10:51:00.892  INFO 52124 --- [           main] io.seata.core.rpc.netty.RmRpcClient      : RM will register :jdbc:mysql://127.0.0.1:3306/seata_order
2020-04-05 10:51:01.054  INFO 52124 --- [           main] io.seata.core.rpc.netty.RmRpcClient      : register RM success. server version:1.1.0,channel:[id: 0xc7553923, L:/127.0.0.1:64449 - R:/127.0.0.1:8091]
2020-04-05 10:51:01.061  INFO 52124 --- [           main] i.s.core.rpc.netty.NettyPoolableFactory  : register success, cost 34 ms, version:1.1.0,role:RMROLE,channel:[id: 0xc7553923, L:/127.0.0.1:64449 - R:/127.0.0.1:8091]
# 因为 OrderServiceImpl 添加了 `@GlobalTransactional` 注解,所以创建其代理,用于全局事务。
2020-04-05 10:51:01.157  INFO 52124 --- [           main] i.s.s.a.GlobalTransactionScanner         : Bean[cn.iocoder.springboot.lab52.orderservice.service.OrderServiceImpl] with name [orderServiceImpl] would use interceptor [io.seata.spring.annotation.GlobalTransactionalInterceptor]
执行 Product ServiceApplication 启动商品 服务。相关的日志,胖友自己瞅瞅。
执行 Account ServiceApplication 启动账户服务。相关的日志,胖友自己瞅瞅。
3.5.1 正常流程
① 先查询下目前数据库的数据情况。如下图所示: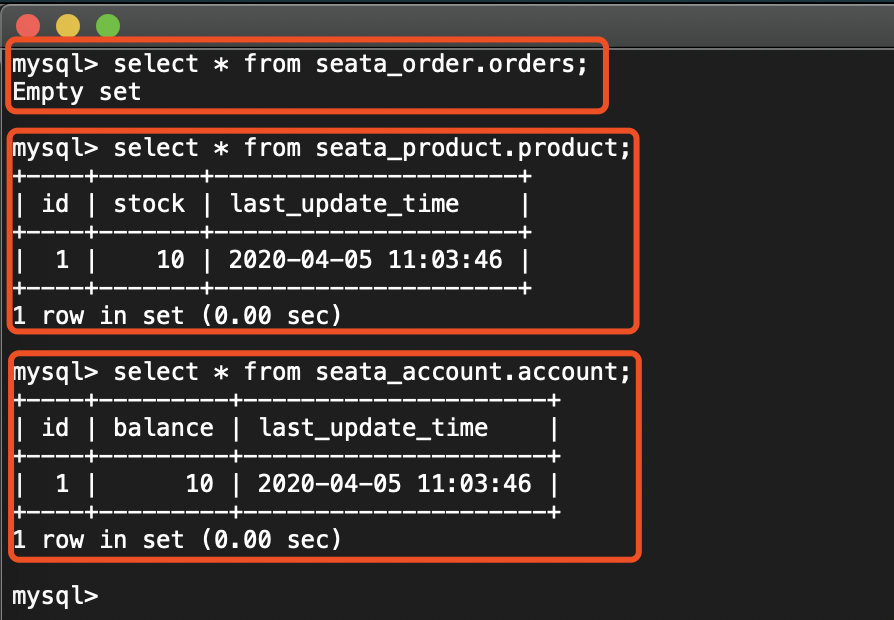
② 使用 Postman 模拟调用 http://127.0.0.1:8081/order/create 创建订单的接口,如下图所示: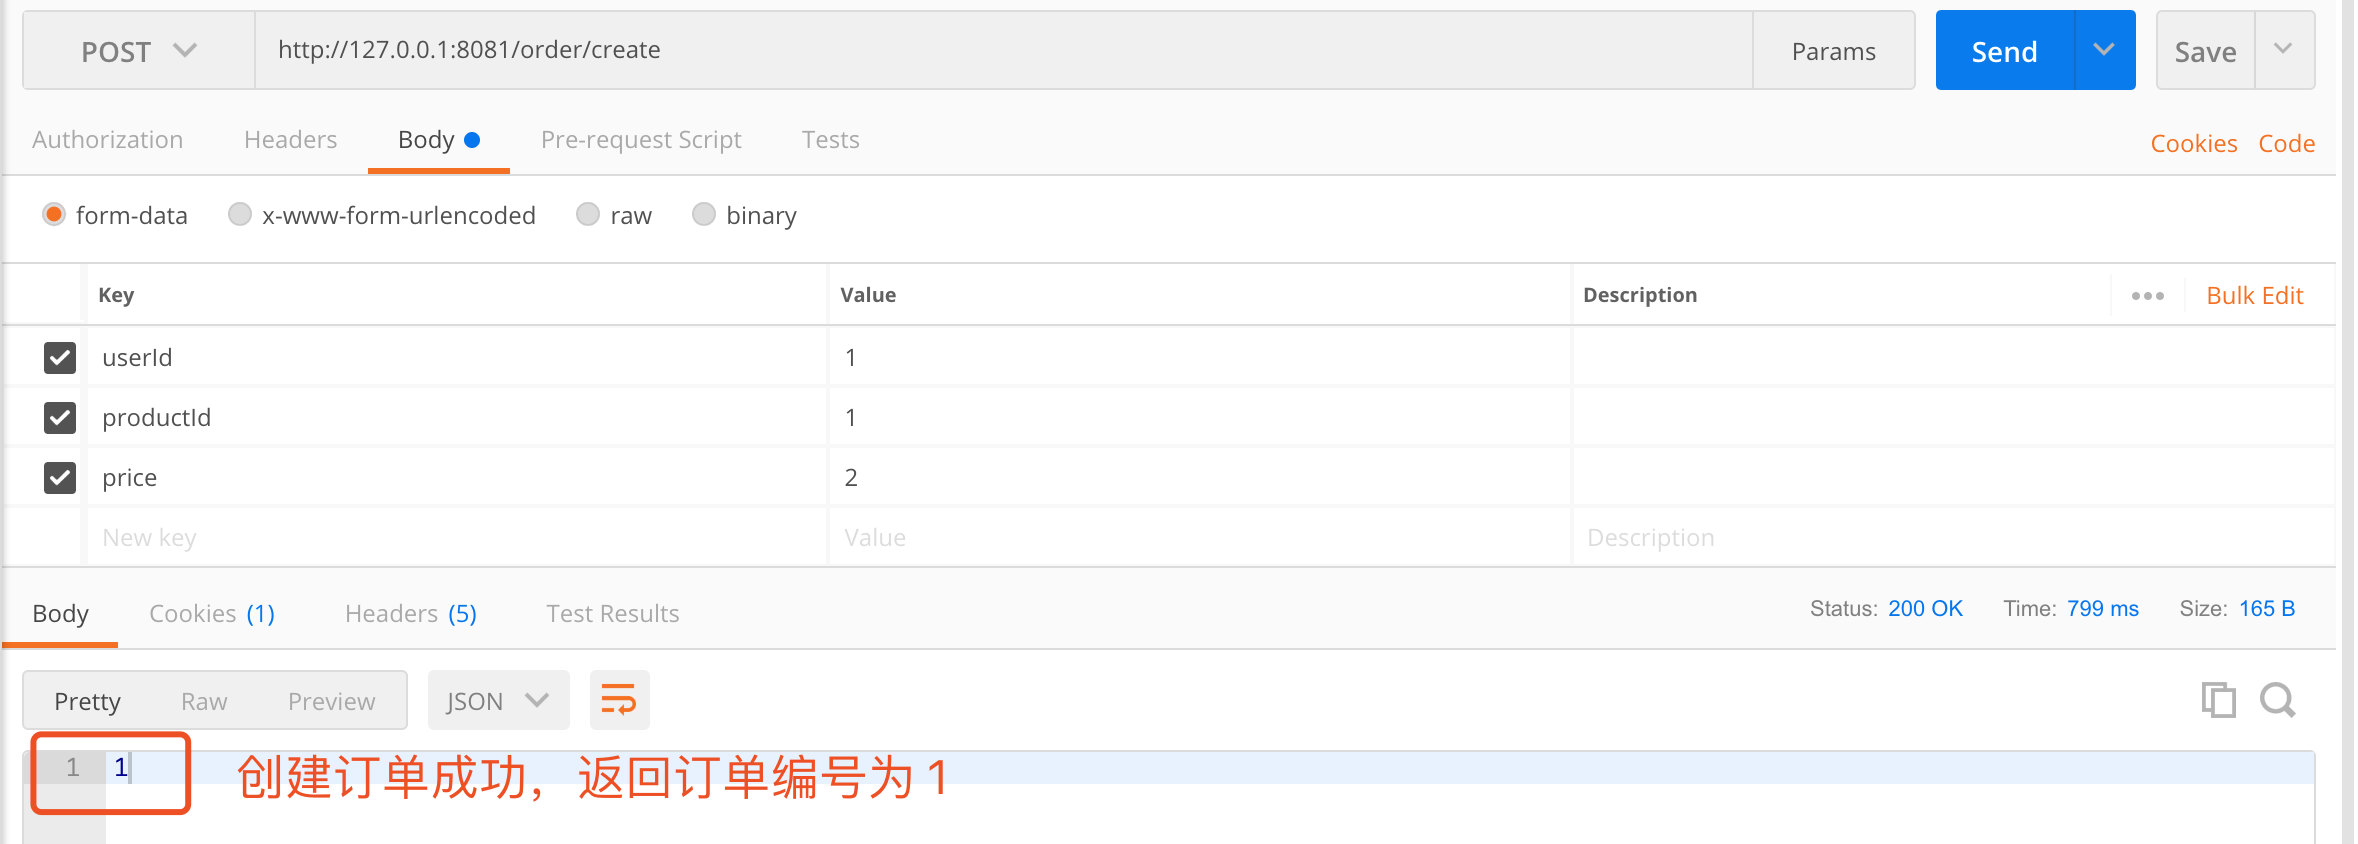
此时,在控制台打印日志如下图所示:
- 订单 服务:

- 商品 服务:

- 账户 服务:

再查询下目前数据库的数据情况。如下图所示: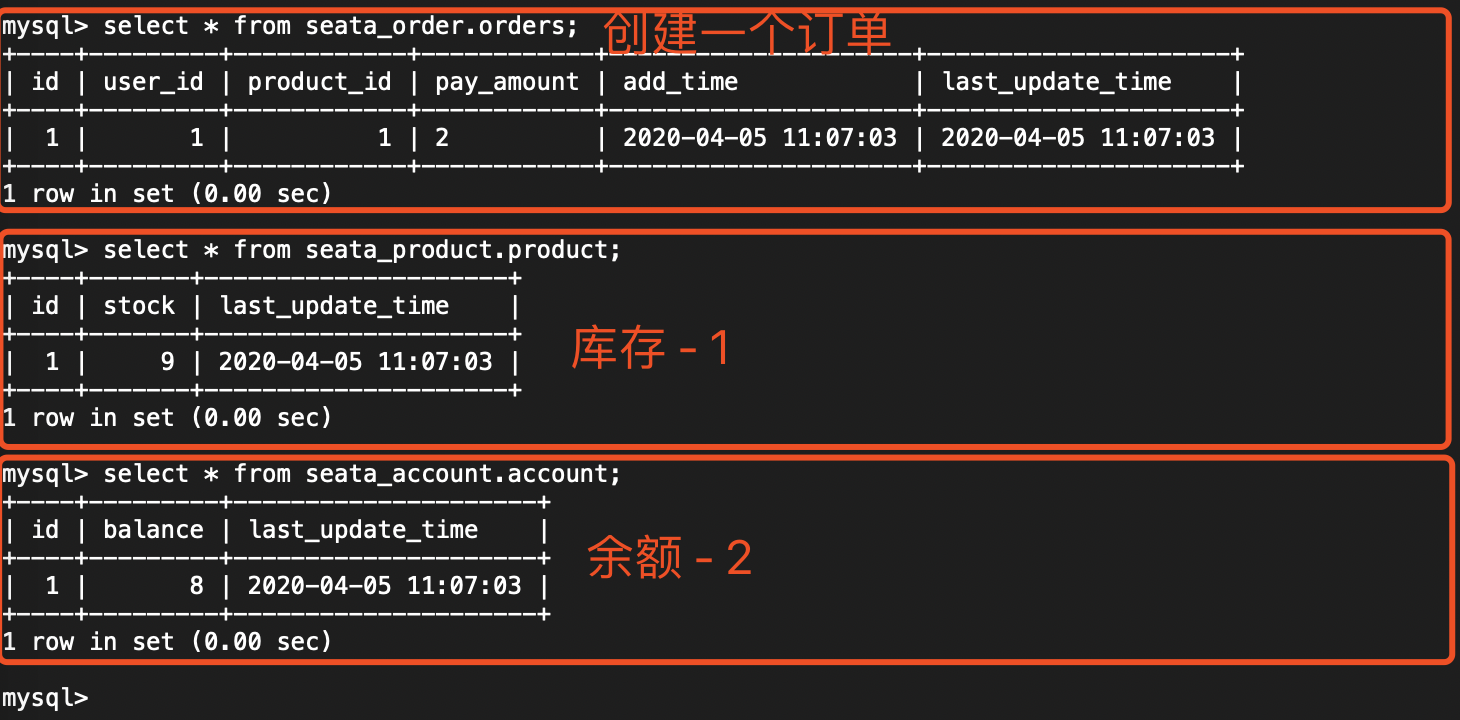
3.5.2 异常流程
① 先查询下目前数据库的数据情况。如下图所示: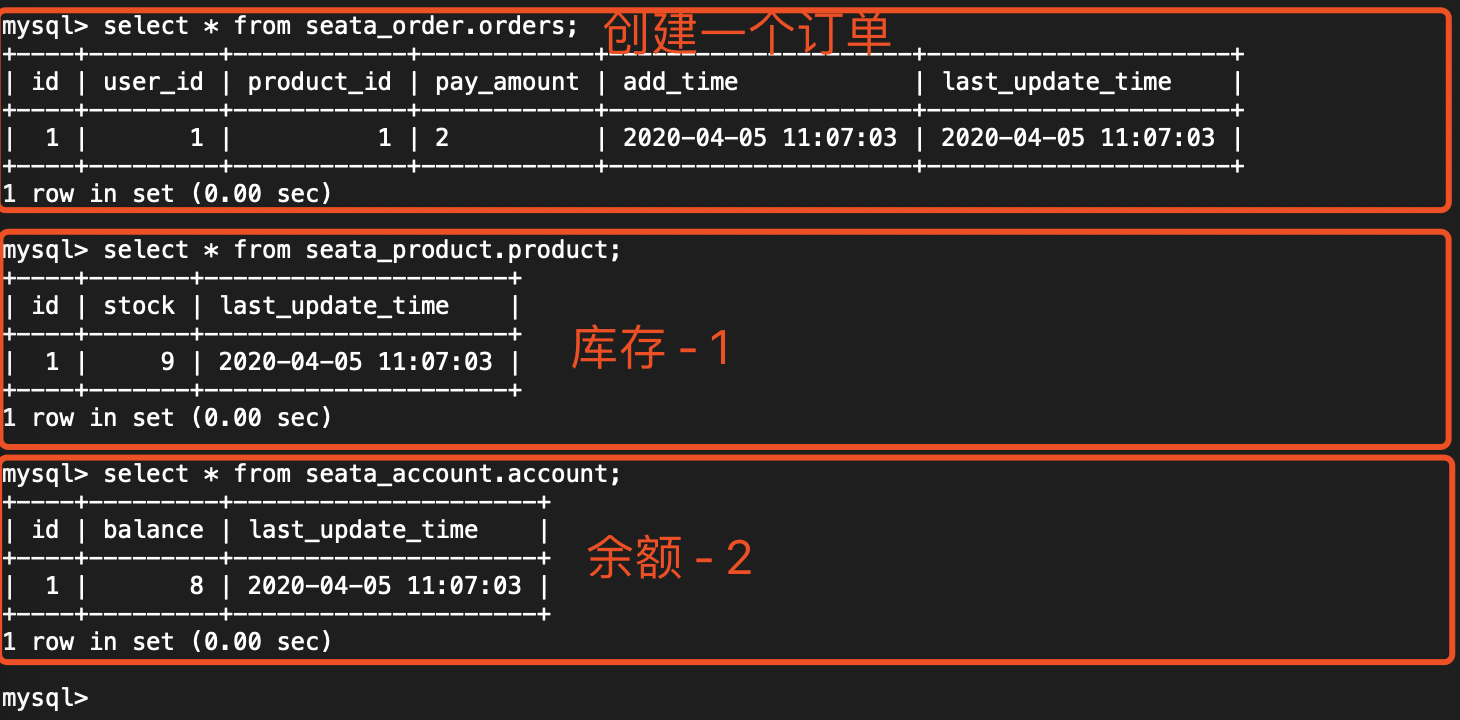
② 在 OrderServiceImpl 的 #createOrder(...) 方法上,打上断点如下图,方便我们看到 product 表的 balance 被减少: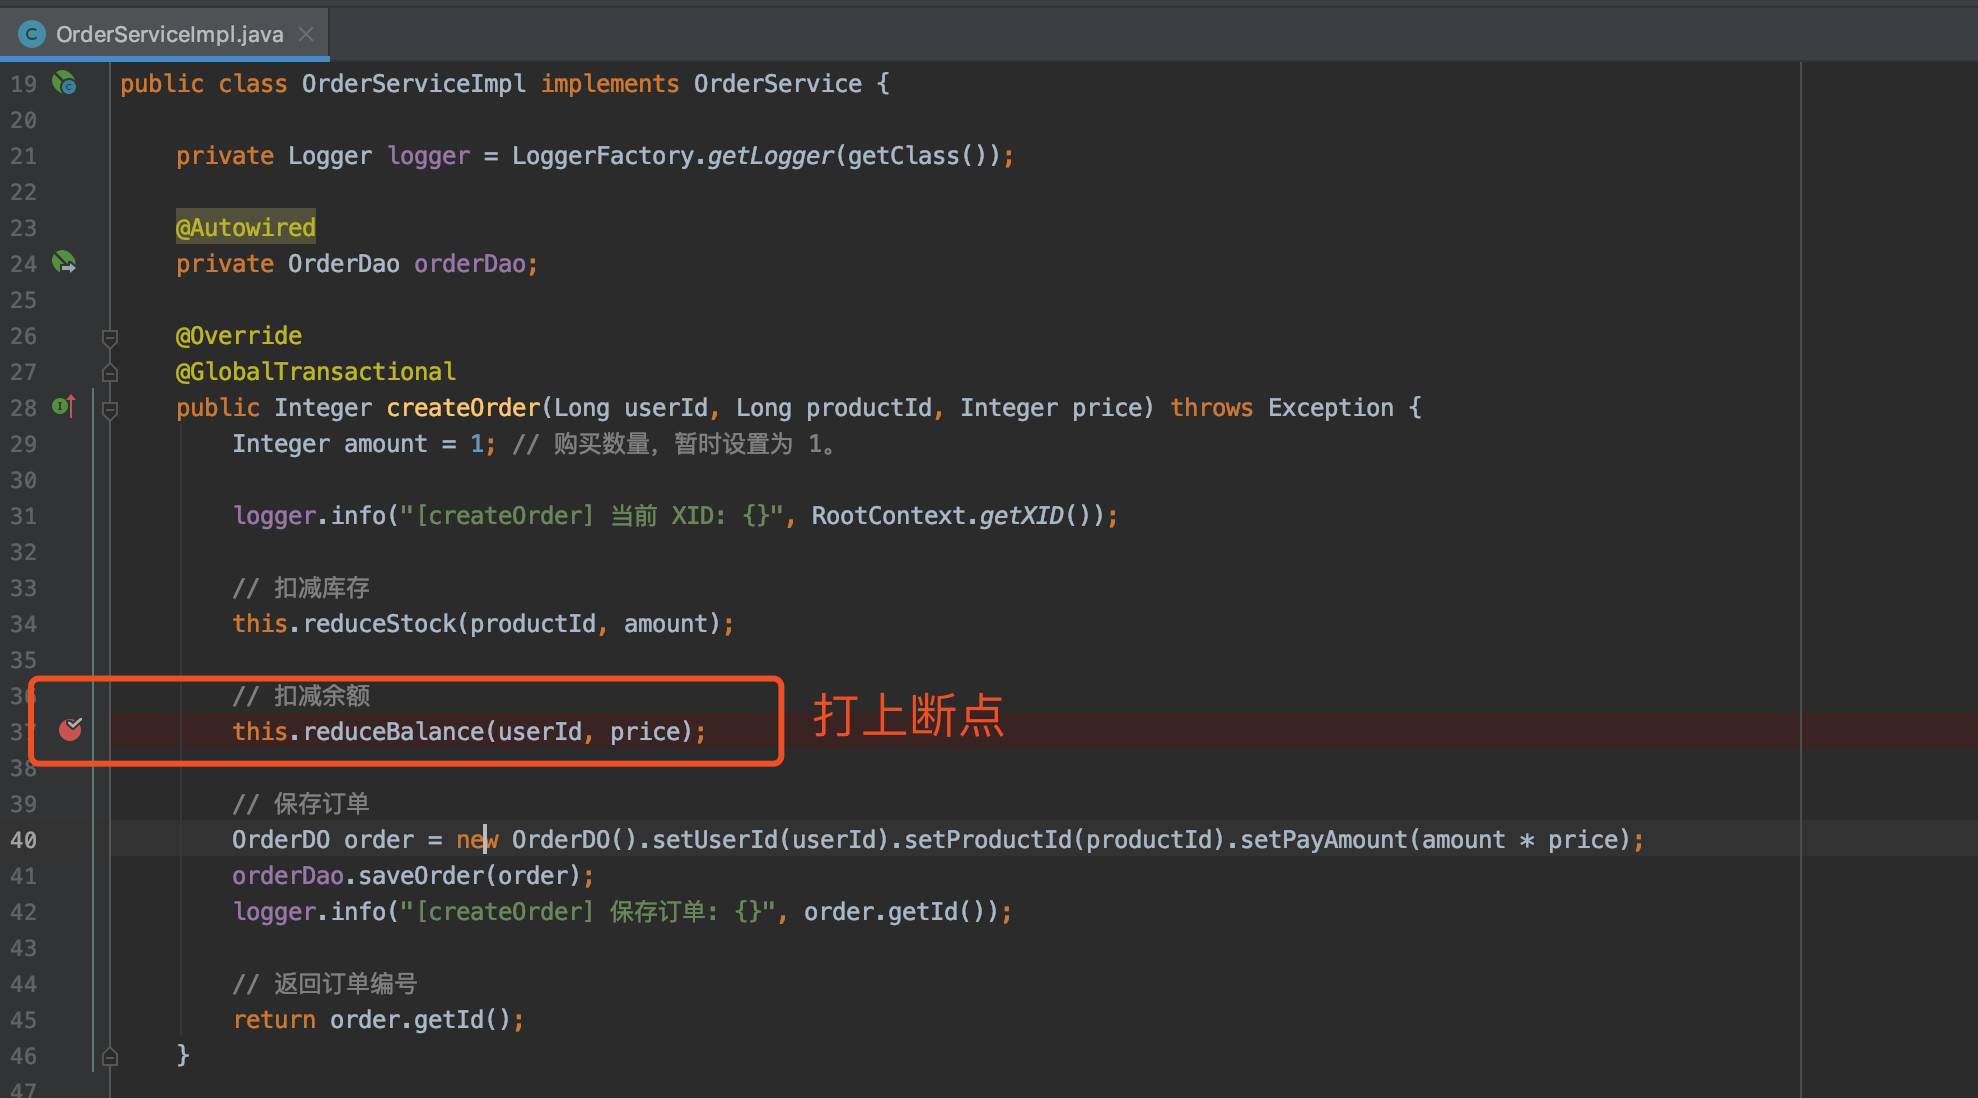
友情提示:这里忘记截图了,稍后 IDEA 停留在该断点时,胖友可以去查询
product表,会发现balance已经减少。
③ 使用 Postman 模拟调用 http://127.0.0.1:8081/order/create 创建订单的接口,如下图所示:
此时,在控制台打印日志如下图所示:
- 订单 服务:

- 商品 服务:

- 账户 服务:

再查询下目前数据库的数据情况。如下图所示: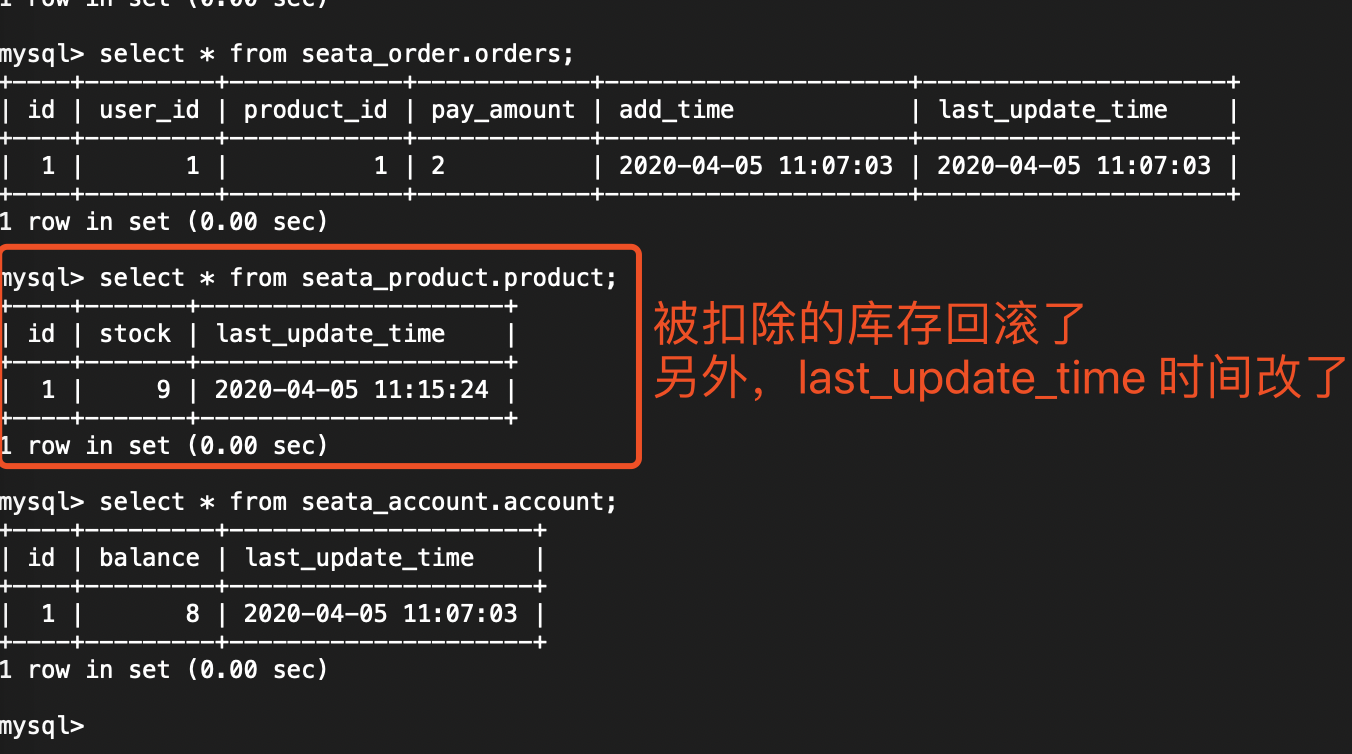
来源:https://blog.csdn.net/weixin_42073629/article/details/105827437

