41.Spring Boot 事件机制 Event 入门
41.Spring Boot 事件机制 Event 入门
1. 概述
在设计模式中,观察者模式是一个比较常用的设计模式。维基百科解释如下:
FROM https://zh.wikipedia.org/wiki/观察者模式
观察者模式是软件设计模式的一种。在此种模式中,一个目标对象管理所有相依于它的观察者对象,并且在它本身的状态改变时主动发出通知。这通常透过呼叫各观察者所提供的方法来实现。
此种模式通常被用来实时事件处理系统。
在我们日常业务开发中,观察者模式对我们很大的一个作用,在于实现业务的解耦。以用户注册的场景来举例子,假设在用户注册完成时,需要给该用户发送邮件、发送优惠劵等等操作,如下图所示:

- UserService 在完成自身的用户注册逻辑之后,仅仅只需要发布一个 UserRegisterEvent 事件,而无需关注其它拓展逻辑。
- 其它 Service 可以自己订阅 UserRegisterEvent 事件,实现自定义的拓展逻辑。
友情提示:很多时候,我们会把观察者模式 和发布订阅模式放在一起对比。
简单来说,发布订阅模式属于广义上 的观察者模式,在观察者模式的 Subject 和 Observer 的基础上,引入 Event Channel 这个中介,进一步解耦。如下图所示:
进一步的讨论,胖友可以瞅瞅《观察者模式和发布订阅模式有什么不同?》的讨论。

2. Spring 事件机制
Spring 基于观察者模式,实现了自身的事件机制,由三部分组成:
- 事件 ApplicationEvent:通过继承 它,实现自定义事件。另外,通过它的
source属性可以获取事件源 ,timestamp属性可以获得发生时间。 - 事件发布者 ApplicationEventPublisher:通过它,可以进行事件的发布。
- 事件监听器 ApplicationListener:通过实现它,进行指定类型的事件的监听。
友情提示:JDK 也内置了事件机制的实现,考虑到通用性,Spring 的事件机制是基于它之上进行拓展。因此,ApplicationEvent 继承自
java.util.EventObject,ApplicationListener 继承自java.util.EventListener。
3. 入门示例
示例代码对应仓库:
lab-54-demo。
看完一些基础的概念,我们来撸个 Spring 事件机制的入门示例,具体的场景还是以用户注册 为例子。新建 lab-54-demo 项目,最终项目如下图:
3.1 引入依赖
在 pom.xml 文件中,引入相关依赖。
<?xml version="1.0" encoding="UTF-8"?>
<project xmlns="http://maven.apache.org/POM/4.0.0"
         xmlns:xsi="http://www.w3.org/2001/XMLSchema-instance"
         xsi:schemaLocation="http://maven.apache.org/POM/4.0.0 http://maven.apache.org/xsd/maven-4.0.0.xsd">
    <parent>
        <groupId>org.springframework.boot</groupId>
        <artifactId>spring-boot-starter-parent</artifactId>
        <version>2.2.2.RELEASE</version>
        <relativePath/> <!-- lookup parent from repository -->
    </parent>
    <modelVersion>4.0.0</modelVersion>

    <artifactId>lab-54-demo</artifactId>

    <dependencies>
        <!-- 实现对 Spring MVC 的自动化配置 -->
        <dependency>
            <groupId>org.springframework.boot</groupId>
            <artifactId>spring-boot-starter-web</artifactId>
        </dependency>
    </dependencies>

</project>
引入 spring-boot-starter-web 依赖的原因,是稍后会提供示例 API 接口,方便测试。
3.2 UserRegisterEvent
创建 UserRegisterEvent 事件类,继承 ApplicationEvent 类,用户注册事件。代码如下:
public class UserRegisterEvent extends ApplicationEvent {

    /**
     * 用户名
     */
    private String username;

    public UserRegisterEvent(Object source) {
        super(source);
    }

    public UserRegisterEvent(Object source, String username) {
        super(source);
        this.username = username;
    }

    public String getUsername() {
        return username;
    }

}
通过在 UserRegisterEvent 类中,定义成员变量 username,将用户名附带上。
3.3 UserService
创建 UserService 类,用户 Service。代码如下:
@Service
public class UserService implements ApplicationEventPublisherAware { // <1>

    private Logger logger = LoggerFactory.getLogger(getClass());

    private ApplicationEventPublisher applicationEventPublisher;

    @Override
    public void setApplicationEventPublisher(ApplicationEventPublisher applicationEventPublisher) {
        this.applicationEventPublisher = applicationEventPublisher;
    }

    public void register(String username) {
        // ... 执行注册逻辑
        logger.info("[register][执行用户({}) 的注册逻辑]", username);

        // <2> ... 发布
        applicationEventPublisher.publishEvent(new UserRegisterEvent(this, username));
    }

}
<1> 处,实现 ApplicationEventPublisherAware 接口,从而将 ApplicationEventPublisher 注入到其中。
<2> 处,在执行完注册逻辑后,调用 ApplicationEventPublisher 的 #publishEvent(ApplicationEvent event) 方法,发布「3.2 UserRegisterEvent」事件。
3.4 EmailService
创建 EmailService 类,邮箱 Service。代码如下:
@Service
public class EmailService implements ApplicationListener<UserRegisterEvent> { // <1>

    private Logger logger = LoggerFactory.getLogger(getClass());

    @Override
    @Async // <3>
    public void onApplicationEvent(UserRegisterEvent event) { // <2>
        logger.info("[onApplicationEvent][给用户({}) 发送邮件]", event.getUsername());
    }

}
<1> 处,实现 ApplicationListener 接口,通过 E 泛型设置感兴趣的事件。
<2> 处,实现 #onApplicationEvent(E event) 方法,针对监听的 UserRegisterEvent 事件,进行自定义处理。
【可以不加】<3> 处,锦上添花,设置 @Async 注解,声明异步执行。毕竟实际场景下,发送邮件可能比较慢,又是非关键逻辑。
友情提示:对
@Async注解感兴趣的胖友,可以阅读《芋道 Spring Boot 异步任务入门》文章。
3.5 CouponService
创建 CouponService 类,优惠劵 Service。代码如下:
@Service
public class CouponService {

    private Logger logger = LoggerFactory.getLogger(getClass());

    @EventListener // <1>
    public void addCoupon(UserRegisterEvent event) {
        logger.info("[addCoupon][给用户({}) 发放优惠劵]", event.getUsername());
    }

}
<1> 处,在方法上,添加 @EventListener 注解,并设置监听的事件为 UserRegisterEvent。这是另一种使用方式!
3.6 DemoController
创建 DemoController 类,提供 /demo/register 注册接口。代码如下:
@RestController
@RequestMapping("/demo")
public class DemoController {

    @Autowired
    private UserService userService;

    @GetMapping("/register")
    public String register(String username) {
        userService.register(username);
        return "success";
    }

}
3.7 DemoApplication
创建 DemoApplication 类,应用启动类。代码如下:
@SpringBootApplication
@EnableAsync // 开启 Spring 异步的功能
public class DemoApplication {

    public static void main(String[] args) {
        SpringApplication.run(DemoApplication.class, args);
    }

}
3.8 简单测试
① 执行 DemoApplication 类,启动项目。
② 调用 http://127.0.0.1:8080/demo/register?username=yudaoyuanma 接口,进行注册。IDEA 控制台打印日志如下:
# UserService 发布 UserRegisterEvent 事件
2020-04-06 13:09:39.145  INFO 18615 --- [nio-8080-exec-1] c.i.s.l.eventdemo.service.UserService    : [register][执行用户(yudaoyuanma) 的注册逻辑]
# CouponService 监听处理该事件
2020-04-06 13:09:39.147  INFO 18615 --- [nio-8080-exec-1] c.i.s.l.eventdemo.service.CouponService  : [addCoupon][给用户(yudaoyuanma) 发放优惠劵]
# EmailService 监听处理该事件
2020-04-06 13:09:39.154  INFO 18615 --- [         task-1] c.i.s.l.eventdemo.service.EmailService   : [onApplicationEvent][给用户(yudaoyuanma) 发送邮件]
4. Spring 内置事件
在 Spring 框架中,自定义了非常多的自定义事件,让我们更容易的进行拓展。下面,我们来简单举一些例子。
4.1 ApplicationContextEvent
ApplicationContextEvent 是 Spring Context 相关的事件基类,如下图所示:
友情提示:Spring Context 可以简单理解成 IoC 容器。

- ContextStartedEvent:Spring Context 启动完成事件。
- ContextStoppedEvent:Spring Context 停止完成事件。
- ContextClosedEvent:Spring Context 停止开始事件。
- ContextRefreshedEvent:Spring Context 初始化或刷新完成事件。
也就是说,在 Spring Context 的整个生命周期中,会发布相应的 ApplicationContextEvent 事件。
SpringApplicationEvent 是 Spring Boot Application(应用)相关的事件基类,如下图所示:
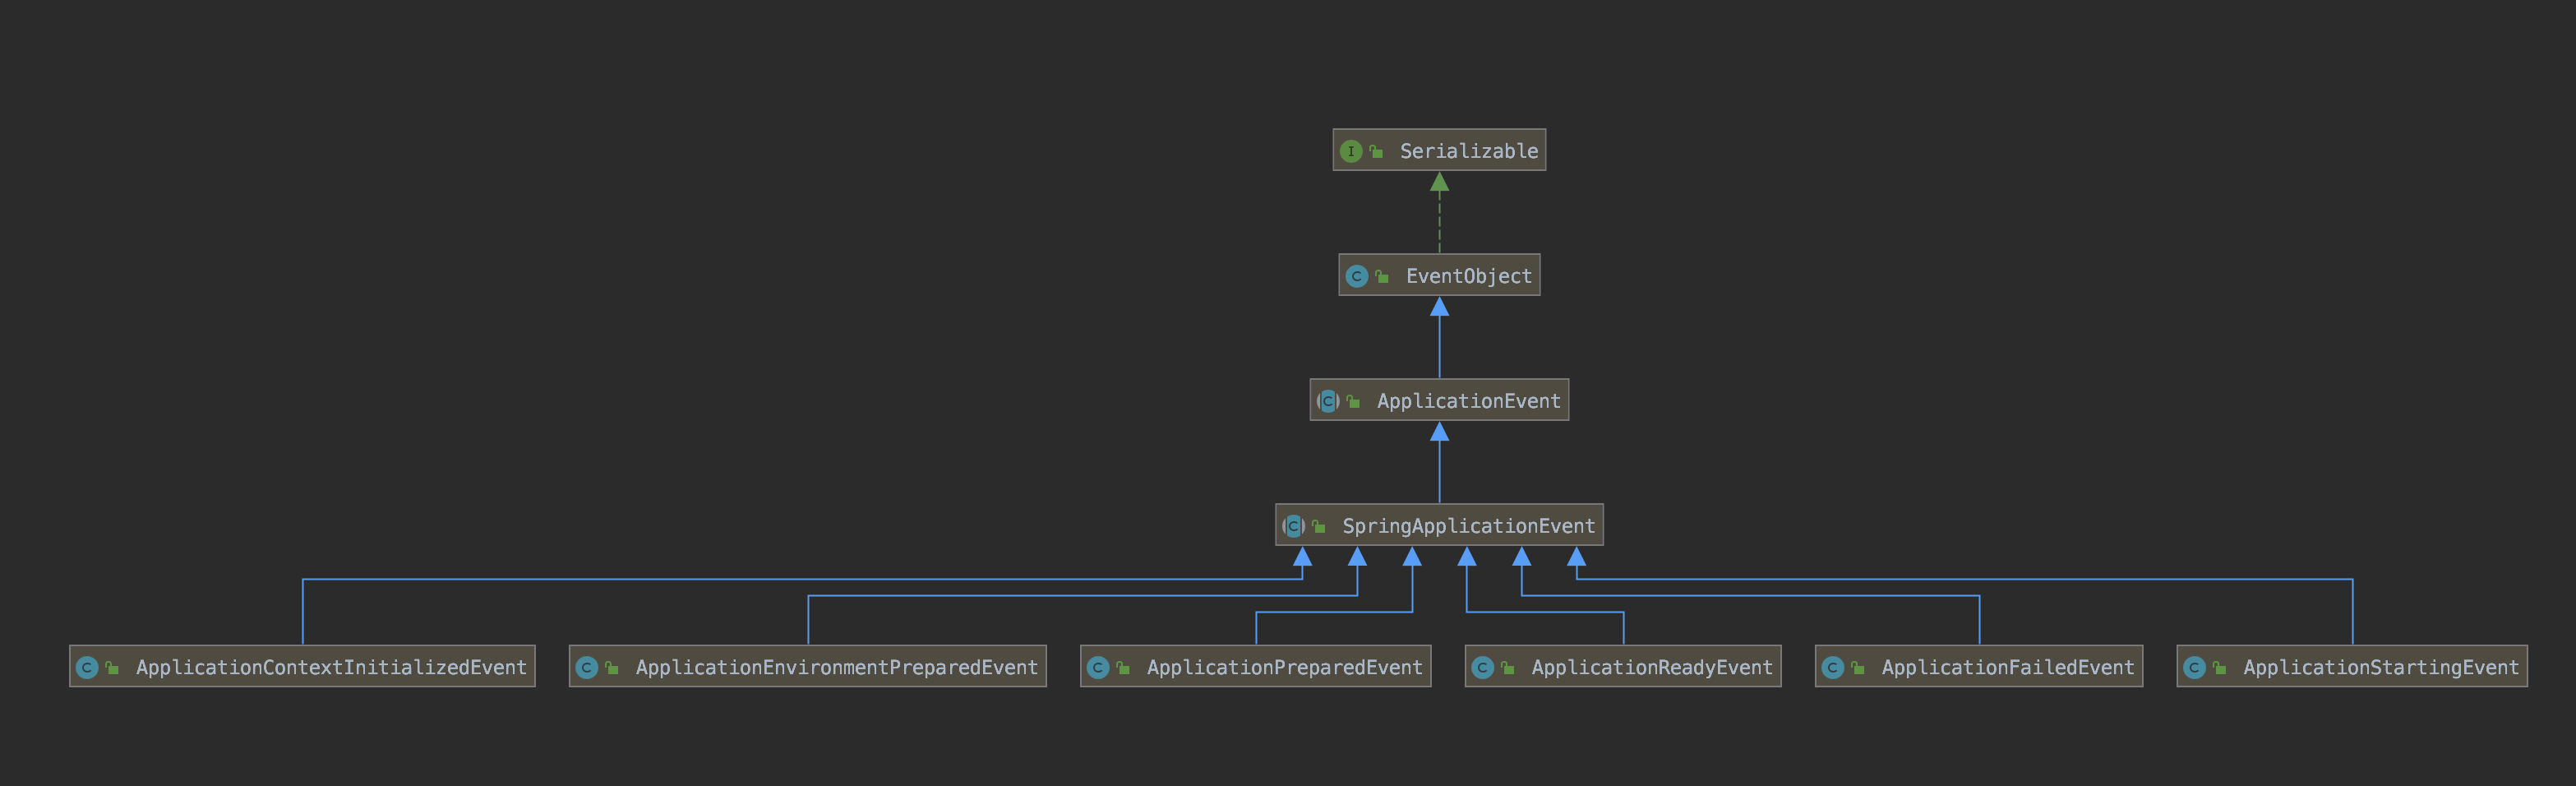
- ApplicationStartingEvent:Application 启动开始事件。
- ApplicationEnvironmentPreparedEvent:Spring Environment 准备完成的事件。
- ApplicationContextInitializedEvent:Spring Context 准备完成,但是 Bean Definition 未加载时的事件
- ApplicationPreparedEvent:Spring Context 准备完成,但是未刷新时的事件。
- ApplicationReadyEvent:Application 启动成功事件。
- ApplicationFailedEvent:Application 启动失败事件。
也就是说,在 Application 的整个生命周期中,会发布相应的 SpringApplicationEvent 事件。
通过 ApplicationContextEvent 和 SpringApplicationEvent 事件,我们在《芋道 Spring Boot 持续交付 Jenkins 入门》文章的「3. 优雅上下线」小节中,实现了 Spring Boot + Nginx 的优雅上下线。
4.2 RouteRefreshListener
在《芋道 Spring Cloud 网关 Spring Cloud Gateway 入门》文章的「6. 基于配置中心 Nacos 实现动态路由」小节中,我们可以看到 Spring Cloud Gateway 通过监听 RefreshRoutesEvent 事件,结合 Nacos 作为配置中心,实现网关路由动态刷新的功能。
友情提示:Spring Cloud Zuul 也是通过监听 RoutesRefreshedEvent 事件,实现网关路由动态刷新的功能。
4.3 RefreshRemoteApplicationEvent
在《芋道 Spring Cloud 配置中心 Spring Cloud Config 入门》文章的「5. 自动配置刷新(第二弹)」小节中,我们可以看到 Spring Cloud Config Client 通过监听 RefreshRemoteApplicationEvent 事件,结合 RabbitMQ 作为 Spring Cloud Bus 消息总线,实现本地配置刷新的功能。

至此,我们已经完成了对 Spring 事件机制的学习。当然,还有一些功能,胖友可以自己在倒腾倒腾。
① 如果胖友想要多个监听器按照指定顺序 执行,可以通过实现 Ordered 接口,指定其顺序。
② 如果胖友想要监听多种 ApplicationContext 事件,可以实现 SmartApplicationListener 接口,具体示例可以看看 SourceFilteringListener 类。
③ @TransactionalEventListener 注解,可以声明在当前事务"结束"时,执行相应的监听逻辑。
④ 可以通过实现 ApplicationEventMulticaster 接口,定义自定义的事件广播器,可以往里面添加和移除监听器,并发布事件给注册在其中的监听器。使用比较少,基本可以忽略。
来源:https://blog.csdn.net/weixin_42073629/article/details/106303089