51.Spring Boot 服务容错 Hystrix 入门
51.Spring Boot 服务容错 Hystrix 入门
1. 概述
在开始 Hystrix 的学习之前,我们先来一起瞅瞅"服务雪崩"、"服务容错"等的概念,方便我们理解为什么要使用 Hystrix 框架。
友情提示:本文是《芋道 Spring Cloud Netflix 服务容错 Hystrix 入门》的弟弟篇。所以内容上,会有蛮多重叠的地方。
写本文的主要目的是,分享在纯 Spring Boot 环境下,如何使用 Hystrix 框架。基本所有的网上文章,都是通过 Spring Cloud Netflix Hystrix 进行 Hystrix 的使用,这样就引入了大量 Spring Cloud 的依赖。而我们的希望,可能仅仅只想使用 https://github.com/Netflix/Hystrix 核心库。
不过绝大多数情况下,我们并不会在纯 Spring Boot 环境下,使用 Hystrix 实现服务容错。
1.1 服务雪崩
在微服务的架构体系中,我们会将系统拆分成多个服务小单元,通过 HTTP 或者 RPC 进行远程调用。如下图所示:
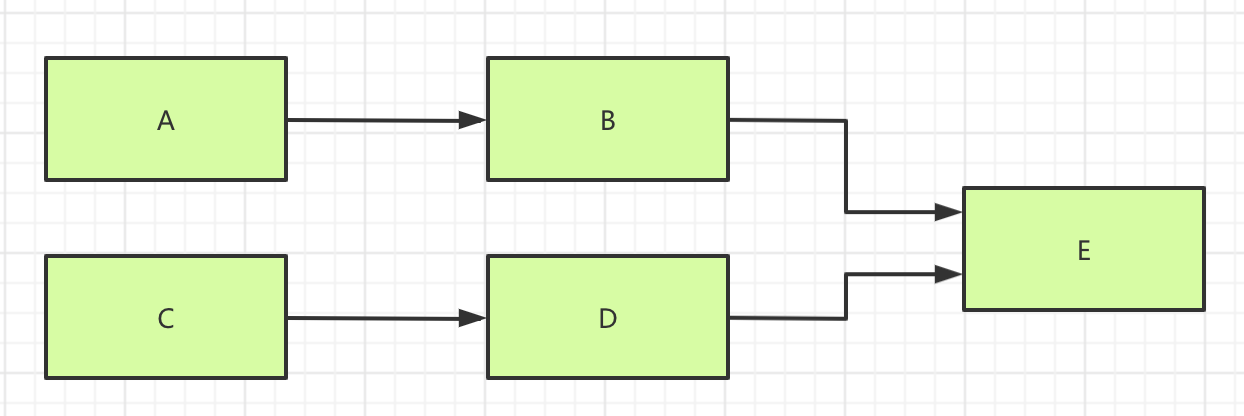
在绝大多数情况下,服务消费者都能正常 的远程调用服务提供者。但是某一时刻,服务提供者执行逻辑较慢 ,又或者网络出现抖动 的情况,导致服务消费调用服务提供者超时 或者失败。如下图所示:
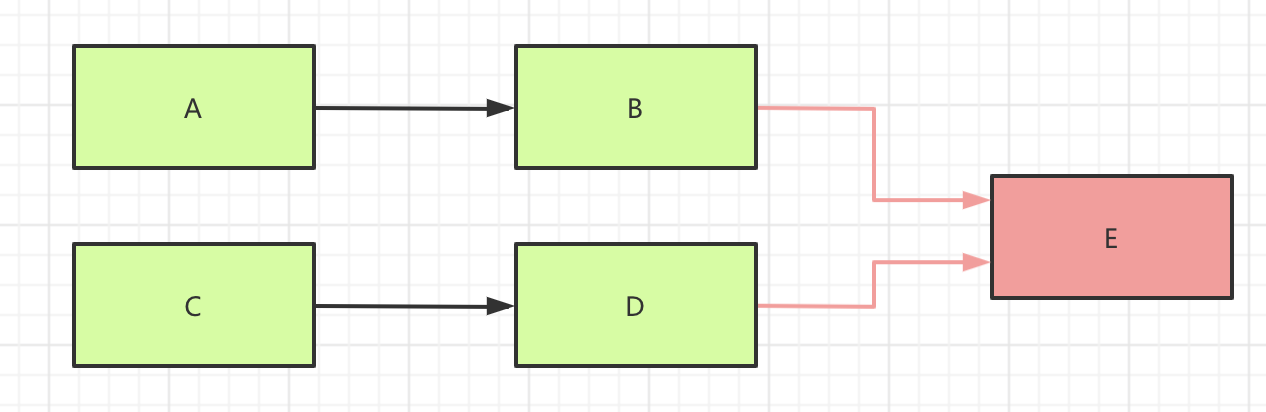
如果这个情况持续一段 时间,服务提供者的响应一直很慢 ,导致服务消费者的响应也跟着很慢 ,最终引起服务消费者的请求任务积压,也跟着一起出问题了。如下图所示:
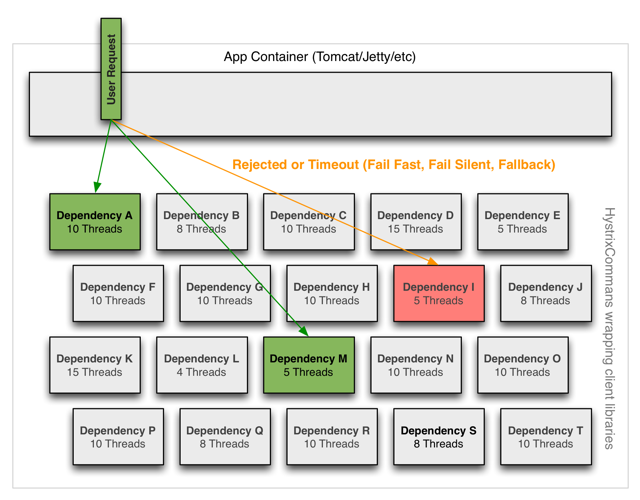
友情提示:以 SpringMVC 提供 API 接口举例子,因为 Tomcat 的线程池是有限的,如果个别请求处理很慢,会逐步占用到整个线程池,导致后续其它请求无法被处理。

这种因为一个下游 服务的故障,导致上游 服务一起跟着故障的现象,我们称为"服务雪崩"。
1.2 服务容错
针对"服务雪崩"的情况,我们需要进行"服务容错 "处理。解决的方向很"简单",尽量不要去调用故障 的服务,避免被拖垮。一般常用的手段有,主要是限流 和开关。
① 限流
通过限制 调用服务的频率 ,避免频繁调用故障服务,导致请求任务积压而自身雪崩。
② 开关
通过关闭 对故障服务的调用,停止调用故障服务,从而避免服务雪崩。当然,关闭的前提是,不调用故障服务的情况下,业务逻辑依然可以走下去,或者业务数据的完整性不会被破坏。
一般来说,开关会分成手动 开关和自动开关。手动开关比较好了解,自动开关是满足指定条件自动进行关闭。
自动 开关比较经典的就是"断路器模式 ",它源于 Martin Fowler 大佬在 《CircuitBreaker》 文章的分享。
"断路器",又称自动开关,它是一种既有手动开关作用,又能自动进行失压、欠压、过载、和短路保护的电器。
它可用来分配电能,不频繁地启动异步电动机,对电源线路及电动机等实行保护,**当它们发生严重的过载或者短路及欠压等故障时能自动切断电路,其功能相当于熔断器式开关与过欠热继电器等的组合。**而且在分断故障电流后一般不需要变更零部件,一获得了广泛的应用。
在微服务架构中,"断路器模式"的用途也是类似的。当某个服务提供者 发生故障(相当于电器发生短路的情况)时,断路器一旦监控到这个情况,会将开关 进行自动 关闭。之后,在服务消费者 调用该故障服务提供者 时,直接抛出错误异常,不进行调用,从而避免调用服务的漫长等待。
友情提示:如果这么描述比较晦涩,稍后我们以 Hystrix 提供的断路器功能,结合它的状态来具体来瞅瞅哈。
1.3 Hystrix
Hystrix 是 Netflix 开源的分布式系统的延迟和容错库。
Hystrix 供分布式系统使用,提供延迟和容错功能,隔离远程系统、访问和第三方程序库的访问点,防止级联失败,保证复杂的分布系统在面临不可避免的失败时,仍能有其弹性。
Netflix 称,在分布式环境中,不可避免会造成一些服务的失败。Hystrix 库旨在控制分布式服务中提供更大容限和服务失败之间的相互关系。Hystrix 通过隔离访问远程系统、服务和第三方库的点,阻止级联故障,从而使复杂的分布式系统更具弹性。
Hystrix 源于 Netflix API 团队在去年启动的弹性工程项目,在此期间,Hystrix 得到了不断发展,并逐渐成熟。现在,在 Netflix 网站中,每天有数十亿的独立线程和信号通过 Hystrix 进行调用,Hystrix 的运行时间和弹性也得到了显著的改善。

Hystrix 比较重要的是三个特性:1)Fallback 服务降级;2)断路器机制;3)资源隔离。
1.3.1 Fallback 服务降级
在服务调用失败时,我们可以通过 Hystrix 实现 Fallback 服务降级。
例如说,对于查询操作,我们给它实现一个 fallback 方法。当请求服务提供者发生异常时,我们可以执行 fallback 方法获得返回结果。示例代码如下:

一般情况下,fallback 方法的返回结果使用设置的默认值,又或者来自缓存。
友情提示:如果想要深入了解,可阅读《Hystrix 源码解析 ------ 请求执行(四)之失败回退逻辑》
1.3.2 断路器机制
Hystrix 内置断路器 HystrixCircuitBreaker 实现,一共有三种状态:
CLOSED:关闭OPEN:打开HALF_OPEN:半开
牛逼!HystrixCircuitBreaker 比较神来之笔,就是增加了
HALF_OPEN状态,不仅仅实现了自动化的关闭 ,还实现了自动化的打开。
其中,断路器处于 OPEN 状态时,链路处于非健康 状态,命令执行时,直接调用回退 逻辑,跳过正常逻辑。
HystrixCircuitBreaker 状态变迁如下图 :
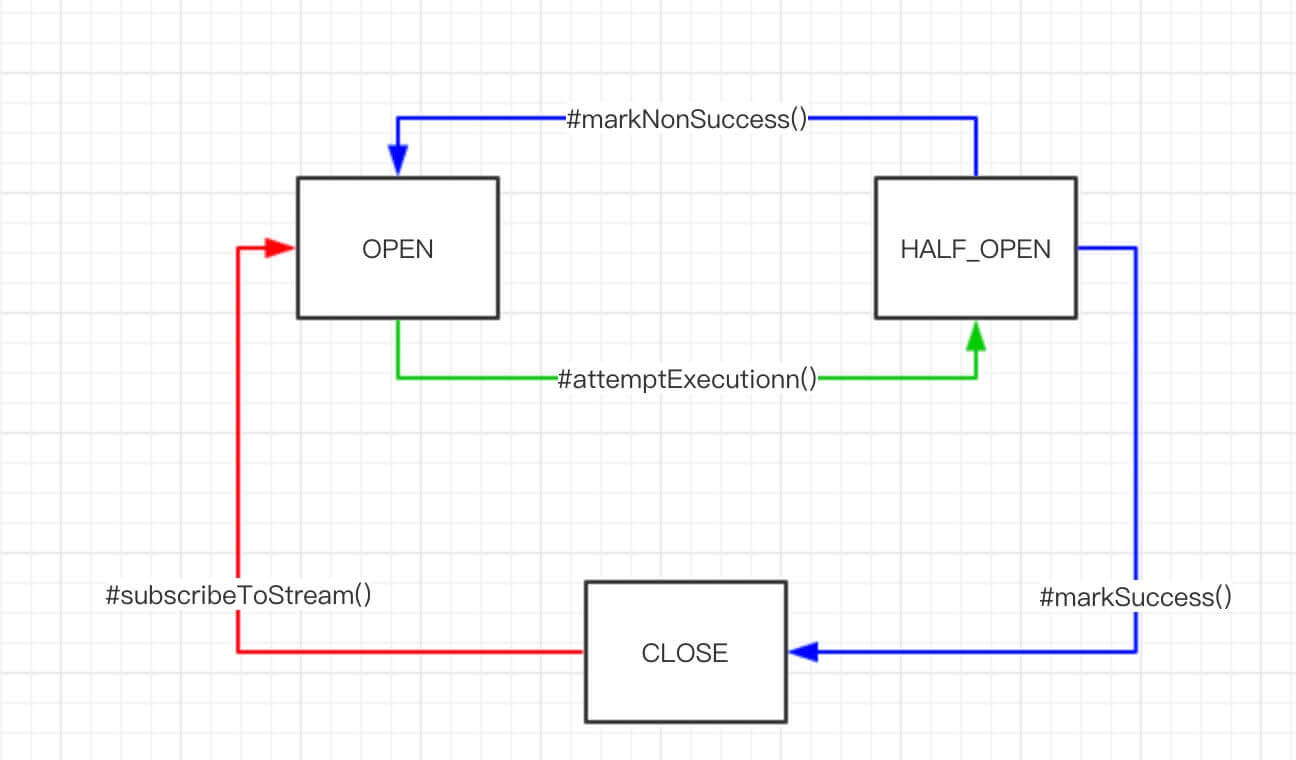
① 红线 :初始时,断路器处于 CLOSED 状态,链路处于健康 状态。当满足如下条件,断路器从 CLOSED 变成 OPEN 状态:
- 周期 ( 可配,
HystrixCommandProperties.default_metricsRollingStatisticalWindow = 10000 ms)内,总请求数超过一定量 ( 可配,HystrixCommandProperties.circuitBreakerRequestVolumeThreshold = 20) 。 - 错误 请求占总请求数超过一定比例 ( 可配,
HystrixCommandProperties.circuitBreakerErrorThresholdPercentage = 50%) 。
② 绿线 :断路器处于 OPEN 状态,命令执行时,若当前时间超过断路器开启 时间一定时间( HystrixCommandProperties.circuitBreakerSleepWindowInMilliseconds = 5000 ms ),断路器变成 HALF_OPEN 状态,尝试 调用正常 逻辑,根据执行是否成功,打开或关闭 熔断器【蓝线】。
友情提示:如果想要深入了解,可阅读《Hystrix 源码解析 ------ 断路器 HystrixCircuitBreaker》
1.3.3 资源隔离
Hystrix 使用了"舱壁隔离模式"来隔离和限制各个请求,从而实现资源的隔离。
Hystrix 通过线程池 和信号量(Semaphore) 两种模式来实现隔离。
① 线程池模式
默认情况下,Hystrix 采用线程池模式来实现隔离。
针对调用的每一个服务,我们给其单独分配一个线程池。例如说,产品服务的调用分配在 A 线程池,用户服务的调用分配在 B 线程池。这样隔离后,两个服务的调用不会相互影响。
② 信号量模式
使用线程池模式来隔离时,需要进行上下文的切换,带来一定的性能损耗。因此,如果对性能有较高要求,且能够接受信号量模式不支持超时的情况,可以考虑采用信号量模式。
友情提示:如果想要深入了解,可阅读《Hystrix 源码解析 ------ 命令执行(二)之执行隔离策略》
下面,我们正式开始本文的旅程,开始学习 Hystrix 咯。
2. 快速入门
示例代码对应仓库:
- 用户服务:
labx-23-user-service- Hystrix 示例项目:
lab-57-hystrix-demo01
本小节,我们来搭建一个 Hystrix 组件的快速入门示例。步骤如下:
- 首先,搭建一个
user-service用户服务,提供获取用户信息的 HTTP API 接口。 - 然后,搭建一个用户服务的消费者,使用 Hystrix 实现服务容错。
2.1 搭建用户服务
创建 labx-23-user-service 项目,搭建用户服务。代码如下图所示:

比较简单,主要是提供 http://127.0.0.1:18080/user/get 接口,获取用户详情。具体的代码,肯定不用艿艿啰嗦讲解哈,点击 labx-23-user-service 查看。
2.2 搭建 Hystrix 示例项目
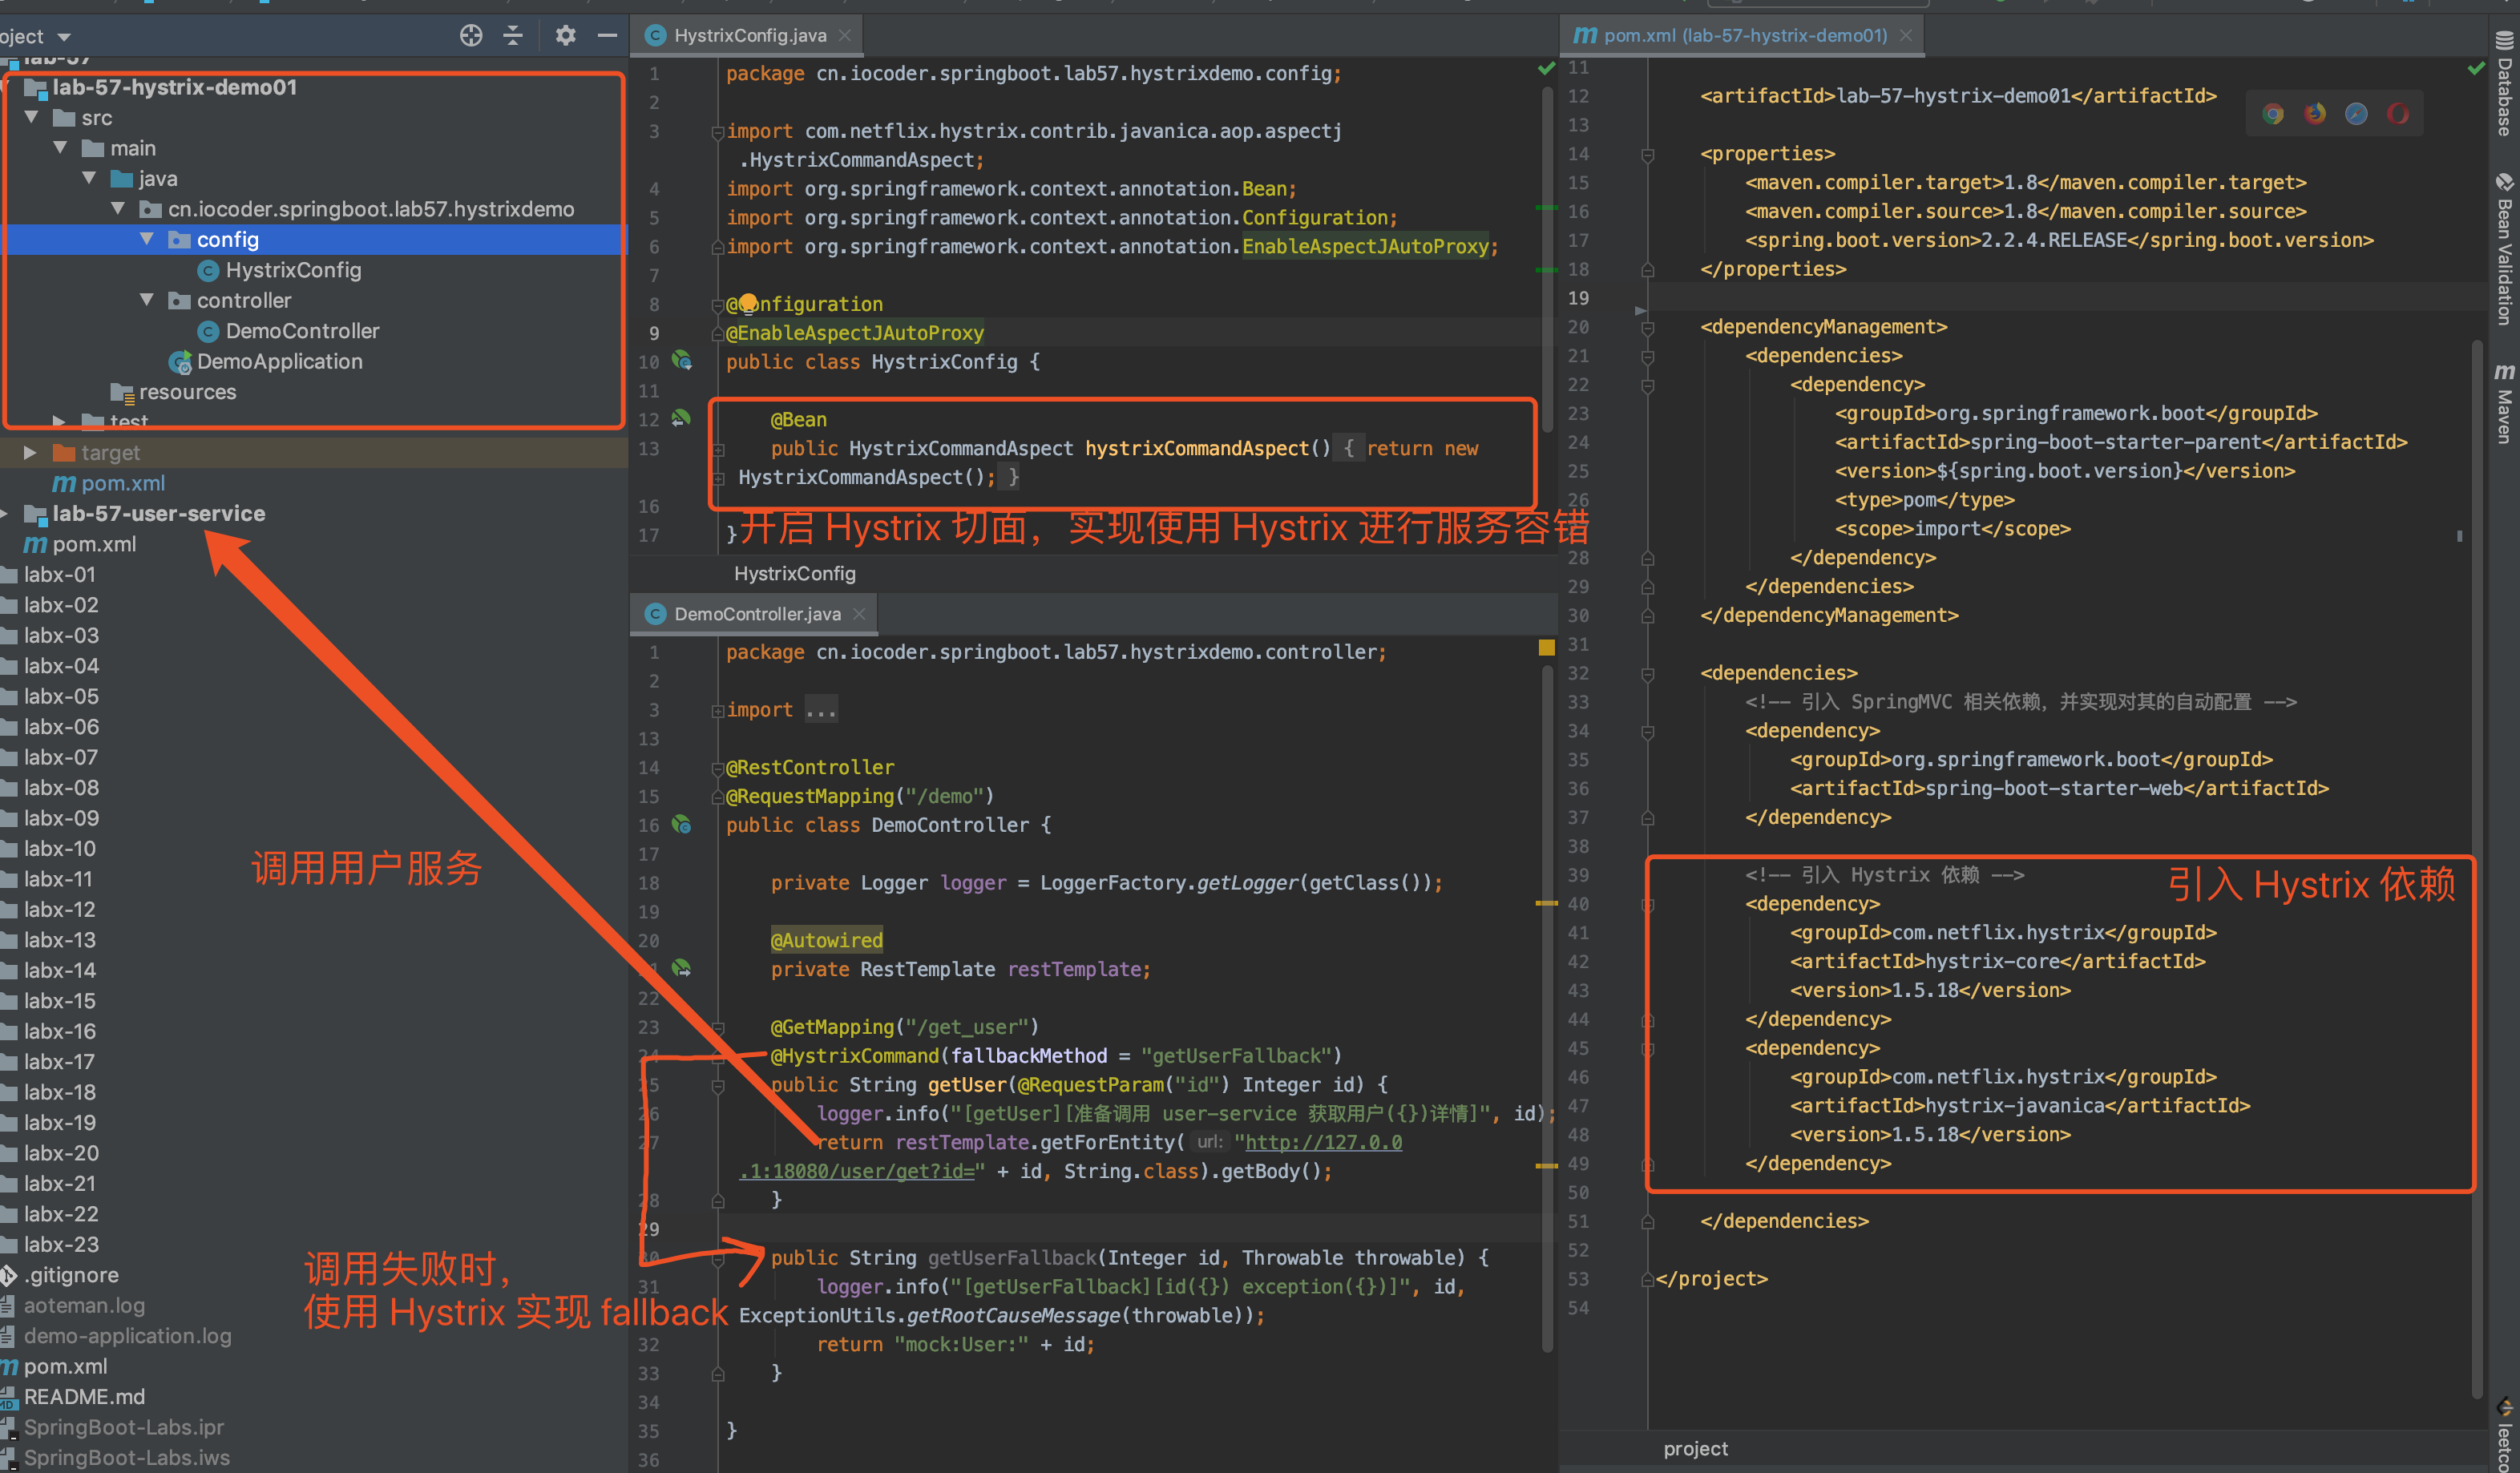
创建 lab-57-hystrix-demo01 项目,搭建一个用户服务的消费者,使用 Hystrix 实现服务容错。代码如下图所示:
2.2.1 引入依赖
在 pom.xml 文件中,引入 Hystrix 相关依赖。
<?xml version="1.0" encoding="UTF-8"?>
<project xmlns="http://maven.apache.org/POM/4.0.0"
         xmlns:xsi="http://www.w3.org/2001/XMLSchema-instance"
         xsi:schemaLocation="http://maven.apache.org/POM/4.0.0 http://maven.apache.org/xsd/maven-4.0.0.xsd">
    <parent>
        <artifactId>lab-57</artifactId>
        <groupId>cn.iocoder.springboot.labs</groupId>
        <version>1.0-SNAPSHOT</version>
    </parent>
    <modelVersion>4.0.0</modelVersion>

    <artifactId>lab-57-hystrix-demo01</artifactId>

    <properties>
        <maven.compiler.target>1.8</maven.compiler.target>
        <maven.compiler.source>1.8</maven.compiler.source>
        <spring.boot.version>2.2.4.RELEASE</spring.boot.version>
    </properties>

    <dependencyManagement>
        <dependencies>
            <dependency>
                <groupId>org.springframework.boot</groupId>
                <artifactId>spring-boot-starter-parent</artifactId>
                <version>${spring.boot.version}</version>
                <type>pom</type>
                <scope>import</scope>
            </dependency>
        </dependencies>
    </dependencyManagement>

    <dependencies>
        <!-- 引入 SpringMVC 相关依赖,并实现对其的自动配置 -->
        <dependency>
            <groupId>org.springframework.boot</groupId>
            <artifactId>spring-boot-starter-web</artifactId>
        </dependency>

        <!-- 引入 Hystrix 依赖 -->
        <dependency>
            <groupId>com.netflix.hystrix</groupId>
            <artifactId>hystrix-core</artifactId>
            <version>1.5.18</version>
        </dependency>
        <dependency>
            <groupId>com.netflix.hystrix</groupId>
            <artifactId>hystrix-javanica</artifactId>
            <version>1.5.18</version>
        </dependency>

    </dependencies>

</project>
① 引入 hystrix-core 依赖,提供 Hystrix 核心实现。
② 引入 hystrix-javanica 依赖,提供 @HystrixCommand 等注解,搭配 AOP 切面功能,简化我们使用 Hystrix 实现服务容错的功能。
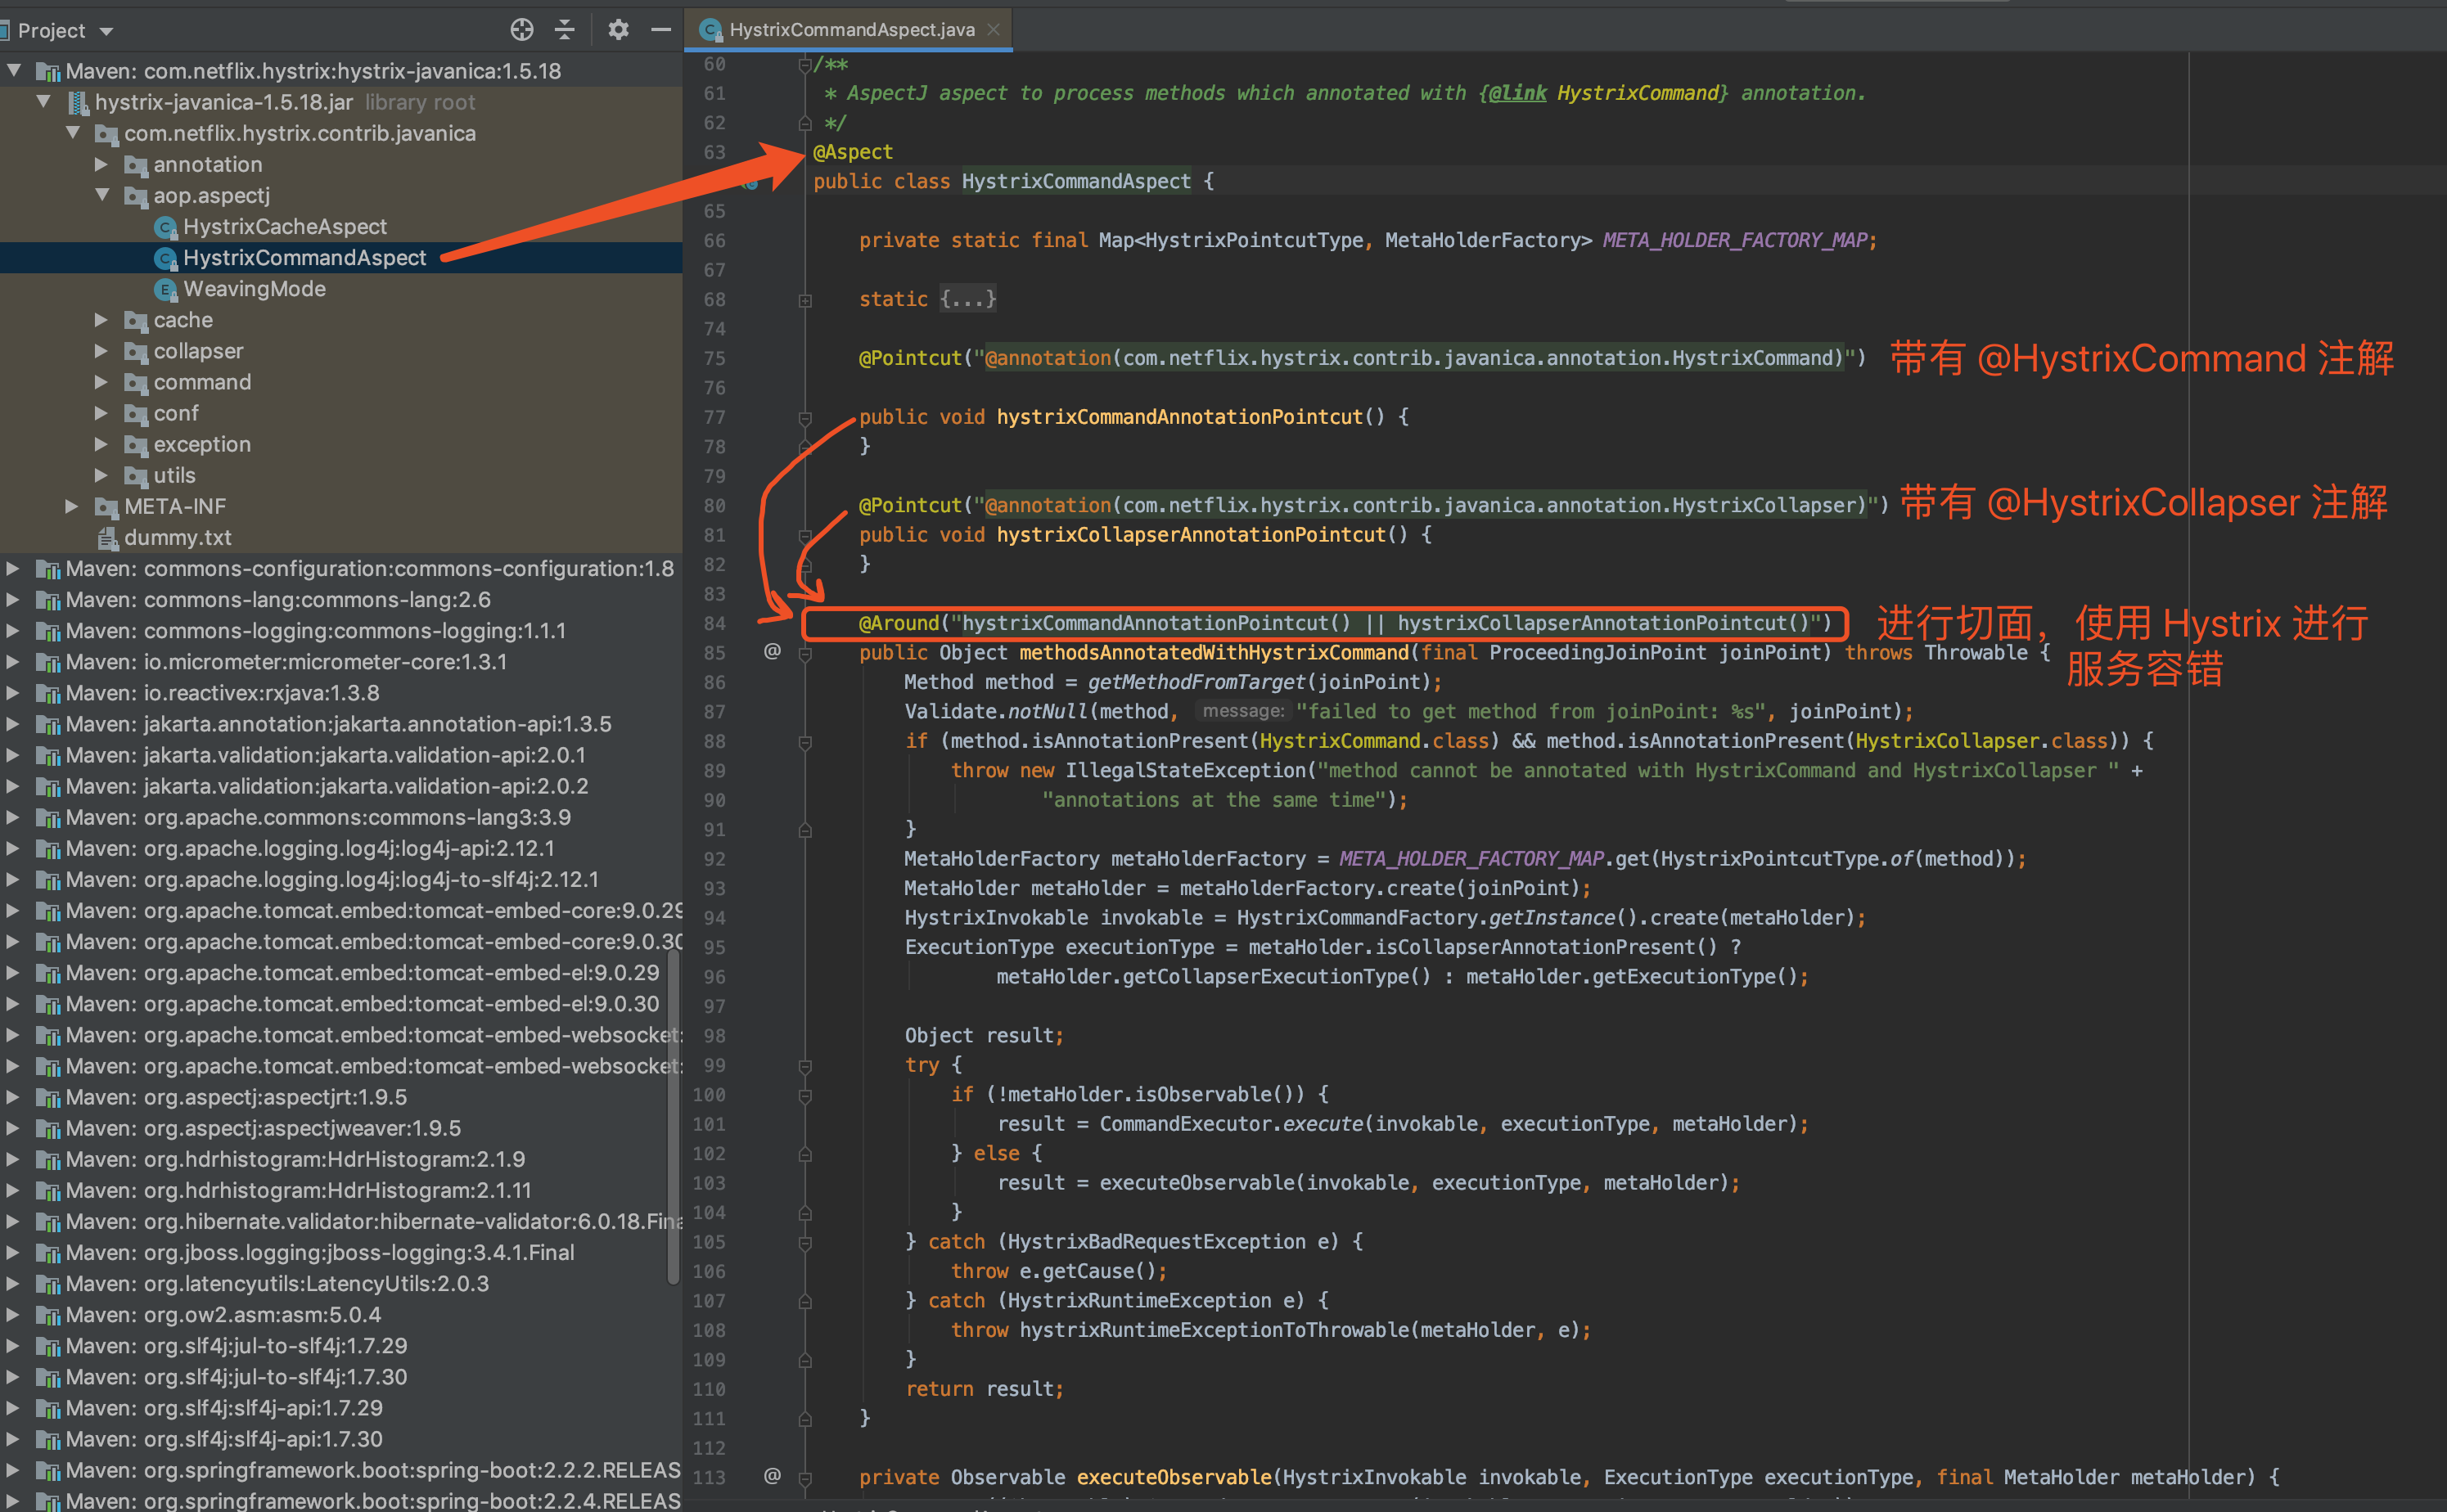
2.2.2 HystrixConfig
创建 HystrixConfig 配置类,创建 HystrixCommandAspect Bean。代码如下:
@Configuration
@EnableAspectJAutoProxy // 开启 AOP 代理的支持
public class HystrixConfig {

    @Bean
    public HystrixCommandAspect hystrixCommandAspect() {
        return new HystrixCommandAspect();
    }

}
通过 HystrixCommandAspect 可以进行扫描 @@HystrixCommand 等注解的切面,使用 Hystrix 进行服务容错。核心代码如下图:
2.2.3 DemoController
创建 DemoController 类,提供调用用户服务的 HTTP API 接口。代码如下:
@RestController
@RequestMapping("/demo")
public class DemoController {

    private Logger logger = LoggerFactory.getLogger(getClass());

    @Autowired
    private RestTemplate restTemplate;

    @GetMapping("/get_user")
    @HystrixCommand(fallbackMethod = "getUserFallback")
    public String getUser(@RequestParam("id") Integer id) {
        logger.info("[getUser][准备调用 user-service 获取用户({})详情]", id);
        return restTemplate.getForEntity("http://127.0.0.1:18080/user/get?id=" + id, String.class).getBody();
    }

    public String getUserFallback(Integer id, Throwable throwable) {
        logger.info("[getUserFallback][id({}) exception({})]", id, ExceptionUtils.getRootCauseMessage(throwable));
        return "mock:User:" + id;
    }

}
① 在 #getUser(Integer id) 方法中 ,我们使用 RestTemplate 调用用户服务提供的 /user/get 接口,获取用户详情。
② 在 #getUser(Integer id) 方法上 ,添加了 Hystrix 提供的 @HystrixCommand 注解,设置执行发生 Exception 异常时,执行 fallbackMethod 属性对应的 #getUserFallback(Integer id, Throwable throwable) 方法。注意,fallbackMethod 方法的参数要和原始 方法一致,最后一个为 Throwable 异常。
通过不同的 Throwable 异常,我们可以进行不同的 fallback 降级处理。极端情况下,Hystrix 断路器熔断(打开) 时,不会执行 #getUser(Integer id) 方法,而是直接抛出 Hystrix circuit short-circuited and is OPEN 异常,然后也是进入 fallback 降级处理。
③ 我们来完整看看 @HystrixCommand 注解的参数:
1. fallbackMethod 属性:
指定 fallback 服务降级的处理方法,处理相应的异常。
2. ignoreExceptions 属性:
指定忽略指定的异常 Class,不进行 fallback 服务降级。
3. commandKey 属性:
Hystrix Command 命令键 ,默认未配置情况下,使用方法名。例如说,我们上面的 #getUser(...) 对应的 commandKey 属性默认为 getUser。
4. groupKey 属性:
Hystrix Command 命令分组键,用于 Hystrix 根据不同的分组来统计命令的统计、告警、仪表盘信息。
默认未配置情况下,使用方法所在类名。例如说,我们上面的 #getUser(...) 方法所在类为 DemoController,则对应的 groupKey 属性默认为 DemoController。
5. threadPoolKey 属性
线程池名,用于划分不同的线程池,进行资源隔离。
默认未配置情况下,相同 groupKey 的 Hystrix Command 使用同一个线程池。在配置情况下,相同 groupKey + threadPoolKey 使用同一个线程池。也就是说,groupKey 是必选 的基础 维度,而 threadPoolKey 是可选 的进一步细化维度。
2.2.4 DemoApplication
创建 DemoApplication 类,作为 Hystrix 示例项目的启动类。代码如下:
@SpringBootApplication
public class DemoApplication {

    @Bean
    public RestTemplate restTemplate() {
        return new RestTemplate();
    }

    public static void main(String[] args) {
        SpringApplication.run(DemoApplication.class, args);
    }

}
2.3 简单测试
执行 UserServiceApplication 启动用户服务,执行 DemoApplication 启动 Hystrix 示例项目。
① 使用浏览器,访问 http://127.0.0.1:8080/demo/get_user?id=1 地址,成功 调用用户服务,返回结果为 User:1。
② 停止 UserServiceApplication 关闭用户服务。
使用浏览器,访问 http://127.0.0.1:8080/demo/get_user?id=1 地址,失败 调用用户服务,返回结果为 mock:User:1。
此时我们会看到如下日志,可以判断触发 Hystrix 的 fallback 服务降级的方法。
2020-05-09 22:32:07.729  INFO 68093 --- [emoController-6] c.i.s.l.h.controller.DemoController      : [getUser][准备调用 user-service 获取用户(1)详情]
2020-05-09 22:32:07.731  INFO 68093 --- [emoController-6] c.i.s.l.h.controller.DemoController      : [getUserFallback][id(1) exception(ConnectException: Connection refused (Connection refused))
③ 疯狂 使用浏览器,访问 http://127.0.0.1:8080/demo/get_user?id=1 地址,会触发 Hystrix 断路器熔断(打开) ,不再执行 #getUser(Integer id) 方法,而是直接 fallback 触发 #getUserFallback(Integer id, Throwable throwable) 方法。日志内容如下:
2020-05-09 22:34:20.946  INFO 68093 --- [nio-8080-exec-2] c.i.s.l.h.controller.DemoController      : [getUserFallback][id(1) exception(RuntimeException: Hystrix circuit short-circuited and is OPEN)]
2020-05-09 22:34:21.099  INFO 68093 --- [nio-8080-exec-3] c.i.s.l.h.controller.DemoController      : [getUserFallback][id(1) exception(RuntimeException: Hystrix circuit short-circuited and is OPEN)]
2020-05-09 22:34:21.173  INFO 68093 --- [nio-8080-exec-4] c.i.s.l.h.controller.DemoController      : [getUserFallback][id(1) exception(RuntimeException: Hystrix circuit short-circuited and is OPEN)]
④ 重新执行 UserServiceApplication 启动用户服务。
使用浏览器,多次访问 http://127.0.0.1:8080/demo/get_user?id=1 地址,Hystrix 断路器的状态逐步从打开 => 半开 => 关闭。日志内容如下:
// 打开
2020-05-09 22:39:05.226  INFO 68093 --- [io-8080-exec-10] c.i.s.l.h.controller.DemoController      : [getUserFallback][id(1) exception(RuntimeException: Hystrix circuit short-circuited and is OPEN)]
...

// 半开
[getUser][准备调用 user-service 获取用户(1)详情]

// 关闭
[getUser][准备调用 user-service 获取用户(1)详情]
[getUser][准备调用 user-service 获取用户(1)详情]
[getUser][准备调用 user-service 获取用户(1)详情]
...
3. 请求缓存
和《芋道 Spring Cloud Netflix 服务容错 Hystrix 入门》的「3. 请求缓存」使用方式一模一样,胖友点击查看即可。
4. 请求合并
和《芋道 Spring Cloud Netflix 服务容错 Hystrix 入门》的「4. 请求合并」使用方式一模一样,胖友点击查看即可。
5. Hystrix Dashboard 监控
hystrix-dashboard 已经废弃,官方描述如下:
This project previously was a part of the Netflix/Hystrix project. It is now deprecated and no longer supported. See the below security section for necessary security considerations.
Spring Cloud Netflix 单独维护了 spring-cloud-netflix-hystrix-dashboard 项目,作为在 Spring Cloud 架构下的 Hystrix Dashboard 监控仪表盘。
因此,如果胖友真的要使用的话,可能只能暂时阅读《芋道 Spring Cloud Netflix 服务容错 Hystrix 入门》的「5. Hystrix Dashboard 监控」和「6. Turbine 聚合监控」小节。
6. 集成到 Dubbo
示例代码对应仓库:
- 用户服务 API:
lab-57-hystrix-dubbo-demo-user-service-api- 用户服务 Provider:
lab-57-hystrix-dubbo-demo-user-service- Hystrix 示例项目:
lab-57-hystrix-dubbo-demo-application
本小节我们来进行 Dubbo 和 Hystrix 的整合,目前暂时没有框架或者库 提供它们的整合,所以我们只能像「2. 快速入门」小节,使用 @HystrixCommand 注解添加在进行 Dubbo RPC 调用的方法上,如下图所示:

Apache Dubbo™ 是一款高性能Java RPC框架。
下面,我们来搭建 Dubbo 和 Hystrix 整合的示例,最终项目如下图所示:
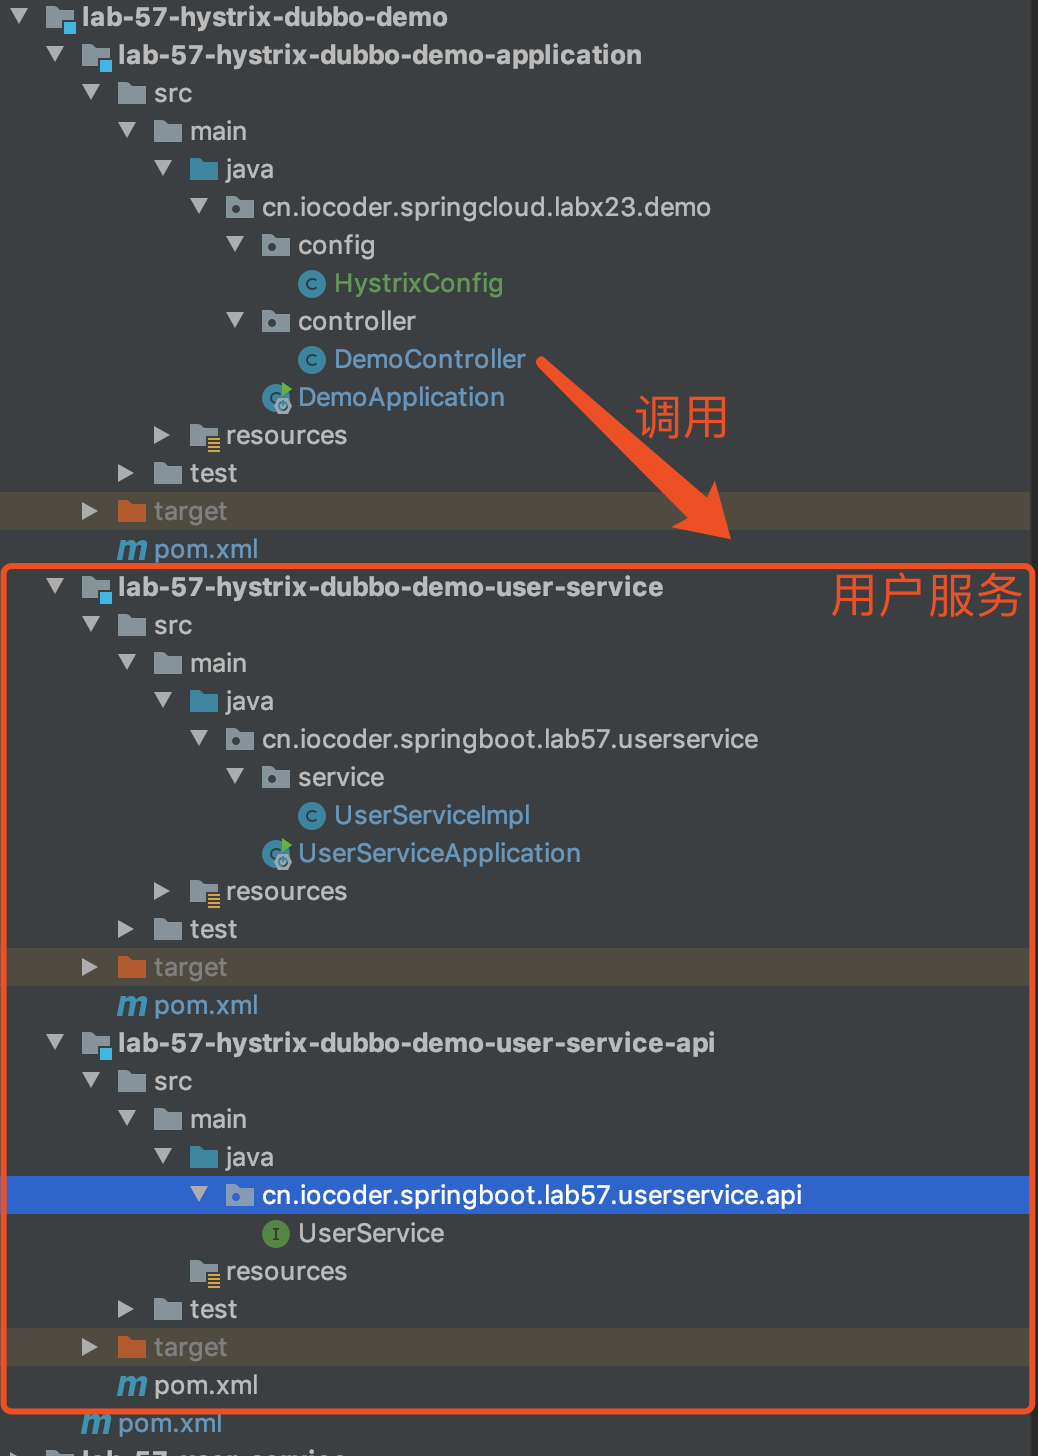
6.1 用户服务 API
创建 lab-57-hystrix-dubbo-demo-user-service-api 项目,作为用户服务 API。如下图所示:

6.1.1 引入依赖
创建 pom.xml 文件,无需引入依赖。
<?xml version="1.0" encoding="UTF-8"?>
<project xmlns="http://maven.apache.org/POM/4.0.0"
         xmlns:xsi="http://www.w3.org/2001/XMLSchema-instance"
         xsi:schemaLocation="http://maven.apache.org/POM/4.0.0 http://maven.apache.org/xsd/maven-4.0.0.xsd">
    <parent>
        <artifactId>lab-57-hystrix-dubbo-demo</artifactId>
        <groupId>cn.iocoder.springboot.labs</groupId>
        <version>1.0-SNAPSHOT</version>
    </parent>
    <modelVersion>4.0.0</modelVersion>

    <artifactId>lab-57-hystrix-dubbo-demo-user-service-api</artifactId>

</project>
6.1.2 UserService
创建 UserService 接口,提供用户服务 API 接口。代码如下:
public interface UserService {
String getUser(Integer id);
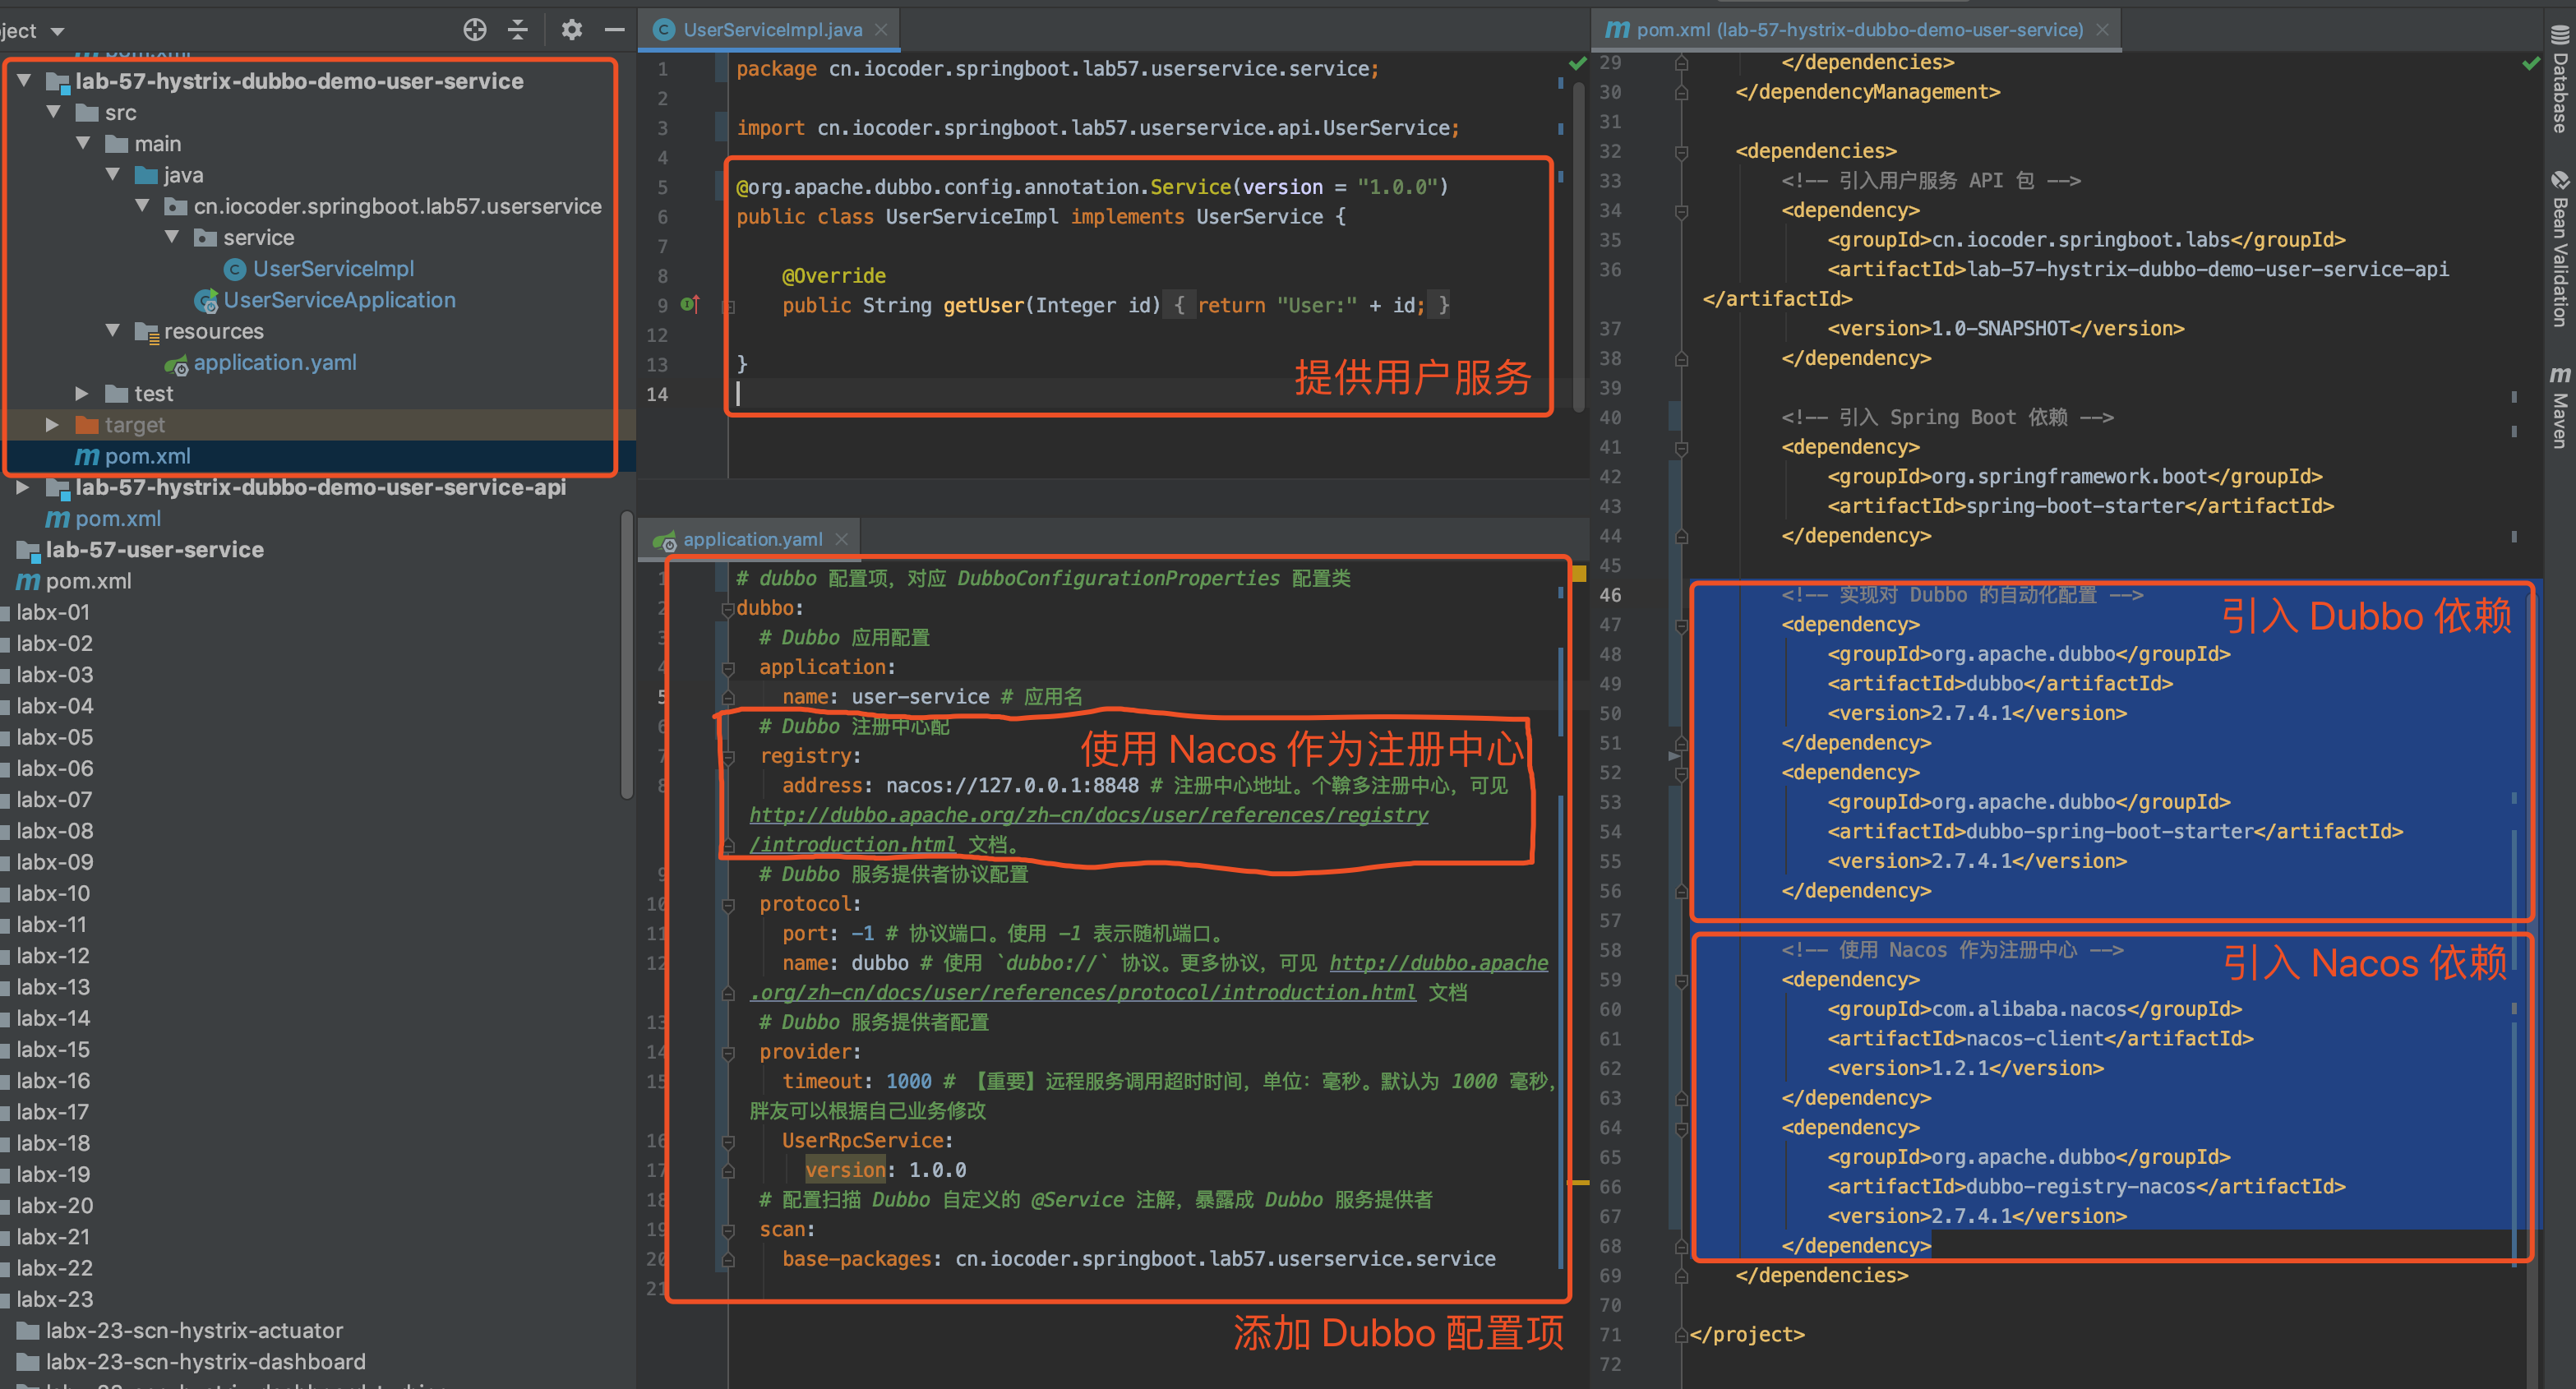
}6.2 用户服务 Provider
创建 lab-57-hystrix-dubbo-demo-user-service 项目,作为用户服务 Provider 实现。如下图所示:
友情提示:对 Dubbo 不了解的胖友可以看看《芋道 Spring Boot Dubbo 入门》文章。
考虑到 Nacos 作为注册中心越来越流行,所以这里就使用 Nacos 啦,不了解的胖友可以看看《芋道 Spring Boot 注册中心 Nacos 入门》文章。
6.2.1 引入依赖
创建 pom.xml 文件,引入 Dubbo、Nacos 依赖。
<?xml version="1.0" encoding="UTF-8"?>
<project xmlns="http://maven.apache.org/POM/4.0.0"
         xmlns:xsi="http://www.w3.org/2001/XMLSchema-instance"
         xsi:schemaLocation="http://maven.apache.org/POM/4.0.0 http://maven.apache.org/xsd/maven-4.0.0.xsd">
    <parent>
        <artifactId>lab-57-hystrix-dubbo-demo</artifactId>
        <groupId>cn.iocoder.springboot.labs</groupId>
        <version>1.0-SNAPSHOT</version>
    </parent>
    <modelVersion>4.0.0</modelVersion>

    <artifactId>lab-57-hystrix-dubbo-demo-user-service</artifactId>

    <properties>
        <maven.compiler.target>1.8</maven.compiler.target>
        <maven.compiler.source>1.8</maven.compiler.source>
        <spring.boot.version>2.2.4.RELEASE</spring.boot.version>
    </properties>

    <dependencyManagement>
        <dependencies>
            <dependency>
                <groupId>org.springframework.boot</groupId>
                <artifactId>spring-boot-starter-parent</artifactId>
                <version>${spring.boot.version}</version>
                <type>pom</type>
                <scope>import</scope>
            </dependency>
        </dependencies>
    </dependencyManagement>

    <dependencies>
        <!-- 引入用户服务 API 包 -->
        <dependency>
            <groupId>cn.iocoder.springboot.labs</groupId>
            <artifactId>lab-57-hystrix-dubbo-demo-user-service-api</artifactId>
            <version>1.0-SNAPSHOT</version>
        </dependency>

        <!-- 引入 Spring Boot 依赖 -->
        <dependency>
            <groupId>org.springframework.boot</groupId>
            <artifactId>spring-boot-starter</artifactId>
        </dependency>

        <!-- 实现对 Dubbo 的自动化配置 -->
        <dependency>
            <groupId>org.apache.dubbo</groupId>
            <artifactId>dubbo</artifactId>
            <version>2.7.4.1</version>
        </dependency>
        <dependency>
            <groupId>org.apache.dubbo</groupId>
            <artifactId>dubbo-spring-boot-starter</artifactId>
            <version>2.7.4.1</version>
        </dependency>

        <!-- 使用 Nacos 作为注册中心 -->
        <dependency>
            <groupId>com.alibaba.nacos</groupId>
            <artifactId>nacos-client</artifactId>
            <version>1.2.1</version>
        </dependency>
        <dependency>
            <groupId>org.apache.dubbo</groupId>
            <artifactId>dubbo-registry-nacos</artifactId>
            <version>2.7.4.1</version>
        </dependency>
    </dependencies>

</project>
6.2.2 配置文件
创建 application.yaml 配置文件,添加 Dubbo 配置项,并使用 Nacos 作为注册中心。
# dubbo 配置项,对应 DubboConfigurationProperties 配置类
dubbo:
  # Dubbo 应用配置
  application:
    name: user-service # 应用名
  # Dubbo 注册中心配
  registry:
    address: nacos://127.0.0.1:8848 # 注册中心地址。个鞥多注册中心,可见 http://dubbo.apache.org/zh-cn/docs/user/references/registry/introduction.html 文档。
  # Dubbo 服务提供者协议配置
  protocol:
    port: -1 # 协议端口。使用 -1 表示随机端口。
    name: dubbo # 使用 `dubbo://` 协议。更多协议,可见 http://dubbo.apache.org/zh-cn/docs/user/references/protocol/introduction.html 文档
  # Dubbo 服务提供者配置
  provider:
    timeout: 1000 # 【重要】远程服务调用超时时间,单位:毫秒。默认为 1000 毫秒,胖友可以根据自己业务修改
    UserRpcService:
      version: 1.0.0
  # 配置扫描 Dubbo 自定义的 @Service 注解,暴露成 Dubbo 服务提供者
  scan:
    base-packages: cn.iocoder.springboot.lab57.userservice.service
① dubbo 配置项,添加 Dubbo 相关的配置项。
② dubbo.registry.address 配置项,设置使用 Nacos 作为配置中心。
6.2.3 UserServiceImpl
创建 UserServiceImpl 类,实现 UserService 接口,提供 Dubbo 用户服务。代码如下:
@org.apache.dubbo.config.annotation.Service(protocol = "dubbo", version = "1.0.0")
public class UserServiceImpl implements UserService {

    @Override
    public String getUser(Integer id) {
        return "User:" + id;
    }

}
6.2.4 UserServiceApplication
创建 UserServiceApplication 类,用户服务的启动类。代码如下:
@SpringBootApplication
public class UserServiceApplication {

    public static void main(String[] args) {
        SpringApplication.run(UserServiceApplication.class);
    }

}
6.3 搭建 Hystrix 示例项目
创建 lab-57-hystrix-dubbo-demo-application 项目,搭建一个用户服务的消费者,使用 Dubbo 进行调用,使用 Hystrix 实现服务容错。如下图所示:
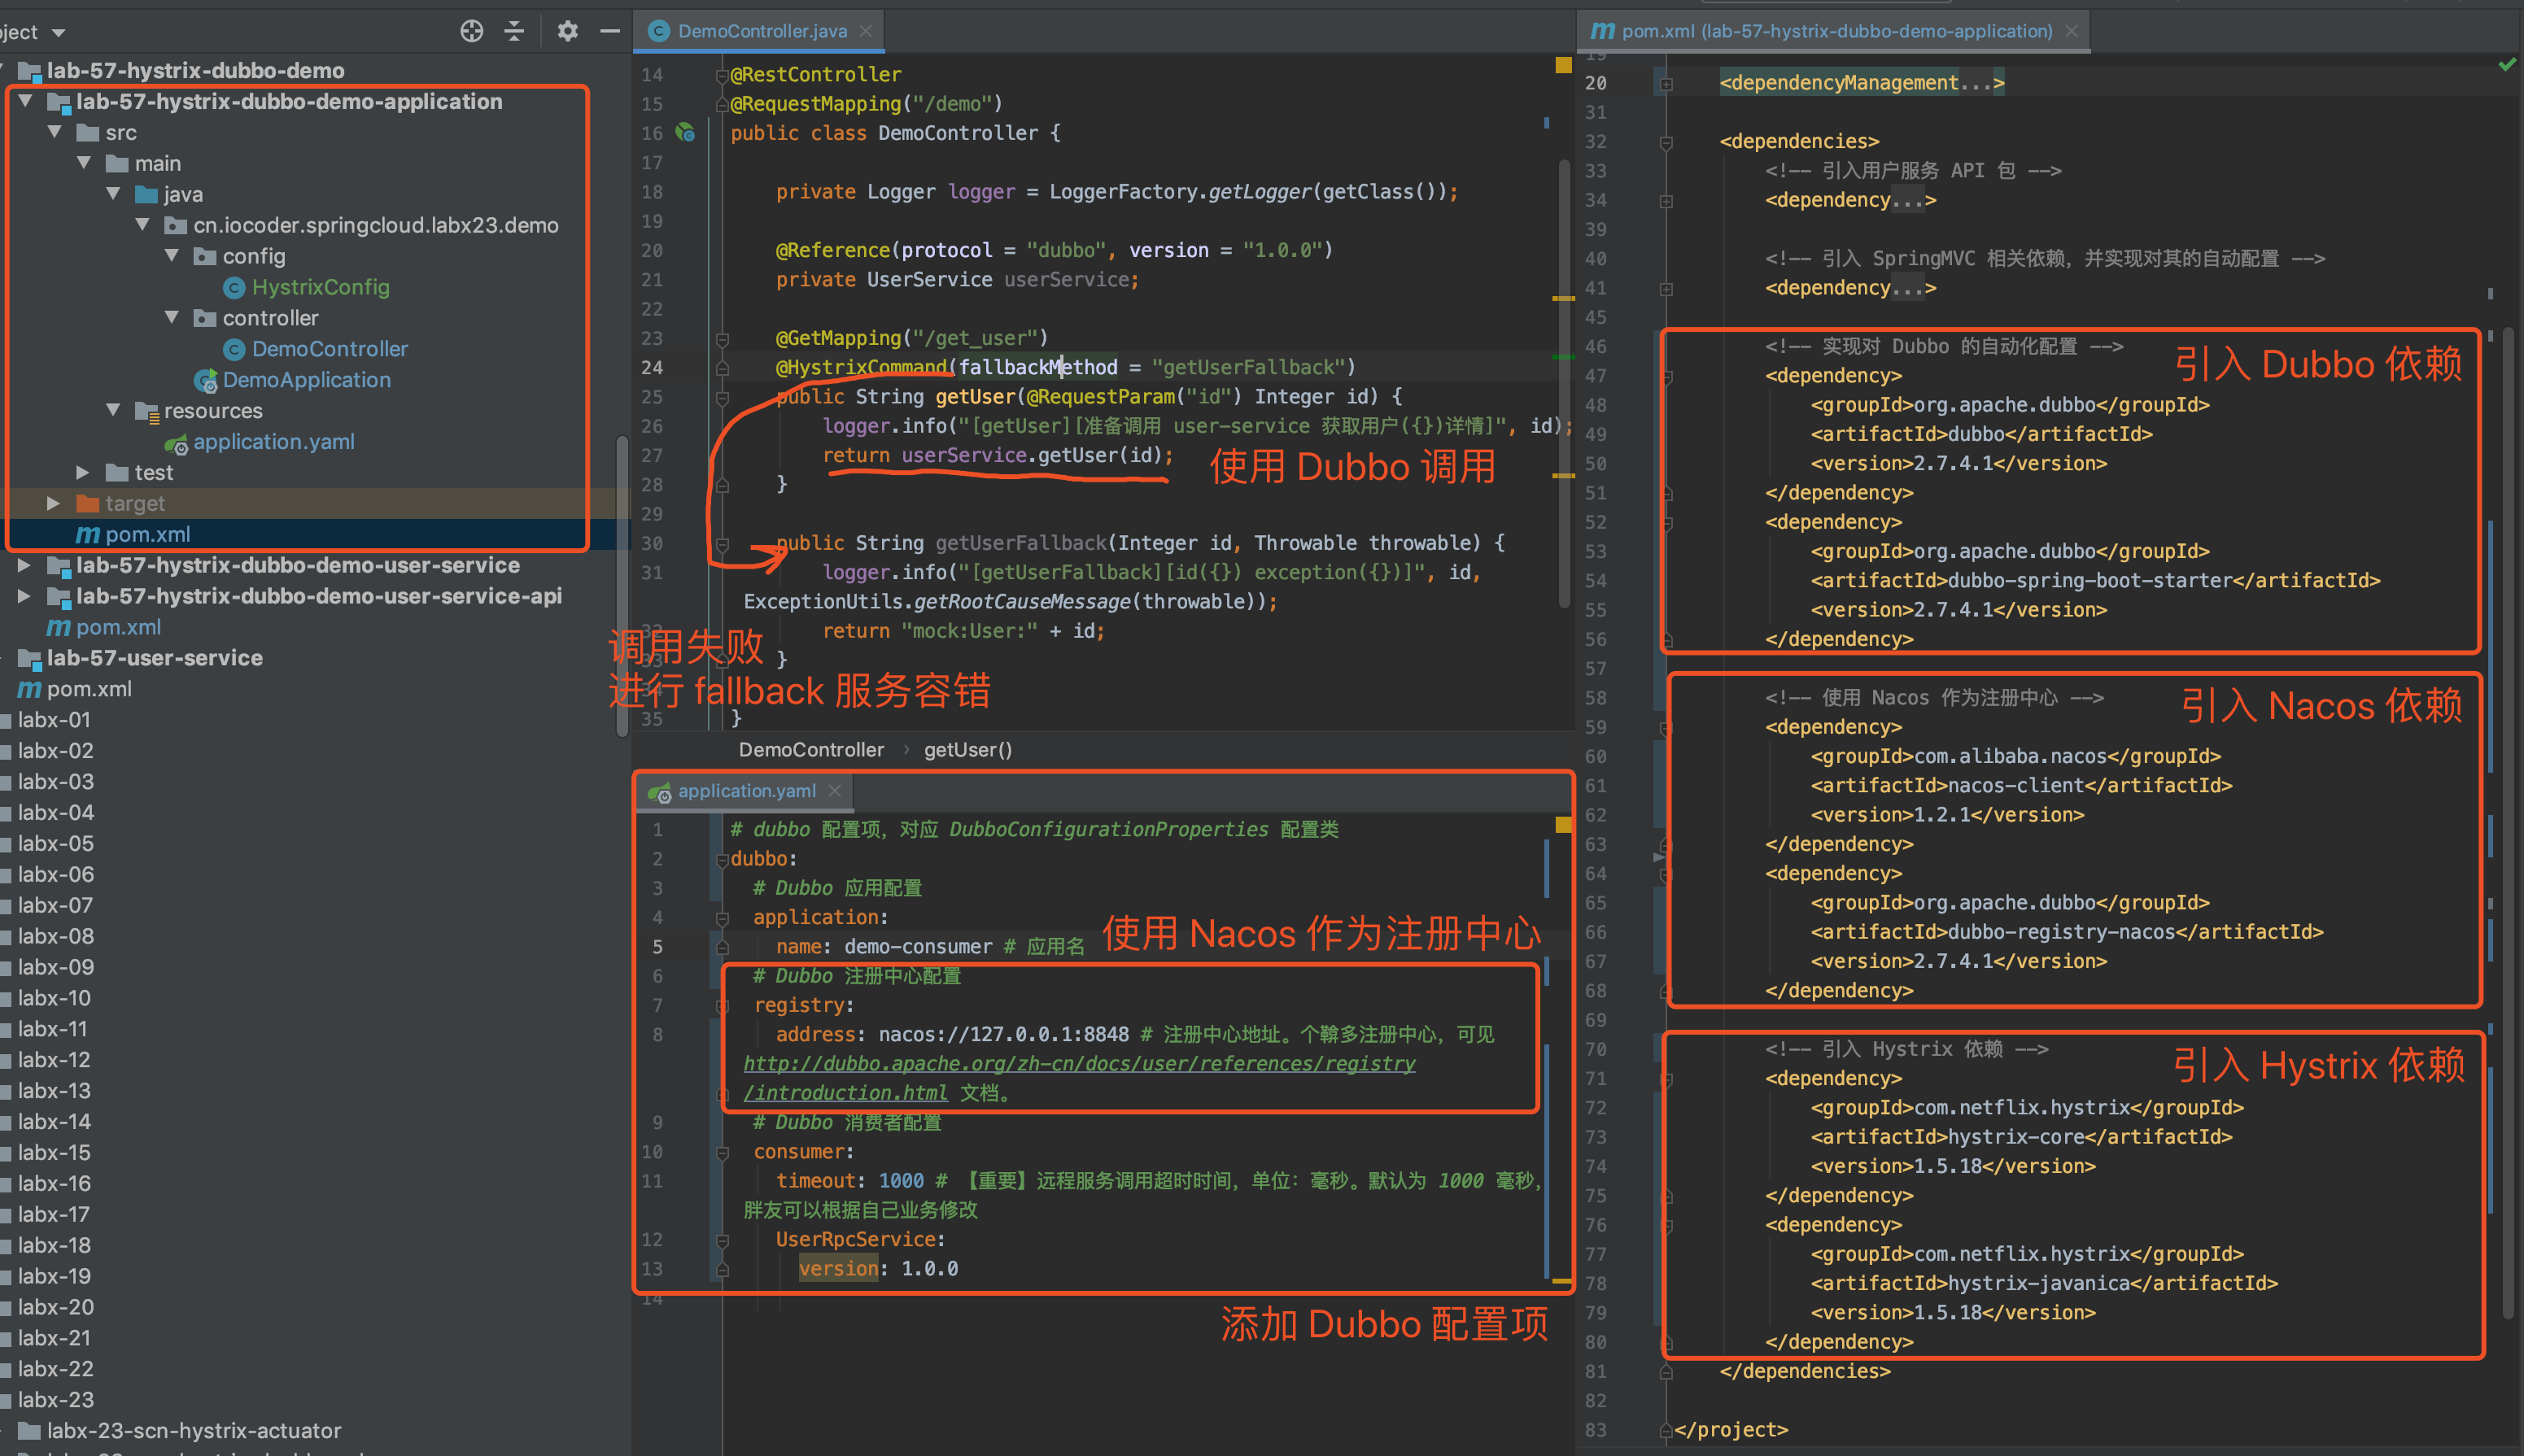
6.3.1 引入依赖
创建 pom.xml 文件,引入 Hystrix、Dubbo、Nacos 依赖。
<?xml version="1.0" encoding="UTF-8"?>
<project xmlns="http://maven.apache.org/POM/4.0.0"
         xmlns:xsi="http://www.w3.org/2001/XMLSchema-instance"
         xsi:schemaLocation="http://maven.apache.org/POM/4.0.0 http://maven.apache.org/xsd/maven-4.0.0.xsd">
    <parent>
        <artifactId>lab-57-hystrix-dubbo-demo</artifactId>
        <groupId>cn.iocoder.springboot.labs</groupId>
        <version>1.0-SNAPSHOT</version>
    </parent>
    <modelVersion>4.0.0</modelVersion>

    <artifactId>lab-57-hystrix-dubbo-demo-application</artifactId>

    <properties>
        <maven.compiler.target>1.8</maven.compiler.target>
        <maven.compiler.source>1.8</maven.compiler.source>
        <spring.boot.version>2.2.4.RELEASE</spring.boot.version>
    </properties>

    <dependencyManagement>
        <dependencies>
            <dependency>
                <groupId>org.springframework.boot</groupId>
                <artifactId>spring-boot-starter-parent</artifactId>
                <version>${spring.boot.version}</version>
                <type>pom</type>
                <scope>import</scope>
            </dependency>
        </dependencies>
    </dependencyManagement>

    <dependencies>
        <!-- 引入用户服务 API 包 -->
        <dependency>
            <groupId>cn.iocoder.springboot.labs</groupId>
            <artifactId>lab-57-hystrix-dubbo-demo-user-service-api</artifactId>
            <version>1.0-SNAPSHOT</version>
        </dependency>

        <!-- 引入 SpringMVC 相关依赖,并实现对其的自动配置 -->
        <dependency>
            <groupId>org.springframework.boot</groupId>
            <artifactId>spring-boot-starter-web</artifactId>
        </dependency>

        <!-- 实现对 Dubbo 的自动化配置 -->
        <dependency>
            <groupId>org.apache.dubbo</groupId>
            <artifactId>dubbo</artifactId>
            <version>2.7.4.1</version>
        </dependency>
        <dependency>
            <groupId>org.apache.dubbo</groupId>
            <artifactId>dubbo-spring-boot-starter</artifactId>
            <version>2.7.4.1</version>
        </dependency>

        <!-- 使用 Nacos 作为注册中心 -->
        <dependency>
            <groupId>com.alibaba.nacos</groupId>
            <artifactId>nacos-client</artifactId>
            <version>1.2.1</version>
        </dependency>
        <dependency>
            <groupId>org.apache.dubbo</groupId>
            <artifactId>dubbo-registry-nacos</artifactId>
            <version>2.7.4.1</version>
        </dependency>

        <!-- 引入 Hystrix 依赖 -->
        <dependency>
            <groupId>com.netflix.hystrix</groupId>
            <artifactId>hystrix-core</artifactId>
            <version>1.5.18</version>
        </dependency>
        <dependency>
            <groupId>com.netflix.hystrix</groupId>
            <artifactId>hystrix-javanica</artifactId>
            <version>1.5.18</version>
        </dependency>
    </dependencies>

</project>相比「6.2.1 引入依赖」小节来说,多引入 Hystrix 相关依赖进行服务容错。
6.3.2 配置文件
创建 application.yaml 配置文件,添加 Dubbo 和 Nacos 配置项。
# dubbo 配置项,对应 DubboConfigurationProperties 配置类
dubbo:
  # Dubbo 应用配置
  application:
    name: demo-consumer # 应用名
  # Dubbo 注册中心配置
  registry:
    address: nacos://127.0.0.1:8848 # 注册中心地址。个鞥多注册中心,可见 http://dubbo.apache.org/zh-cn/docs/user/references/registry/introduction.html 文档。
  # Dubbo 消费者配置
  consumer:
    timeout: 1000 # 【重要】远程服务调用超时时间,单位:毫秒。默认为 1000 毫秒,胖友可以根据自己业务修改
    UserRpcService:
version: 1.0.0和「6.2.2 配置文件」小节差不多,不重复啰嗦哈。
6.3.3 HystrixConfig
HystrixConfig
创建 HystrixConfig Bean。代码如下:
@Configuration
@EnableAspectJAutoProxy // 开启 AOP 代理的支持
public class HystrixConfig {

    @Bean
    public HystrixCommandAspect hystrixCommandAspect() {
        return new HystrixCommandAspect();
    }

}和「2.2.2 HystrixConfig」小节一样。
6.3.4 DemoController
创建 DemoController 类,提供一个通过 Dubbo 调用用户服务提供者的 HTTP 接口。代码如下:
@RestController
@RequestMapping("/demo")
public class DemoController {

    private Logger logger = LoggerFactory.getLogger(getClass());

    @Reference(protocol = "dubbo", version = "1.0.0")
    private UserService userService;

    @GetMapping("/get_user")
    @HystrixCommand(fallbackMethod = "getUserFallback")
    public String getUser(@RequestParam("id") Integer id) {
        logger.info("[getUser][准备调用 user-service 获取用户({})详情]", id);
        return userService.getUser(id);
    }

    public String getUserFallback(Integer id, Throwable throwable) {
        logger.info("[getUserFallback][id({}) exception({})]", id, ExceptionUtils.getRootCauseMessage(throwable));
        return "mock:User:" + id;
    }

}
在 #getUser(Integer id) 方法上,添加了 @HystrixCommand 注解,从而在 Dubbo 调用失败时,执行 #getUserFallback(Integer id, Throwable throwable) 方法进行服务容错。
6.3.5 DemoApplication
创建 DemoApplication 类,创建应用启动类。代码如下:
@SpringBootApplication
public class DemoApplication {

    public static void main(String[] args) {
        SpringApplication.run(DemoApplication.class, args);
    }

}
6.4 简单测试
执行 UserServiceApplication 启动用户服务,执行 DemoApplication 启动 Hystrix 示例项目。
① 使用浏览器,访问 http://127.0.0.1:8080/feign-demo/get_user?id=1 地址,成功 调用用户服务,返回结果为 User:1。
② 停止 UserServiceApplication 关闭用户服务。
使用浏览器,访问 http://127.0.0.1:8080/feign-demo/get_user?id=1 地址,失败 调用用户服务,返回结果为 mock:User:1。
此时我们会看到如下日志,可以判断触发 Hystrix 的 fallback 服务降级的方法。
2020-05-15 07:18:06.183 INFO 75980 --- [emoController-3] c.i.s.l.demo.controller.DemoController : [getUser][准备调用 user-service 获取用户(1)详情]
2020-05-15 07:18:06.184 INFO 75980 --- [emoController-3] c.i.s.l.demo.controller.DemoController : [getUserFallback][id(1) exception(RemotingException: message can not send, because channel is closed . url:dubbo://192.168.43.240:20880/com.alibaba.cloud.dubbo.service.DubboMetadataService?anyhost=true&application=demo-consumer&bind.ip=192.168.43.240&bind.port=20880&check=false&codec=dubbo&deprecated=false&dubbo=2.0.2&dynamic=true&generic=true&group=user-service&heartbeat=60000&interface=com.alibaba.cloud.dubbo.service.DubboMetadataService&lazy=false&methods=getAllServiceKeys,getServiceRestMetadata,getExportedURLs,getAllExportedURLs&pid=75980&qos.enable=false®ister.ip=192.168.43.240&release=2.7.4.1&remote.application=user-service&revision=2.2.0.RELEASE&side=consumer&sticky=false×tamp=1589498209533&version=1.0.0)]③ 疯狂 使用浏览器,访问 http://127.0.0.1:8080/feign-demo/get_user?id=1 地址,会触发 Hystrix 断路器熔断(打开) ,不再执行 #getUser(Integer id) 方法,而是直接 fallback 触发 #getUserFallback(Integer id, Throwable throwable) 方法。日志内容如下:
2020-05-15 07:20:02.809  INFO 75980 --- [nio-8080-exec-1] c.i.s.l.demo.controller.DemoController   : [getUserFallback][id(1) exception(RuntimeException: Hystrix circuit short-circuited and is OPEN)]
2020-05-15 07:20:02.907  INFO 75980 --- [nio-8080-exec-2] c.i.s.l.demo.controller.DemoController   : [getUserFallback][id(1) exception(RuntimeException: Hystrix circuit short-circuited and is OPEN)]
2020-05-15 07:20:02.995  INFO 75980 --- [nio-8080-exec-3] c.i.s.l.demo.controller.DemoController   : [getUserFallback][id(1) exception(RuntimeException: Hystrix circuit short-circuited and is OPEN)]
④ 重新执行 UserServiceApplication 启动用户服务。
使用浏览器,多次访问 http://127.0.0.1:8080/feign-demo/get_user?id=1 地址,Hystrix 断路器的状态逐步从打开 => 半开 => 关闭。日志内容如下:
// 打开
2020-05-14 21:27:28.560  INFO 71995 --- [nio-8080-exec-5] .f.UserServiceFeignClientFallbackFactory : [getUserFallback][id(1) exception(RuntimeException: Hystrix circuit short-circuited and is OPEN)]
...

// 半开
2020-05-15 07:21:43.486  INFO 75980 --- [moController-10] c.i.s.l.demo.controller.DemoController   : [getUser][准备调用 user-service 获取用户(1)详情]

// 关闭
2020-05-15 07:21:50.449  INFO 75980 --- [moController-10] c.i.s.l.demo.controller.DemoController   : [getUser][准备调用 user-service 获取用户(1)详情]
2020-05-15 07:21:50.653  INFO 75980 --- [moController-10] c.i.s.l.demo.controller.DemoController   : [getUser][准备调用 user-service 获取用户(1)详情]
2020-05-15 07:21:50.818  INFO 75980 --- [moController-10] c.i.s.l.demo.controller.DemoController   : [getUser][准备调用 user-service 获取用户(1)详情]
...
来源:https://blog.csdn.net/weixin_42073629/article/details/106416135