42.Spring Boot 配置文件入门
42.Spring Boot 配置文件入门
1. 概述
经历过早期 Spring 年代的胖友,肯定会有和艿艿一样的感受,在享受 Spring 提供的强大的功能的同时,使用 XML 配置真的是好特喵的繁琐 。而这个情况,Spring 提供了 JavaConfig 又稍好了一些。最终,Spring Boot 的诞生,基于 JavaConfig 提供自动化配置,把我们从配置的泥潭之中,进一步解放。
在使用 Spring Boot 时,我们仅需在 pom.xml 文件中,引入需要组件 的 *-starter 依赖,并在 application.yaml 等配置文件中添加该组件定义的配置项 ,最终 Spring Boot 在自动化配置时,会基于该组件的配置项 + 配置类,自动创建该组件的 Bean 们。
例如说,在《芋道 Spring Boot 数据库连接池入门》中,我们想要初始化数据库连接池 组件,所以我们引入 spring-boot-starter-jdbc 依赖,并在 application.yaml 配置文件中添加该组件的 spring.datasource 配置项。
😈 相信正在阅读本文的胖友,可能已经在实际项目中使用过 Spring Boot 了,所以我们重点讲讲 Spring Boot 配置文件的常用 特性和功能。更多其它 的,后续胖友可以阅读《Spring Boot 中文文档 ------ 外部化 Configuration》文档,贼全,哈哈哈。
Spring Boot 支持 Properties、YAML、JSON 三种格式的配置文件。目前主流的采用的是 Properties 或是 YAML 格式。艿艿自己的话,比较喜欢 YAML 格式,因为相比 Properties 来说,支持层次结构化、更丰富的数据类型。因此,本文的示例,我们会以 application.yaml 配置文件为主哈。
2. 自定义配置
示例代码对应仓库:lab-43-demo。
本小节,我们会在 application.yaml 配置文件中自定义配置,并使用 @ConfigurationProperties 和 @Value 注解,读取该自定义配置。
下面,我们来搭建本小节的示例。
2.1 引入依赖
在 pom.xml 文件中,引入相关依赖。
<?xml version="1.0" encoding="UTF-8"?>
<project xmlns="http://maven.apache.org/POM/4.0.0"
         xmlns:xsi="http://www.w3.org/2001/XMLSchema-instance"
         xsi:schemaLocation="http://maven.apache.org/POM/4.0.0 http://maven.apache.org/xsd/maven-4.0.0.xsd">
    <parent>
        <groupId>org.springframework.boot</groupId>
        <artifactId>spring-boot-starter-parent</artifactId>
        <version>2.2.2.RELEASE</version>
        <relativePath/> <!-- lookup parent from repository -->
    </parent>
    <modelVersion>4.0.0</modelVersion>

    <artifactId>lab-43-demo</artifactId>

    <dependencies>
        <!-- Spring Boot Starter 基础依赖 -->
        <dependency>
            <groupId>org.springframework.boot</groupId>
            <artifactId>spring-boot-starter</artifactId>
        </dependency>

        <!-- Spring Boot 配置处理器 -->
        <dependency>
            <groupId>org.springframework.boot</groupId>
            <artifactId>spring-boot-configuration-processor</artifactId>
            <optional>true</optional>
        </dependency>
    </dependencies>

</project>
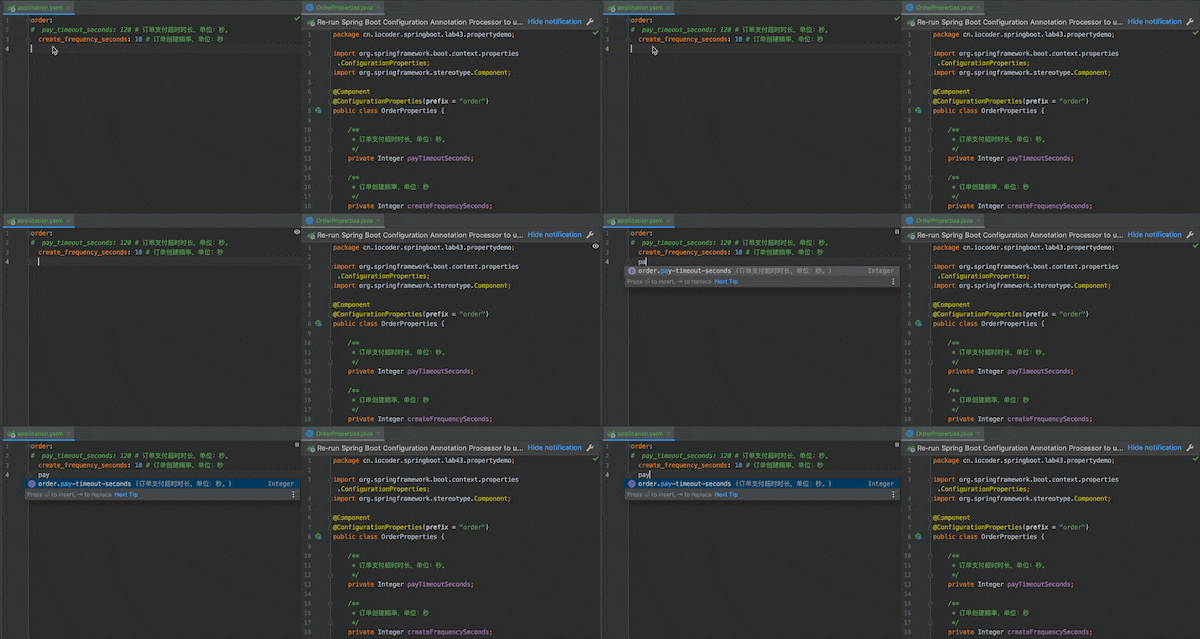
这里,我们引入 spring-boot-configuration-processor 依赖的原因是,编译项目时,会扫描 @ConfigurationProperties 注解,生成 spring-configuration-metadata.json 配置元数据文件给 IDEA。这样在 IDEA 中,可以带来两个好处:
- 在
application.yaml配置文件,添加配置项时,IDEA 会给出提示。如下图所示:
- 点击配置项时,可以跳转到对应的
@ConfigurationProperties注解的配置类。如下图所示:
2.2 配置文件
在 application.yml 中,添加自定义配置,如下:
order:
  pay-timeout-seconds: 120 # 订单支付超时时长,单位:秒。
create-frequency-seconds: 10 # 订单创建频率,单位:秒- 注意,单词之间,Spring Boot 推荐使用
-中划线间隔。
2.3 OrderProperties
创建 OrderProperties 配置类,读取 order 配置项。代码如下:
@Component
@ConfigurationProperties(prefix = "order")
public class OrderProperties {

    /**
     * 订单支付超时时长,单位:秒。
     */
    private Integer payTimeoutSeconds;

    /**
     * 订单创建频率,单位:秒
     */
    private Integer createFrequencySeconds;

    // ... 省略 set/get 方法

}- 在类上,添加
@Component注解,保证该配置类可以作为一个 Bean 被扫描到。 - 在类上,添加
@ConfigurationProperties注解,并设置prefix = "order"属性,这样它就可以读取前缀 为order配置项,设置到配置类对应的属性上。
因为 OrderProperties 配置类上的 @ConfigurationProperties 注解,所以我们在编译一次该项目后,可以自动通过 spring-boot-configuration-processor 依赖生成对应的 spring-configuration-metadata.json 配置元数据。如下:
{
  "groups": [
    {
      "name": "order",
      "type": "cn.iocoder.springboot.lab43.propertydemo.OrderProperties",
      "sourceType": "cn.iocoder.springboot.lab43.propertydemo.OrderProperties"
    }
  ],
  "properties": [
    {
      "name": "order.create-frequency-seconds",
      "type": "java.lang.Integer",
      "description": "订单创建频率,单位:秒",
      "sourceType": "cn.iocoder.springboot.lab43.propertydemo.OrderProperties"
    },
    {
      "name": "order.pay-timeout-seconds",
      "type": "java.lang.Integer",
      "description": "订单支付超时时长,单位:秒。",
      "sourceType": "cn.iocoder.springboot.lab43.propertydemo.OrderProperties"
    }
  ],
  "hints": []
}- 胖友可以在
target/META-INF目录下,看到该文件。 - 整个配置元数据的内容比较简单,胖友自己瞅一瞅即可明白。
另外,@ConfigurationProperties 注解除了支持添加在类上,也只支持添加在方法上。例如说,我们在 Configuration 配置类上使用。示例如下:
@Configuration
public class DataSourceConfig {

    @Bean(name = "ordersDataSource")
    @ConfigurationProperties(prefix = "spring.datasource.orders") // 读取 spring.datasource.orders 配置到 HikariDataSource 对象
    public DataSource ordersDataSource() {
        return DruidDataSourceBuilder.create().build();
    }

}- 该示例的详细,后续胖友可以看看《芋道 Spring Boot 数据库连接池入门》文章的「3. HikariCP 多数据源」小节。
2.4 Application
创建 Application.java 类,配置 @SpringBootApplication 注解即可。代码如下:
@SpringBootApplication
public class Application {

    public static void main(String[] args) {
        SpringApplication.run(Application.class, args);
    }

    @Component
    public class OrderPropertiesCommandLineRunner implements CommandLineRunner {

        private final Logger logger = LoggerFactory.getLogger(getClass());

        @Autowired
        private OrderProperties orderProperties;

        @Override
        public void run(String... args) {
            logger.info("payTimeoutSeconds:" + orderProperties.getPayTimeoutSeconds());
            logger.info("createFrequencySeconds:" + orderProperties.getCreateFrequencySeconds());
        }

    }

    @Component
    public class ValueCommandLineRunner implements CommandLineRunner {

        private final Logger logger = LoggerFactory.getLogger(getClass());

        @Value("${order.pay-timeout-seconds}")
        private Integer payTimeoutSeconds;

        @Value("${order.create-frequency-seconds}")
        private Integer createFrequencySeconds;

        @Override
        public void run(String... args) {
            logger.info("payTimeoutSeconds:" + payTimeoutSeconds);
            logger.info("createFrequencySeconds:" + createFrequencySeconds);
        }

    }

}- 在 OrderPropertiesCommandLineRunner 类中,我们测试了使用
@ConfigurationProperties注解的 OrderProperties 配置类,读取order配置项的效果。 - 在 ValueCommandLineRunner 类中,我们测试了使用
@Value注解,读取order配置项的效果。 - 其中,
@Value注解是 Spring 所提供,@ConfigurationProperties注解是 Spring Boot 所提供。
执行 Application 的 #main(String[] args) 方法,启动 Spring Boot 应用。输出日志如下:
# ValueCommandLineRunner 输出
2020-01-19 20:02:40.755  INFO 80204 --- [           main] s.l.p.Application$ValueCommandLineRunner : payTimeoutSeconds:120
2020-01-19 20:02:40.755  INFO 80204 --- [           main] s.l.p.Application$ValueCommandLineRunner : createFrequencySeconds:10

# OrderPropertiesCommandLineRunner 输出
2020-01-19 20:02:40.755  INFO 80204 --- [           main] ication$OrderPropertiesCommandLineRunner : payTimeoutSeconds:120
2020-01-19 20:02:40.755 INFO 80204 --- [ main] ication$OrderPropertiesCommandLineRunner : createFrequencySeconds:10- 两个 CommandLineRunner 都读取
order配置项成功,美滋滋。
3. 配置随机值
Spring Boot 通过 RandomValuePropertySource 类,提供配置项的随机值 。例如说,用于临时密码、服务器端口等等。RandomValuePropertySource 通过在配置文件中,设置配置想的值为 ${random.*} 来实现,目前提供了如下几种随机值:
- 随机整数。
# 指定 int 整数。
my-number=${random.int}
# 指定 long 整数。
my-long-number=${random.long}
# 随机小于 10 的 int 整数。
my-number-2=${random.int(10)}
# 随机大于等于 10 ,小于等于 65536 的 int 整数。
my-number-3=${random.int[1024,65536]}- 随机字符串。
# 普通字符串
secret-1=${random.value}
# UUID 字符串
secret-2=${random.uuid}
4. 配置引用
在配置文件中,一个配置项可以引用另外的配置项,进行拼接。示例如下:
order:
  pay-timeout-seconds: 120 # 订单支付超时时长,单位:秒。
  create-frequency-seconds: 10 # 订单创建频率,单位:秒
desc: "订单支付超时时长为 ${order.pay-timeout-seconds} 秒,订单创建频率为 ${order.create-frequency-seconds} 秒"- 最终,
order.desc配置项的输出结果为"订单支付超时时长为 120 秒,订单创建频率为 10 秒"。
🐶 不过,配置引用,使用非常非常非常少,嘿嘿。知道即可哈~
5. 命令行配置
Spring Boot 支持从命令行参数 ,读取作为配置。例如说,比较常见的,我们希望修改 SpringMVC 的服务器端口,则会使用 java -jar xxx.jar --server.port=18080 命令,将端口修改为 18080。
通过命令行连续的两个中划线 --,后面接 配置项=配置值 的方式,修改配置文件中对应的配置项 为对应的配置值 。例如说,--配置项=配置值。如果希望修改多个配置项,则使用多组 -- 即可。例如说,--配置项1=配置值1 --配置项2=配置值2。
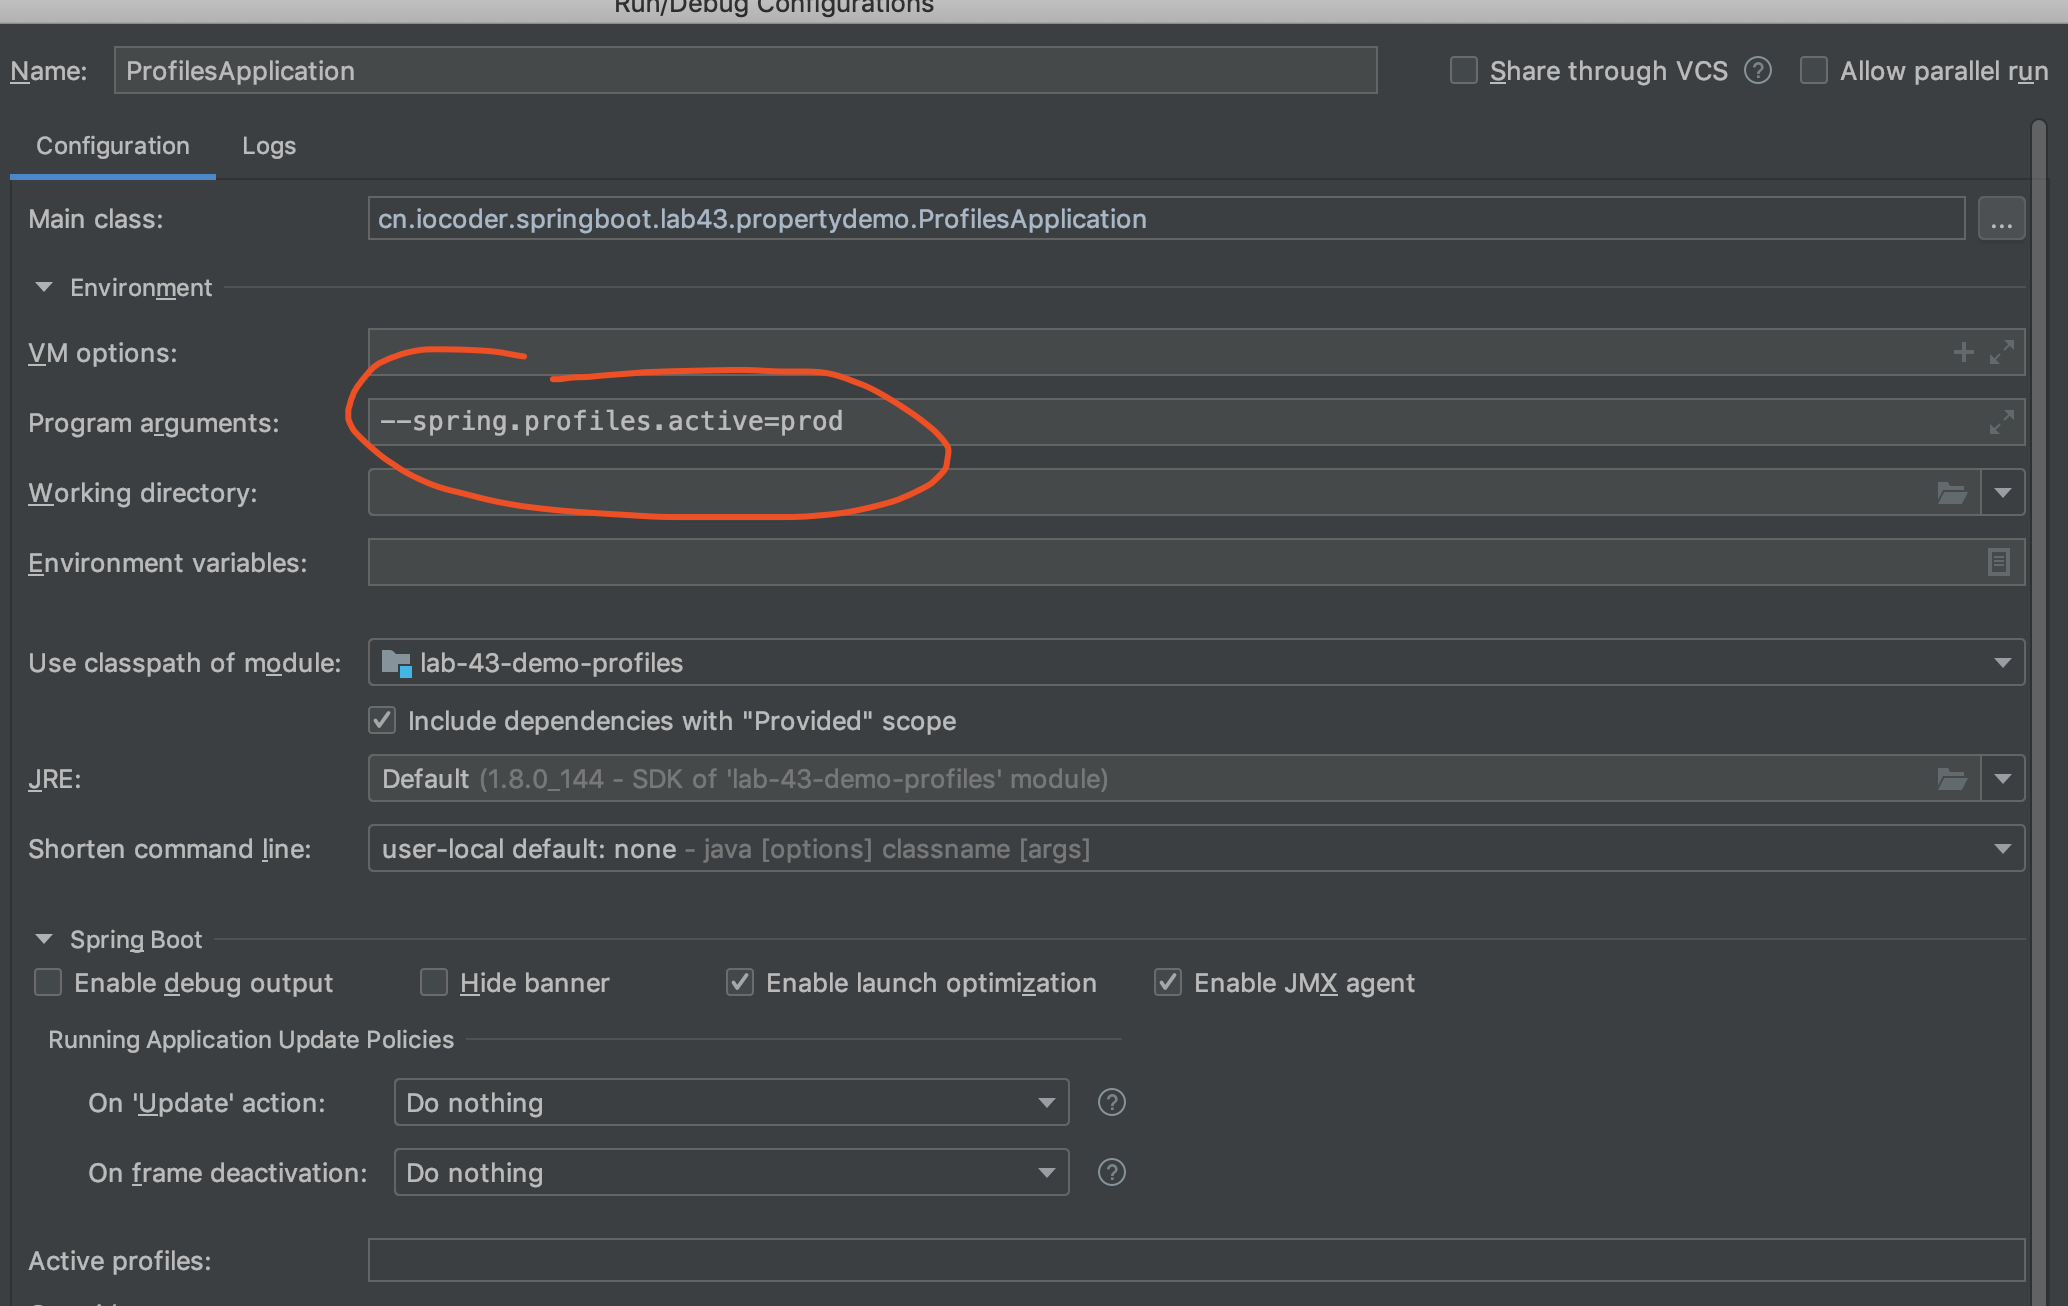
要注意,命令行的配置高于配置文件 。这里我们使用「2. 自定义配置」的示例,进行下演示。直接在 IDEA 中,增加 Program arguments。如下图所示:
执行 Application 的 #main(String[] args) 方法,启动 Spring Boot 应用。输出日志如下:
# ValueCommandLineRunner 输出
2020-01-19 20:53:30.147  INFO 80935 --- [           main] s.l.p.Application$ValueCommandLineRunner : payTimeoutSeconds:60
2020-01-19 20:53:30.147  INFO 80935 --- [           main] s.l.p.Application$ValueCommandLineRunner : createFrequencySeconds:10

# OrderPropertiesCommandLineRunner 输出
2020-01-19 20:53:30.147  INFO 80935 --- [           main] ication$OrderPropertiesCommandLineRunner : payTimeoutSeconds:60
2020-01-19 20:53:30.147 INFO 80935 --- [ main] ication$OrderPropertiesCommandLineRunner : createFrequencySeconds:10- 最终
order.pay-timeout-seconds配置项的值为 60,来自命令行配置,符合预期~
😈 命令行配置使用的还是非常多 的。例如说,通过 --spring.profiles.active=prod 命令行参数,设置生效的 Profile 为 prod 生产环境。详细的,我们接着在「6. 多环境配置」中可以看到。
6. 多环境配置
示例代码对应仓库:lab-43-demo-profiles。
在 Spring Boot 的项目开发中,我们会涉及多个不同的环境。例如说,艿艿所在的团队,有本地、开发、UAT、预发布、生产五套环境。并且,本地与开发、UAT、预发布与生产,分别对应不同的 MySQL、Redis、MongoDB、ES、RocketMQ 等等不同的服务。因此,我们在部署 Spring Boot 到对应环境时,需要采用不同的配置。
如果只使用一份 配置文件,每次部署到不同的环境,就需要重复去修改,显然非常麻烦且容易出错。所以针对多环境场景下,我们会给每个环境创建一个配置文件 application-${profile}.yaml。其中,${profile} 为环境名 ,对应到 Spring Boot 项目生效的 Profile。
例如说:application-dev.yaml 配置文件,对应 dev 开发环境。这样,我们在生产 环境的服务器上,使用 java -jar xxx.jar --spring.profiles.active=prod 命令,就可以加载 application-prod.yaml 配置文件,从而连接上配置文件配置的生产环境的 MySQL、Redis 等等服务。
😈 那么,为什么设置生效的 Profile 为 prod 时,Spring Boot 应用就能读取 application-prod.yaml 配置文件呢?这个是 Spring Boot 提供的功能,就是如此,哈哈哈~
下面,我们来搭建一个多环境的示例。
6.1 引入依赖
在 pom.xml 文件中,引入相关依赖。
<?xml version="1.0" encoding="UTF-8"?>
<project xmlns="http://maven.apache.org/POM/4.0.0"
         xmlns:xsi="http://www.w3.org/2001/XMLSchema-instance"
         xsi:schemaLocation="http://maven.apache.org/POM/4.0.0 http://maven.apache.org/xsd/maven-4.0.0.xsd">
    <parent>
        <groupId>org.springframework.boot</groupId>
        <artifactId>spring-boot-starter-parent</artifactId>
        <version>2.2.2.RELEASE</version>
        <relativePath/> <!-- lookup parent from repository -->
    </parent>
    <modelVersion>4.0.0</modelVersion>

    <artifactId>lab-43-demo-profiles</artifactId>

    <dependencies>
        <!-- 实现对 SpringMVC 的自动化配置 -->
        <dependency>
            <groupId>org.springframework.boot</groupId>
            <artifactId>spring-boot-starter-web</artifactId>
        </dependency>
    </dependencies>

</project>- 引入
spring-boot-starter-web原来的原因是,我们会使用server.port配置项,配置 Tomcat 的端口。
6.2 配置文件
在 resources 目录下,创建 5 个配置文件,对应不同的环境。如下:
注意:为了方便,我们通过
server.port配置项,设置不同的 Tomcat 的端口,来"模拟"不同环境下,不同配置。
application-local.yaml,本地环境。
server:
port: 8080application-dev.yaml,开发环境。
server:
port: 8081application-uat.yaml,UAT 环境。
server:
port: 8082application-pre.yaml,预发布环境。
server:
port: 8083application-prod.yaml,生产环境。
server:
  port: 8084
另外,我们会创建 application.yaml 配置文件,放不同环境的相同配置 。例如说,spring.application.name 配置项,肯定是相同的啦。配置如下:
server:
  port: 7070

spring:
  application:
name: demo-application- 其中,该文件的
server.port配置项,我们是来表达,application-${profile}配置文件的优先级更高,会覆盖它噢。
6.3 ProfilesApplication
创建 ProfilesApplication.java 类,配置 @SpringBootApplication 注解即可。代码如下:
@SpringBootApplication
public class ProfilesApplication {

    public static void main(String[] args) {
        SpringApplication.run(ProfilesApplication.class, args);
    }

}
6.4 简单测试
下面,我们使用命令行参数进行 --spring.profiles.active 配置项,实现不同环境,读取不同配置文件。
① 本地环境 示例:直接在 IDEA 中,增加 --spring.profiles.active=local 到 Program arguments 中。如下图所示:
启动 Spring Boot 应用,输出日志如下:
# 省略其它日志...
2020-01-20 19:21:44.620 INFO 86025 --- [ main] o.s.b.w.embedded.tomcat.TomcatWebServer : Tomcat started on port(s): 8080 (http) with context path ''- Tomcat 启动在 8080 端口,符合读取
application-local.yaml配置文件。
② 生产环境 示例:直接在 IDEA 中,增加 --spring.profiles.active=prod 到 Program arguments 中。如下图所示:
启动 Spring Boot 应用,输出日志如下:
# 省略其它日志...
2020-01-20 19:22:44.620 INFO 86025 --- [ main] o.s.b.w.embedded.tomcat.TomcatWebServer : Tomcat started on port(s): 8084 (http) with context path ''- Tomcat 启动在 8084 端口,符合读取
application-prod.yaml配置文件。
另外,关于 Spring Boot 应用的多环境部署,胖友也可以看看《芋道 Spring Boot 持续交付 Jenkins 入门》文章。
7. 自定义配置文件
示例代码对应仓库:lab-43-demo-configname。
Spring Boot 默认读取文件名为 application 的配置文件。例如说,application.yaml 配置文件。同时,Spring Boot 可以通过 spring.config.name 配置项,设置自定义配置文件名。
那么,一般什么情况下,我们会需要自定义配置文件呢?我们来看看下图:
- 在图中,我们可以看到在
demo-application项目中,引入demo-rpc-service和demo-business项目。而引入的每个项目,都有自己的配置文件。如果每个项目都使用application.yaml配置文件,则会有且仅有一个生效。 - 因此,我们给每个项目创建了一个独立 的配置文件名,同时设置
spring.config.name配置项为application,demo,rpc。这样,Spring Boot 就会读取这三个配置文件。并且,它和「6. 多环境配置」是可以共存使用的。
下面,我们来搭建一个读取多个自定义配置文件的示例。
7.1 引入依赖
在 pom.xml 文件中,引入相关依赖。
<?xml version="1.0" encoding="UTF-8"?>
<project xmlns="http://maven.apache.org/POM/4.0.0"
         xmlns:xsi="http://www.w3.org/2001/XMLSchema-instance"
         xsi:schemaLocation="http://maven.apache.org/POM/4.0.0 http://maven.apache.org/xsd/maven-4.0.0.xsd">
    <parent>
        <groupId>org.springframework.boot</groupId>
        <artifactId>spring-boot-starter-parent</artifactId>
        <version>2.2.2.RELEASE</version>
        <relativePath/> <!-- lookup parent from repository -->
    </parent>
    <modelVersion>4.0.0</modelVersion>

    <artifactId>lab-43-demo-configname</artifactId>

    <dependencies>
        <!-- Spring Boot Starter 基础依赖 -->
        <dependency>
            <groupId>org.springframework.boot</groupId>
            <artifactId>spring-boot-starter</artifactId>
        </dependency>
    </dependencies>

</project>- 具体每个依赖的作用,胖友自己认真看下艿艿添加的所有注释噢。
7.2 配置文件
在 resources 目录下,创建两个配置文件。如下:
application.yaml配置内容如下:
application-test: hahaharpc.yaml配置内容如下:
rpc-test: yeah7.3 Application
创建 Application.java 类,配置 @SpringBootApplication 注解即可。代码如下:
@SpringBootApplication
public class Application {

    /**
     * 设置需要读取的配置文件的名字。
     * 基于 {@link org.springframework.boot.context.config.ConfigFileApplicationListener#CONFIG_NAME_PROPERTY} 实现。
     */
    private static final String CONFIG_NAME_VALUE = "application,rpc";

    public static void main(String[] args) {
        // <X> 设置环境变量
        System.setProperty(ConfigFileApplicationListener.CONFIG_NAME_PROPERTY, CONFIG_NAME_VALUE);

        // 启动 Spring Boot 应用
        SpringApplication.run(Application.class, args);
    }

    @Component
    public class ValueCommandLineRunner implements CommandLineRunner {

        private final Logger logger = LoggerFactory.getLogger(getClass());

        @Value("${application-test}")
        private String applicationTest;

        @Value("${rpc-test}")
        private String rpcTest;

        @Override
        public void run(String... args) {
            logger.info("applicationTest:" + applicationTest);
            logger.info("rpcTest:" + rpcTest);
        }

    }

}- 因为
spring.config.name配置项,必须在读取配置文件之前完成设置,所以我们在<X>处,通过环境变量来设置。 - 在 ValueCommandLineRunner 中,我们打印了两个配置文件的配置项。
执行 Application 的 #main(String[] args) 方法,启动 Spring Boot 应用。输出日志如下:
2020-01-20 19:56:38.097  INFO 86516 --- [           main] s.l.p.Application$ValueCommandLineRunner : applicationTest:hahaha
2020-01-20 19:56:38.098 INFO 86516 --- [ main] s.l.p.Application$ValueCommandLineRunner : rpcTest:yeah- 两个配置项都有对应的值,符合预期。
8. 配置加密
示例代码对应仓库:lab-43-demo-jasypt。
考虑到安全性,我们可能最好将配置文件中的敏感信息进行加密。例如说,MySQL 的用户名密码、第三方平台的 Token 令牌等等。
配置加密的方案比较多,目前使用比较广泛的是 Jasypt。其介绍如下:
FROM https://www.oschina.net/p/jasypt
Jasypt 这个 Java 类包为开发人员提供一种简单的方式来为项目增加加密功能,包括:密码 Digest认证,文本和对象加密,集成 hibernate,Spring Security(Acegi) 来增强密码管理。
Jasypt 开发团队推出了 Java 加密工具 Jasypt 1.4,它可与 Spring Framework、Hibernate 和 Acegi Security 集成。
下面,我们来搭建一个配置加密的示例。
8.1 引入依赖
在 pom.xml 文件中,引入相关依赖。
<?xml version="1.0" encoding="UTF-8"?>
<project xmlns="http://maven.apache.org/POM/4.0.0"
         xmlns:xsi="http://www.w3.org/2001/XMLSchema-instance"
         xsi:schemaLocation="http://maven.apache.org/POM/4.0.0 http://maven.apache.org/xsd/maven-4.0.0.xsd">
    <parent>
        <groupId>org.springframework.boot</groupId>
        <artifactId>spring-boot-starter-parent</artifactId>
        <version>2.2.2.RELEASE</version>
        <relativePath/> <!-- lookup parent from repository -->
    </parent>
    <modelVersion>4.0.0</modelVersion>

    <artifactId>lab-43-demo-jasypt</artifactId>

    <dependencies>
        <!-- Spring Boot Starter 基础依赖 -->
        <dependency>
            <groupId>org.springframework.boot</groupId>
            <artifactId>spring-boot-starter</artifactId>
        </dependency>

        <!-- 实现对 Jasypt 实现自动化配置 -->
        <dependency>
            <groupId>com.github.ulisesbocchio</groupId>
            <artifactId>jasypt-spring-boot-starter</artifactId>
            <version>3.0.2</version>
        </dependency>

        <!-- 方便等会写单元测试 -->
        <dependency>
            <groupId>org.springframework.boot</groupId>
            <artifactId>spring-boot-starter-test</artifactId>
            <scope>test</scope>
        </dependency>
    </dependencies>

</project>- 引入
jasypt-spring-boot-starter依赖,实现对 Jasypt 的自动化配置。舒服啊~
8.2 配置文件
在 application.yml 中,添加 Jasypt 配置,如下:
spring:
  application:
#    name: ENC(YFJ/nBxn89KUfbBW6cPxqjFo3K63GJaOcDMSKWOsFxMAKCgBiLoMAw==)
    name: demo-application

jasypt:
  # jasypt 配置项,对应 JasyptEncryptorConfigurationProperties 配置类
  encryptor:
    algorithm: PBEWithMD5AndDES # 加密算法
password: ${JASYPT_PASSWORD} # 加密秘钥spring.application.name配置项,设置应用名。为了方便,我们稍后针对它实现配置加密的功能。jasypt.encryptor配置项,设置 Jasypt 配置,对应 JasyptEncryptorConfigurationProperties 配置类。algorithm配置项,设置使用 PBEWithMD5AndDES 算法。这里不采用默认的 PBEWITHHMACSHA512ANDAES_256 的原因是,会报如下异常:
org.jasypt.exceptions.EncryptionOperationNotPossibleException: Encryption raised an exception. A possible cause is you are using strong encryption algorithms and you have not installed the Java Cryptography Extension (JCE) Unlimited Strength Jurisdiction Policy Files in this Java Virtual Machine* `password` 配置项,设置加密秘钥,非常重要。这里,我们显然不能直接把该配置项设置在配置文件中,不然不就白加密了嘛。因此,这里我们采用 `JASYPT_PASSWORD` 环境变量。当然,我们也可以通过[「6. 命令行配置」](#),例如说 `java -jar xxx.jar --jasypt.encryptor.password=秘钥` 操作。因为我们设置了 jasypt.encryptor.password 配置项读取 JASYPT_PASSWORD 环境变量,所以胖友记得设置下噢。以 MAC 操作系统为例:
# 编辑 bash_profile 文件
vi ~/.bash_profile
# 行末增加 JASYPT_PASSWORD 秘钥。添加完成后,保存并退出
export JASYPT_PASSWORD="justdoit" # 具体秘钥,自己选择。- 记得重启 IDEA 噢,重新读取环境变量。
8.3 Application
创建 Application.java 类,配置 @SpringBootApplication 注解即可。代码如下:
@SpringBootApplication
public class Application {

    public static void main(String[] args) {
        SpringApplication.run(Application.class, args);
    }

}
8.4 简单测试
下面,我们进行下简单测试。
- 首先,我们会使用 Jasypt 将
demo-application进行加密,获得加密结果。 - 然后,将加密结果,赋值到
spring.application.name配置项。 - 最后,我们会使用 Jasypt 将
spring.application.name配置项解密。
创建 JasyptTest 测试类,编写测试代码如下:
@RunWith(SpringRunner.class)
@SpringBootTest
public class JasyptTest {

    @Autowired
    private StringEncryptor encryptor;

    @Test
    public void encode() {
        String applicationName = "demo-application";
        System.out.println(encryptor.encrypt(applicationName));
    }

    @Value("${spring.application.name}")
    private String applicationName;

    @Test
    public void print() {
        System.out.println(applicationName);
    }

}- 首先,执行
#encode()方法,手动 使用 Jasypt 将demo-application进行加密,获得加密结果。加密结果如下:
xQZuD8KnkqzIGep0FFH0DYJ3Re9TrKTdvu2fxIlWNpwFcdNGhkpCag==然后,将
application.yaml配置文件的spring.application.name配置项,设置为加密结果ENC(xQZuD8KnkqzIGep0FFH0DYJ3Re9TrKTdvu2fxIlWNpwFcdNGhkpCag==)。注意,前后需要使用ENC()进行包裹噢。最后,执行
#print()方法,自动 使用 Jasypt 将spring.application.name配置项解密。解密结果如下:
demo-application- 成功正确解密,符合预期。
8.5 加密配置项
在「8.4 简单测试」小节中,我们通过编写程序,实现对配置项的加密。在本小节,我们通过在命令行中使用 jasypt.jar 包,进行加密配置项。操作命令如下:
# 下载,从 https://github.com/jasypt/jasypt 获得下载地址。
# 这里,我们下载的是 1.9.3 版本
$ wget https://github.com/jasypt/jasypt/releases/download/jasypt-1.9.3/jasypt-1.9.3-dist.zip

# 解压
$ unzip jasypt-1.9.3-dist.zip

# 查看目录
$ cd jasypt-1.9.3/
$ ls -ls
24 -rw-r--r--@  1 yunai  staff  11358 Apr 19  2019 LICENSE.txt
 8 -rw-r--r--@  1 yunai  staff   3767 Apr 19  2019 NOTICE.txt
 8 -rw-r--r--@  1 yunai  staff    393 Apr 19  2019 README.txt
 0 drwx------@ 16 yunai  staff    512 May 26  2019 apidocs
 0 drwx------@ 10 yunai  staff    320 Jan 20 16:42 bin # 执行脚本
 0 drwx------@ 47 yunai  staff   1504 Jan 20 15:36 lib # jar 包

# 加密
$ encrypt.sh input=demo-application password=${JASYPT_PASSWORD} algorithm=PBEWithMD5AndDES
主要输出结果为 8NoRSJ4Ly3kBWMJfjHVbb4S0UeLoOTKyo9EC+IfSP+k=

# 解密
$ sh decrypt.sh input="8NoRSJ4Ly3kBWMJfjHVbb4S0UeLoOTKyo9EC+IfSP+k="  password="${JASYPT_PASSWORD}" algorithm=PBEWithMD5AndDES
主要输出结果为 demo-application
不过比较奇怪,艿艿使用 jasypt.jar 包进行配置项加密之后,拿到 Spring Boot 应用中时,解密结果为乱码,找不到原因 = =!有知道的胖友,麻烦告诉下艿艿哟。
9. 配置加载顺序
Spring Boot 不仅仅可以从配置文件获得配置,还可以从环境变量、命令行参数、jar 外部配置文件等等。其加载的优先级如下:
- 您的主目录上的Devtools global 设置 properties(当 devtools 为 active 时为
~/.spring-boot-devtools.properties)。 - @TestPropertySource 注释测试。
- 你测试的
properties属性。可在@SpringBootTest和test annotations 用于测试 application 的特定切片上使用。 - 命令 line arguments。
- _Pro来自
SPRING_APPLICATION_JSON(嵌入在环境变量或系统 property 中的内联 JSON)。 ServletConfiginit 参数。ServletContextinit 参数。- 来自
java:comp/env的 JNDI 属性。 - Java System properties(
System.getProperties())。 - OS 环境变量。
- 只在
random.*中具有 properties。 - 在打包的 jar(
application-{profile}.properties和 YAML 变体)之外的Profile-specific application properties。 - Profile-specific application properties打包在 jar(
application-{profile}.properties和 YAML 变体)中。 - Application properties 在打包的 jar(
application.properties和 YAML 变体)之外。 - Application properties 打包在 jar(
application.properties和 YAML 变体)中。 @Configurationclasses 上的@PropertySource 注释。- 默认 properties(通过设置
SpringApplication.setDefaultProperties指定)。
来源:https://blog.csdn.net/weixin_42073629/article/details/106304126
